
To see if this custom-fit item will work for you please tell us what vehicle you'll use it with.


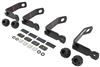
This aerodynamic Thule roof rack mounts flush on your roof for a sleek, factory look. Crossbars with split rubber strips in top channels work with channel-mount and clamp-on accessories. Installs to fixed mounting points on your vehicle's roof.
Features:
Specs:
 Alternate Instructions
California residents: click here
Videos are provided as a guide only. Refer to manufacturer installation instructions and specs for complete information.
Hey, everyone, it's Evangeline right here at etrailer. Today we're gonna take a look at some of the features of our Thule flush roof rack, and I'll also show you how to get this all installed on a 2020 Jeep Grand Cherokee. Now the Grand Cherokee has some different options when it comes to trim and different types of roofs. So double-check your roof and your rails to make sure this is gonna be the right fit for you. There are some different versions of the flush roof rack. Some have an all black look to them, some have a black and a chrome, which is what we have here today.
Thule actually refers to this specific roof rack as a factory track rack, while we call it a flush rail. So in case that confuses you, it's nice to know that here, We'll get to see it actually work and actually get installed so that you can get onto your fun adventures that much quicker and that much easier. So, let's get started. I actually have a Thule reef rack on my own car because I wanna carry around things like kayaks, the rooftop tent, and maybe even a roof box whenever I need to. And I like the stability of that rack.
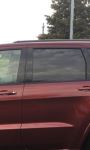
The odor of this Grand Cherokee is actually using this for their own roof box, so that makes sense in terms of the type of roof rack they picked. So what is the main benefit of the flush roof rack Well, this is gonna be the WingBar Edge, which has that really streamlined look. Now what we have today is the silver or chrome-looking version, but this is also available in a black version. I think this pairs pretty nicely with their Jeep today, so it's nice to know that you can find one that pairs nice with yours. This being a flush rack means there's no bars that go past it.
For me, I'm not a big fan of that because I'm on the shorter side and I like being able to reach the roof rack a bit easier. But in the case of the owner of this vehicle with a roof box, that's totally fine. This gives a more flush, more sleek, more streamlined look. It almost looks like a factory rack on their Jeep. So it really depends on what your priorities are.
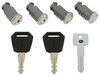
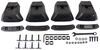
Do you want something more sleek Do you want something that's easier to reach Chances are we have the solution for you. This kit is a combination of three different parts, the crossbars, the towers, and then the custom-fit kit. So this fixes itself into specific points on your Grand Cherokee. So you can't quite address it as much as you could on some other types, but that's okay. Because if you measure from the center of one crossbar to the center of the other crossbar, you get a crossbar spread of about 33 1/2 inches, which is awesome. It's on the wider end of still a versatile range of crossbar spreads. So you can carry things like roof boxes, and kayaks, and bike racks. Double-check those roof boxes though 'cause those tend to have a very specific spot. You wanna make sure that 33 1/2 can fit for yours. With this on your roof, it is gonna add a little bit of height. So let's take some measurements to see exactly how much. Two measurements here. First is how much space do you have underneath your crossbars Well, a lot. If you measure here, it's about 4 1/2 inches. Plenty of space for U-bolts with wing nuts, the old fashioned clamps, or even your more streamlined clamps, they're all gonna work fine. Now the height it's gonna add is, from here, top of the roof, top of the crossbar, around 5 1/2 inches, which is on the taller end for crossbars. Something to be mindful is if you're carrying, let's say, a roof box or a bike rack up here, be mindful of car washes, garage doors, drive-throughs, because then that's gonna be a lot of height to your taller Jeep Grand Cherokee. But with those measurements in mind, the good thing is that you're gonna be able to carry a lot of things on here and have the clearance to be so. Now let me be clear, when I say a lot, I mean a lot of types of things because this is a versatile roof rack, but you also don't have as much usable bar space as if you had something with more length and more overhang. So usable space up here in the front is gonna be about 34 3/4 inch. So in our case here, the owner's gonna put a large roof box, perfect for that. You could put a kayak on there, you could put some bikes. Can you carry all three things at the same time Chances are not. So keep that in mind when you're planning out your accessories. But going back to the main perk of the fixed point is really just how sturdy and how fixed it is, which I love. You'll notice this really large base over here, this rubber base not only gives a lot of height and support to your system, but it actually hides a bolt that goes through the rack into your vehicle. It uses the mounting points that are already on your factory rail or factory track, whatever you call it. So this whole system works together for while you have that limited bar space, you also have a very sturdy rack. And if that's what you're looking for, well, get ready 'cause I'm about to show you how to get this all installed. Now some cute reminders here is this is gonna be a full kit, custom-fit for your Jeep Grand Cherokee. If you like this rack but you want the black version instead, you can find that using our fit guide right here at etrailer.com. Or feel free to give us a call, or send us a message, or an email, and we'll get you all those different parts so that you don't have to worry about mixing and matching on your own. And another thing is that this does work well if you get some add-ons, especially the One Key System, which is gonna be your metal lock cores. If you have other Thule accessories, I recommend getting a full kit of those so they can all be keyed-alike using the same key. Not necessary, I personally don't use them, but very helpful for security. So, with all being said, let's get to the install. Getting everything installed onto your Jeep can be a little intimidating because there are a lot of individual parts. However, this video will hopefully guide you along that process and make it a lot easier for you. And then you have your fixed point towers, your fit kits. The only thing I needed to bring to the table was a Torx wrench, a T31 to be exact, as well as a pen to write down the lock number code. start by installing your wind strips. So these actually arrive together like this. You just tear them apart, flip them around, and then push them into your spots on the crossbar. So these should just push in by hand into their grooves. You just need to make sure that you have each one facing the right way. The one without any markings goes on the Thule logo, and the one with the arrows goes away from Thule logo. This is gonna indicate which side is the front, so it's facing the front of the vehicle. Next, it's time to prep the towers. So the end caps do take a little bit of effort to pop off. So once you have that off, you're then able to see whether it's a right or a left tower. So just look at the shape of the tower, look for a marking, R or L, and that will orient you to your crossbar. What helps me the most is to stand right where the Thule logo is because that helps orient which direction the crossbar is. And then as I set the towers beside it on the left and the right, then we're all good. Now we're gonna lift up the ends of this wind strip so that you can see that little slot inside the crossbar. So that slot is gonna line up with the tab in the tower. And that way when you move your left tower into the left side of the crossbar, you're just gonna push this all the way in. You may need to push down on that. I always use the tool to do it just 'cause I'm a little afraid of catching a fingernail. (tab popping) (roof thudding) And continue pushing in until that tab is in the crossbar. Now getting this tower in is where a lot of people start stressing out just because there's a lot of just tight tolerances all throughout. So something I recommend doing if you struggle with that is just use your torque tool on that bolt on the inside and just make sure you're in a spot where everything feels pretty loose. And then you can wiggle around that tower. And that way you know you're in a good spot all throughout to just slide on through. If you heard that click, it means that we are set. Now, we may need to adjust this a little bit just to make sure that we are in the right measurement on both sides. But before you get to that, what I recommend doing is go ahead and set aside your two crossbars for now, with that all set up, because now we need to set up the vehicle side. Now the instructions where their pictures don't quite specify where the crossbars supposed to go, but in my experience, what I found as the best fit was put the front bar as far forward as you can get it and then put the rear bar around somewhere behind that rear door. And then what I use for this next step is a T30 wrench, or star bit wrench, to undo the bolts. This is what that inside of that rail looks like. You can see that there's that bolt in there. And we're gonna use a T 30 wrench to loosen it. So you're going to want to completely remove this. And then you will not need this for the rest of your roof rack, but I do recommend saving that bolt just in case you want to take off your roof rack. You wanna make sure that this whole system is still secure. Now replace that bolt with one of the included bolts in your kit. This is gonna be that really long bolt. And you wanna do it where that star nut is facing the top. And as you thread this down, do try to follow the torque specs in your kit. The short version of that is tighten it down pretty tightly. Now you're gonna build your bases. This is a really important time for double-checking the numbers in the instructions and the numbers printed on your pieces. So in our case here, we're working on that rear passenger's side, which is also gonna be RR in your instructions, which that's gonna be number 16, number 45, and 002. So number 16 is going to fit into your base. And notice the shape on that rubber pad because you're also going to fit that metal piece up top. And everything once it is all clicked together is gonna have the tall part of that metal piece facing the opening part of that rubber piece. And then you have these two plastic or rubberized prongs that are clipped in, or supposed to be clipped in, there we go, into the pad. Now this whole piece is then going to fit onto your rails. And see where that bolt is, that's gonna fit right on through. Now this, looks like a really good fit. I do recommend playing around with this just to get used to what looks good and what doesn't. If you notice that your pad just doesn't fit fleshly, that's because you have to flip this around, and now you are good. So repeat this process on all four sides of the rails. Again, playing close attention to those numbers. Secure your bases. You're going to have this plastic piece. This is going to clip in into the holes inside that metal base. And then this will get tightened down with this nut. Now you are gonna have to line this up so it actually threads, and then you're gonna tighten it down with your torque tool. (metal clacking) And as with pretty much any bolt or nut in this set, you're gonna tighten them down until that torque tool clicks. And now you're back to the crossbars. Now this process will be a lot easier with a second person, but totally doable by yourself, as long as you're careful. Now you're gonna grab your crossbar, making sure it's facing the right way, and you're just gonna gently set it onto the bases you just created. So the thing you wanna look for here is just making sure that those silver parts of the tower fit nicely into the base, and then this outside part is loose enough where it just hooks into that metal clamp. And you are gonna double-check on both sides, making sure that your distance apart is pretty consistent. And you are gonna go ahead and tighten down that center bolt. Now remember up top where I mentioned briefly, you want them a certain apart. Now you don't have to be too precise with that. The most important thing is you need to make sure that this bolt gets tightened down completely on both sides before you finish off the install. So tighten down til torqued. (torque tool clicking) Final step now that everything is secure is to put your end caps on. Now at this point, if you have the One Key System, which is their metal lock cores, that is what you will put into the towers and then what you'll write down in your instructions to make sure that you know exactly what lock number you have. In our case here, we're just going to use the plastic caps. So these plastic caps are still durable, they still stay in place. These are what I have on my own roof rack, and they will just pop into the end cap. And then the end cap will just pop into the tower and click into place. To double-check that it's seated properly, just go ahead and grab a flathead screwdriver or a quarter, and you can use that to turn the lock into the lock position, and that will secure your end cap completely. If you do need to remove this rack, what a lot of people do is they actually leave those bases on there since they are tightened on with a bolt and just take off the main part of the system. If you need to remove this completely, well, just watch this video again, but follow the steps in reverse. If you have any questions, please feel free to reach out to me right here at etrailer.com. I'd love to see all types of adventures you get up to with your own roof rack. But today, this is a look at the Thule Edge fixed-point roof rack right here on our 2020 Jeep Grand Cherokee.


Do you have a question about this Roof Rack?
Info for this part was:
At etrailer.com we provide the best information available about the products we sell. We take the quality of our information seriously so that you can get the right part the first time. Let us know if anything is missing or if you have any questions.


Thank you! Your comment has been submitted successfully. You should be able to view your question/comment here within a few days.
Error submitting comment. Please try again momentarily.