
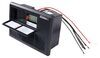
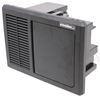
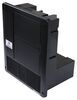
Easily replace your inlet and power cord for a SmartPlug connection that is both safer and easier to use. This package contains everything you need to upgrade your ride for a new generation of shore power connection.
Features:
Specs:
SmartPlug vs. Twist Lock
RV and boat owners have long relied on Twist Lock style connections for powering their rides. For years, it has been the best option for connecting to shore power. It's been reliable, but most know it's not without disadvantages:
SmartPlug's connector addresses each of these concerns and does all of the heavy lifting.
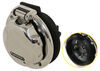
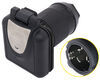
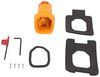
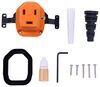
Locking arms grab the inlet, a clamp inside the plug body holds the cord, the inlet cap snaps to the top while in use, and the integrated seals weatherproof the connection. This helps prevent the wiggly, dirty connections that increase electrical resistance, which creates potentially dangerous heat.
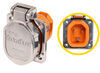
Since it uses a square plug face, SmartPlug is able to use flat pins which create far more surface contact, further reducing the risk of high heat and electrical arcing. The square shape and flat pins also make it easy to plug in - no more twisting or guessing if the pins are lined up correctly.
Videos are provided as a guide only. Refer to manufacturer installation instructions and specs for complete information.
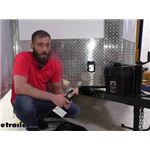
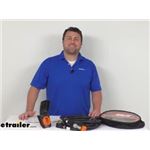
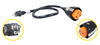
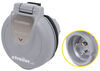
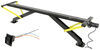
Hey guys, Kevin here with etrailer. And today I'm gonna be showing you how to install the SmartPlug, 30 amp inlet and power cord kit that comes in black, white, or chrome. So this kit is gonna come with your inlet and your power cord. The power cord itself comes with a protective cover as well but when it's not in use, the best part about this cable here in inlet, is that it takes all the weight off of the pins like you would normally have with your other standard RV power cords, and puts it onto the base itself of the inlet and the power cord. So that as time goes on, you're not slowly bending down your pins. Another thing with this is, that it has these clamps on the side, they hold it in place, and that way if you accidentally bump this, hit this, something else happens.
Maybe you got raccoons messing with your trailer, and coming up and climbing on stuff. It's gonna put the weight on the clamps and on the body of the inlet and the power cord instead of on your pins. So these clamps also will, indicate when you actually have this fully plugged in, there'll be a clicking noise. And then to remove, you'll just pull those clamps and pull it out. Another good thing about this design is the pins are actually a solid metal instead of curved, or cut out like you'd see with your standard twist plug pins.
So this is actually going to conduct more electricity so you're not gonna have that voltage drop like you would with your twist pins, and that's going to actually reduce the heat. So, if you look at the product page for this item or any of the other ones with it, it's gonna show you a little diagram of just how hot some of your standard plugs get, whereas this one's gonna stay nice and cool. So you don't have to worry about anything melting. The protective cover that we have on here also has a gasket on the back just to prevent any water from hitting your walls running down it and then getting inside. And on top of that, this cover is also going to go over your body of the inlet cover which is also going to help keep out any unwanted water.
There's a gasket on inside here as well which is gonna cover up these pins so that if you're not using this at all you don't ever have to worry about water getting inside and corroding those pins at all. So it's a fairly straightforward installation, you're probably gonna spend more time just trying to find exactly where you wanna place it, but once you're done with that, like on this build. So typically if you're doing on your RV you already had the hole, and all you're doing is just popping it in and screwing it in. Whereas this one since it's a build, we actually had to find a hole, or placement for our hole. So really you're looking at maybe 15 minutes of work here.
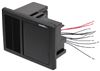
So now we've gone over some of the features. Let me show you how I installed this. So the first step to this installation is gonna be finding out exactly where you want your inlet to be. Typically on RVs, you'll see it on the passenger side. Unfortunately on our trailer bill today, we don't really have quite enough room, just because once we put this door up, it's only given us just a few inches in this cable that comes with it, is super beefy and it is not going to really cohesively fit with this door. So, what we're gonna do instead, is put it up closer up on the nose of our trailer here especially because we're going to wire all of this over to our battery management system that we're gonna install right on the opposite side of this wall here. So first thing you need to do, pick your spot, make sure that it's not gonna interfere with anything else, and then just we'll go on the inside, and start drilling out our hole. So I took our gasket here, and set it up where we are wanting to put it, and then I just trace the inside of it, so that we can get a good idea of where it's gonna sit. To start, I'm gonna make a small hole through, and just see where it comes out, just to make sure that we got it exactly where we want it. Just based on where the studs are in this trailer, I'm gonna lean more to our right side, 'cause I can't really go over or anymore here to the left if I need to, but I can more towards the right. So we're gonna make a small starter hole through here and see how it comes out. Alright, now we can go back on the outside and take a look, see if it's exactly where we want it. Alright, so after looking outside, I decided that I wanna move this over just a little bit. We are gonna keep this hole still, but I think it'll look a little bit more uniform with how it is outside, if we just move this over just a bit, and we can redraw our line. And I'm also going to use a level, just double check that I have this level, we don't wanna our inlet sitting in crooked. Okay, so since we have this nice diamond tread plate up front, I'm gonna actually end up cutting it from out here, I'm not gonna get too fancy, I'm not gonna try and cut it to the actual shape, I'm just gonna do just a straight hole here, just like you'd see on your normal RV if you we're replacing your current inlet with a SmartPlug. So to start, I'm gonna put a little divot here with our punch. Just so that the tip of this drill bit doesn't walk on me, and then we can start drilling in. Alright, now that we got a nice uniform hole here, we can test fit our SmartPlug. Fits in no issues at all, so the next thing we can do is put on that gasket that I was using as a template. We're gonna put that on first, just so that we get a water tight seal with our actual plug here. So let me go grab that, and then we'll start screwing it in. Okay, so now after our holding cut, we're going to put on our gasket here. One thing I do recommend doing is just kind of wiping off this area. You don't want any dust or debris or anything else from cutting the hole or any dirt that may be on the front of your trailer to interfere with the stickiness of our gasket here. We'll peel off the backing, and center it over our hole, press it into place. So now with this kit, it does not come with any self tapping screw. So you will have to purchase those separately. 'cause this kit is designed really for replacing your own RV inlet that you already had installed, but, we had some self tapping screws just laying around so, we're gonna use these today. Alright now that we got it screwed into place, we can take the cap off of our cable, plug it right in and you can see, no issues going on. Now we can go on the inside and handle the wiring. So like I said, with this kit, it didn't come with screws and it's also not gonna come with the wiring that would normally hook up to your converter or your control panel, whatever you have in your camper, but since this is a fresh build, we just don't have that, but I'm still gonna show you just how to hook the wires in. So first we're gonna remove this cover. It's just Phillip's head screw in the center Get it in place, take that off, and as you can see, you got your neutral, your power and your ground. And then, so this is our labeled color coded. Typically your AC wiring for your camper is going to be colored the same. But you would just insert your wire, your bare wire into here and then screw it, or tighten it down using the Allen wrench included in your kit, and then you'd run that over to your panel. Well, I think that about does it for our installation of the SmartPlug 30 amp power cord and inlet kit. My name's Kevin, thanks for watching..
Average Customer Rating: 4.8 out of 5 stars (63 Customer Reviews)
Easily replace your inlet and power cord for a SmartPlug connection that is both safer and easier to use. This package contains everything you need to upgrade your ride for a new generation of shore power connection.I already had the wiring on the old box on the rv disconnected. When the new one came today, I had it mounted and completed in 20 minutes. Alot better than the old twist on one that gave us trouble since we bought the rv new in 2023

I've had this cord for a year and am very happy with how it works. It's much easier to use than a twist lock style cord and I like that I get a light as soon as I plug in to tell me if the park power is ok.
The SmartPlug works great and was easy to install.
great product
I purchased Smartplug RV power cord and inlet to use with my race trailer and I really like it. The quality is great, and the technology is fantastic. The plug is so much better than the old RV twist plugs. The only downside is the cost. What I really like is the customer service from etrailer is fantastic!
Probably the best RV/Marine Power Cord/Inlet on the market. Good solid electrical connection with no worries about loose connection. This is the second RV that I converted. First modification I make on a new RV, even if I brought a brand new RV would be to make this modification!!!
We chose to change to this product because the "pull out" shore power line that came with our RV got hung up inside the compartment and took considerable work to get out. The SmartPlug system was an easy install and the stainless steel inlet is very high quality. I really like the led indicator lights that confirm the incoming power is properly wired. The power cord has quality plugs and securely attaches to the RV.
etrailer was easy to work with. Order process was smooth and delivery was timely. The SmartPlug RV Power Cord - 30 Amp - 30 ft was well priced and received in good condition. The item is definitely well made and durable. It even came in a nice storage bag. I look forward to years of trouble free usage on my adventure vehicle. Based on this experience I would recommend etrailer to anyone looking for similar products.
I replaced by 2010 Airstream's inlet and cord with the SmartPlug. Installation was simple and took only a few minutes with simple tools. I enjoy the peace of mind of knowing that fire risk has been diminished. Highly recommend this product.
VERY FAST ON DELIVERY! ALWAYS COMES THROUGH WHEN I NEED SOMETHING! :)
Exactly what I was looking for at a reasonable price. Free delivery was fast and easy.
Very good product. Works well and cord is nice and flexible allowing for easy stowage. I like the clip on female plug instead of the screw ring. A lot easier to connect and disconnect.
I was in despirate need of this power cord. Etrailer delivered in a flash! I have been ordering products from Etrailer for a few years and i have never been disappointed. The how to videos are great, customer service is fantastic.
Very fast delivery. Product arrived in perfect condition and was tested. It works as advertised.
Thank you for the great service!
Very nice carrying bag, too. That was a surprise!
Always a pleasant experience dealing with E-Trailer. Timely and efficient.
I couldn’t have been serviced any better. Thanks for getting me out of a mess
Delivery was a few days later than it said at first. Otherwise, product was what I ordered.
fast delivery
They were very easy to install and look great on my Airstream.
As advertised and works like a charm. Super fast delivery.
Needed a replacement RV smart plug. Delivered in less than a week!
Perfect, just like every other things I have ordered from etrailer
Although I have not used it for camping, the cord is excellent quality and very flexible. Connection is much better than the old quarter turn plug and seems more weatherproof.
I haven’t had a chance to use the product yet therefore I can’t comment on it. But etrailer customer service was great and the sale price was the best I see anywhere. I received the product promptly and well packed for shipping.
Do you have a question about this RV Power Cord?
Info for this part was:
At etrailer.com we provide the best information available about the products we sell. We take the quality of our information seriously so that you can get the right part the first time. Let us know if anything is missing or if you have any questions.


Thank you! Your comment has been submitted successfully. You should be able to view your question/comment here within a few days.
Error submitting comment. Please try again momentarily.