


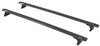
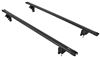
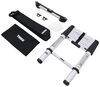
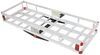
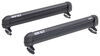
Durable nylon legs with built-in locks mount 1 Heavy-Duty crossbar to your vehicle's naked roof or fixed mounting points. Leg bases pivot to level bars on your roof. Pair with custom half fit kit to add a third crossbar to an existing roof rack.
Features:
Specs:

California residents: click here
Videos are provided as a guide only. Refer to manufacturer installation instructions and specs for complete information.
Hi, everyone, Steve here with etrailer.com. Today, we're looking at our Rhino Rack 2,500 series legs for your heavy duty crossbars for naked roofs or fixed mounting points. So, folks, you're gonna get two legs, and they're gonna help mount one Rhino Rack heavy duty crossbar to your vehicle's naked roof or fixed mounting points. So, again, this is enough to do one bar. So obviously, if you have two bars on top, you're gonna need two kits. Now, these pair with a custom Fit Kit sold separately, and that whole kit would create a complete roof rack, and you can reach those parts separately on our website or reach out to us, and we can help assist you with finding them for your specific vehicle as well.
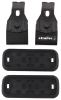
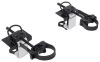
Now, these leg bases here do pivot to ensure that (equipment clatters) the crossbars are level on your roof. So when everything's installed and attached here, these will pivot to match up the roof line of the vehicle. (equipment clatters) And then you have two plastic covers over 'em. You get these plastic keys included. You unlock it, and that's how you're gonna reach the hardware and stuff to install everything and keep everything nice and tight.
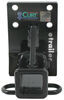
You have a special security wrench here. It looks like an Allen wrench, but it does have a hole in the center, and that matches up with these special bolts here to make sure no one can steal your gear. And then, once you've got it so tight, you'll see that (part clanks) this blue handle here is curved. They've designed this to be almost like a torque wrench, so once you've got it at the right setting, per the instructions, this would become flat, and that would tell you, okay, I've got enough torque on it. It's tight enough.
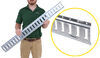
So pretty neat as far as (tool taps table) that design and how they've done that. Again, all that information's in the instructions, so make sure you're checking that out to be sure you're getting everything installed correctly the first time. (part taps table) They even throw in some stickers here, and that lets you put 'em on the legs and tell you if they're the front left, rear left, rear right, front right, and then some white arrows as well to help assist you with maybe the next time you install it. So once you get these installed the first time, you're gonna have these markers in place after that to know exactly on your roof line where this gets installed. Now, these have all been UV-stabilized, glass-reinforced nylon on the construction, so they're durable and weather resistant as well.
Well, that's gonna wrap it up, folks, for our look together. I'm Steven; thanks for watching.

Do you have a question about this Accessories and Part?
Info for this part was:
At etrailer we provide the best information available about the products we sell. We take the quality of our information seriously so that you can get the right part the first time. Let us know if anything is missing or if you have any questions.


Thank you! Your comment has been submitted successfully. You should be able to view your question/comment here within a few days.
Error submitting comment. Please try again momentarily.