
Custom RCP Fit Kit for 4 Rhino-Rack RC and RV Series Roof Rack Legs - Fixed Mounting Points


To see if this custom-fit item will work for you please tell us what vehicle you'll use it with.


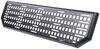
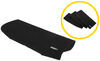
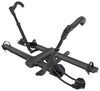
Custom fit kit lets you mount Rhino-Rack RC or RV series legs to a vehicle with fixed mounting points. Legs mount to vehicle with attachment studs. Molded inserts cover bases when the legs are removed. Includes 4 pads, covers, and mounting hardware.
Features:
Specs:

California residents: click here
Videos are provided as a guide only. Refer to manufacturer installation instructions and specs for complete information.
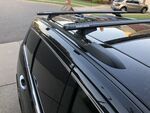
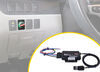
Hey, it's Ethan here at etrailer. Today we're gonna be taking a look at and showing you how to install this Rhino-Rack Vortex Aero Roof Rack system with the crossbars, the legs, and the fit kit on our 2022 Lincoln Navigator. We'll let you know a little bit more about how it all works in just a second, but you might want to use a roof rack like this in the event that you want to get some accessories on there like skis and snowboard carriers or kayak carriers. Or if you want a little bit more storage, you could put roof boxes or baskets on there as well. So let's check it out. The roof rack system will fit into your Navigator's raised rails on these fixed mounting points.
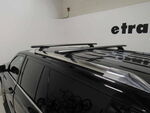
This front crossbar is always going to be in the front and it does block a little bit of this moon roof. That's pretty much going to be inevitable, but there's a ton of space still available. It might get covered up as you put longer accessories on there. The back crossbar can be mounted in the middle here, which we found is a pretty universal spread, coming in at about 28" or 29" or so, or it can be mounted further back in the event that you have some longer accessories or some longer items that you're trying to transport, like boxes or some lumber, whatever have you. The crossbars on our roof rack systems are made of an anodized aluminum.
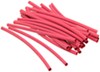
So they're lightweight. If you take the end caps off, you can see they have this H-bar construction which gives it some of that structural integrity as well, so they are light weight, but they are still able to support up to 165 pounds, keeping in mind that the roof has a rating of it's own, so make sure you check your owner's manual and make sure that it's good to go and that you can get 165 pounds on there. As you look at the top of the crossbars here, you can see that these are the vortex strips that are mentioned in the name, so you will get the strip out originally, it'll just be one strip, you'll have to trim it up according to your needs, but once you do, you'll cut down on some of that wind noise and it'll hold some of your T track accessories in place. So if I remove that end cap again, you can see that T channel which is where your accessories stored slide in and out. As I replace this end cap, you can see that there is a lock on the end.
It's just plastic for now that you'll turn with this universal plastic key, but you can upgrade those to metal locking cores if you want a little bit more security. As we look at the top of our crossbars here, you can see that these are where the vortex strips lay in your T tracks, so if you want to cut down on that wind noise while you're driving, this is where you'll trim that up and put it into place. If I take the end cap off, you can take a closer look at that T track which is useful for a lot of accessories, they'll have parts that just slide in and mount to that. The strip on top as well will give some padding to your clamp accessories if you want those, too. Seal this back into place, we can put our end cap back on and point out the fact that you can lock it up, it just comes with this plastic key, but you can upgrade to metal lock cores if you want another layer of security.
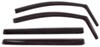
As we take a look underneath our crossbars here, there's this channel here that also can generate wind noise while you're driving, they do include a rubber strip that we do have to trim up and slide in there. It also gives you measurements, so it makes installation a little bit easier. This is just for demonstration, so we didn't actually trim the rubberized strip in our case, but you will do that, slide that in there to cut down on some of that noise. As we look at the crossbar shape itself, it has an elliptical shape which is going to cut down on some of that as well, making the whole system more aerodynamic. One thing to note about a roof rack system is that it's going to add a little bit of height to an already pretty tall vehicle, so I'll get a measurement from the top of the rails to the top of the system to give you an idea of how much height you're going to add. In the case of these crossbars, it's about 2 3/4 inches from the rail to the top, if you want to know how much room you'll have from the bottom where you're actually making contact with the roof and the bottom of the crossbars to give you an idea. That's 3 1/2 inches, so that's how much room you're gonna have for those accessories or clamps, keeping in mind that the whole system obviously is going to increase in height as you start to add accessories, so keep that first measurement in mind. Factor in what the height of your accessories are, for things like storing it in your garage or clearance issues wherever you go. In addition to the low profile, aerodynamic crossbars, we also have these legs that secure the crossbars to the fit kit and the rails. They're going to be made of a durable nylon material that's reinforced with glass to keep everything nice and sturdy, as well as they are also pretty low profile, so they don't add a ton of height. You can see that there is this included key. If we just fit that in, we can remove the front cap, and we see that it's doing it's job at protecting the hardware that secures the legs into the brackets on your rails. The fit kit consists of this bracket and the rubber skirt that hold onto the rail securely. It's nice that the rubber skirt is there to protect your rails from the metal hardware and they're secured in place by security Allen bolts, so you need a special tool to get them off. When we install, we first like to start by making sure that we have everything we're gonna need for the entire roof rack, starting with the crossbars. If you have your vortex strips, you can trim them up now if you'd like to. And we want to make sure that we have the towers, we have the fit kit which comes with the rubber skirt, the bracket, we have the Allen key, we have a trim panel tool which helps us get the spaces out of the rails. We have those here at trailer, they're not included with the set. First thing you might need to do in your case is to remove this end cap if it comes on there. Also, you're going to have to install this bolt through the bottom of the feet and this square nut, just the bolt, the spring washer, and one of the flat washers go into this side and then you'll attach the nut loosely on the other side. Next, we'll prep our crossbars. First, by removing these end caps if they're locked. In our case, they're already loose, but if they are locked, you'll just fit this plastic key in, unlock them, pull them out, and now we can slide that square nut into that track. Just like that. And then we'll tighten it up just to the point where it's tight enough that it'll stay on it's own but we can move it with just enough force. So, right about there is probably good. Next, we'll fit our skirt onto these brackets, just lining things up, doing your best to fit the bracket underneath the lip. Might have to stretch it just a little bit to get those points in to fit, you'll see them start poking through. Just lining them up again as you go. I'll try to get the sides first, if you get the sides, then the middle tends to line up a little bit better. There's not necessarily a set way to do it, just sort of maneuvering it as best you can to get those points through. Again, just trying to feed the outsides under the lip. So, there we go. And you'll see all those points coming through. We're up on the roof now for our next step which involves using this trim panel tool that I talked about earlier, to fit under these rubber fasteners. See, there are a couple different options for you to fit into your rails, we're just going to pick the middle one because we found that's about the right distance for our accessories. We'll just fit the panel tool under the fasteners and lever them out. Also, I tried this with a flathead screwdriver earlier as the first method and this panel tool is way easier. So, we got a mount on this side, we'll repeat the process for the other side. Now that we have those rubber fasteners out of the way, we can get our brackets installed. We first have to start by finding where these cap screws. We'll put a spring washer on first and then a smaller flat washer on second. And then we'll put the bracket up facing out just like this, line it up, and we'll hand thread with these cap screws, just until they start to thread enough that it'll stay in place. Then, we'll grab the other one. Repeat the process. The cap screws are hand threadable to a pretty good point. So, we'll do as much as we can before we'll use the provided Allen tool to finish tightening things down. I will say, there are a handful of times where we'll run into clearance type issues with using this Allen tool to tighten bolts down. You'll see a little bit more about that as we go. Now, we'll get our crossbar set up. It can be helpful to have an extra pair of hands here just so that you can guide the other side across, but if you place the feet loosely in the bracket, then we can slide the next one to fit in as well and that's why we didn't tighten it down all the way because now we can adjust the crossbar's thread. We'll come back and measure that in just a second. Now, we'll be fitting these hex bolts into where the feet meet the brackets. So, we'll start with one of these spring washers again and we'll place one of the larger washers on. The ratcheting wrench is helpful just because of how little clearance we have in here, but you could do it with a normal wrench if you want to, it's just going to take a little bit longer. So, we gotta hand tighten as far as we can and now we tighten it the rest of the way with that wrench. We repeated the process on the other side with this hex nut, just getting it in place. Now we'll measure the overhang to make sure we have the same distance on either side. So, in our case, we measure basically just from the inside of the end cap. You just want to make sure that you have the same on both sides and then we can use our Allen key to tighten up the square nut on the bottom of our towers. Now you see why we had those bolts at the bottom of our feet pretty much fully turned. As I try to get this Allen key under here, not only have to find where the bolt is but you have to have enough clearance to actually turn the key at the same time. So, definitely prone to not only being difficult to find, but also potentially scratching up your roof. In the front side we have our sun or moon roof in the way as well. So, as you can see, I'm actively having a tough time finding where this bolt lines up and even a tougher time turning it so having to do this fully on either side is definitely a bit of a struggle. Still just struggling to find where we line up. There we go. And just tighten that up the last couple turns. This is really a matter of having the patience to find where the key lines up with the bolt because you will have to basically just turn it one slow rotation at a time. This one's tightened up, we'll repeat the process for the other side. Once we have both of the towers tightened to the crossbars, we'll finish things up by first replacing these plastic end caps with the end of the crossbars as well as the lock to secure them in place. Then, we'll get the lock end covers for the towers in place as well and lock those up with the provided key. Repeat the process for your front crossbars and then you're ready to get some accessories on your roof. This was just a look at that Rhino-Rack Vortex Aero Roof Rack system and how it fits on a 2022 Lincoln Navigator.


Do you have a question about this Accessories and Part?
Info for this part was:
At etrailer we provide the best information available about the products we sell. We take the quality of our information seriously so that you can get the right part the first time. Let us know if anything is missing or if you have any questions.


Thank you! Your comment has been submitted successfully. You should be able to view your question/comment here within a few days.
Error submitting comment. Please try again momentarily.