
Thank you! Your comment has been submitted successfully. You should be able to view your question/comment here within a few days.
Error submitting comment. Please try again momentarily.


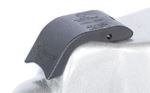
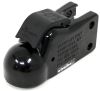
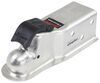
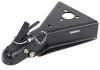
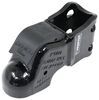
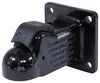
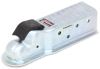
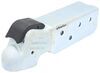
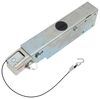
Repair the composite eZ-Latch on your Demco 2" trailer coupler with 10,000-lb capacity (DM14791-97, DM14793-52, DM14793-81, DM14793-95, and DM14976-52).
Features:
California residents: click here
Videos are provided as a guide only. Refer to manufacturer installation instructions and specs for complete information.
Hey, everyone. I'm Evangeline right here at etrailer. If you have a Demco EZ Latch coupler and you may need some replacement parts to adjust that latch or replace it, this is gonna be the rebuild video for you. By rebuild, we're gonna be using our repair kit here designed for your Demco EZ Latch, just to show you what the different components are that are involved in this latching mechanism to help you replace your own latch or figure out what you even need in the first place to start replacing. Demco has had this EZ Latch design for a while and people love it, just because of the easy way to latch your trailers onto your ball mounts and have a super secure fit. The mechanism design has been the same all throughout 'cause it works great, but the design of the coupler itself, Demco has continually been making new and better versions because trailers have been changing through the years.
So to make sure you get the best fit for you, you have plenty of options. While your coupler might look a little different from ours today, chances are this will still be the correct fit for you. Some major changes you might notice though is difference in the type of bolt used underneath as well as whether there is a spacer underneath your coupler. Another thing you also need to look for is the size of the coupler. Do you have a two-inch, do you have a two and 5/16ths All of these things are important for getting that good fit.
Hopefully this video will be helpful for figuring out what type of coupler you have and whether this kit is the right fit for you. But if you're still not sure, please give us a call, send us a message. We love helping people out with getting the right fits for their trailers. Now let's get going with our rebuild process. The tools I brought to the table are a T27 Torx key, a 5/32 Allen key, a punch, as well as a mallet or hammer.
We'll start off underneath the coupler with that T27 bolt. Now I have a special trick here for you. Yes, over time the bottom of the coupler can get pretty gross. You'll have all types of grease, dirt, and debris, so try to clean that out as much as you can, especially if you're unable to remove the coupler, you might be working upside down. And then next is push that spring in as much as you can, holding that wedge in place.
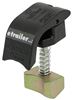
That will make it a lot easier to undo this bolt. But also as you hold this in and the bolt is completely released, you can then very carefully push down and release that wedge. And if you're working underneath your trailer, this will help prevent that wedge from flying out at you once that spring's released. Remove that spring once you've removed that wedge, and then the whole latch and this bar will come out easily. Now let's go over our parts here. We have our latch, we have our spring pin, we have our bolt that goes inside, and then we have our spring. Then on the other end, we also have this spacer that you will see on some couplers. If you have a spacer on yours and you see it as you unassemble it, this will be the part for you. If you don't have this spacer, then you do not need this part, and then you have your exact replacement block as well as another bolt. To secure that split pin, you are gonna need that mallet and the punch because the split pin moves very easily through the handle, but not easily through our bar. So get that lined up where the holes all line up, just like that, and then drive it on through with your hammer. (hammer knocking) As you get further down, that punch will be very helpful for getting it all the way through. You're now able to fit your latch back in, taking note of the orientation of the latch. Don't install it backwards. Follow the angle of your coupler. And then if you are using the spacer, that will go in. We are not using the spacer here today, so we're going directly with the spring. And then the block you can see has a square cutout. That square cutout matches our bar underneath. However, it's a little tricky to get that lined up, so I have a special trick there. I use the Allen key that I've used for this installation. I use that to go through that first hole into the bar underneath, and that keeps things lined up in place as I push down on that block into its slot and then wedge it in the coupler. May require a little bit of force. Once you have that block wedged in there, you can then secure it with your bolt. Now for some couplers, they have a hex head bolt. Other couplers, they're gonna have that torques head bolt. If yours happens to be a little bit different, don't worry, they're both threaded the same and they will tighten down on that block. So keep holding that in place as you tighten down. And that's gonna be it for your installation. Just double check that your latch engages and disengages just like it used to. All of your parts are new and now your trailer is back into business. If you have any questions at any point, whether it is what is the right piece that I need, which Demco coupler do I even have, then we are here for you for your trailering adventures. If you only need to replace certain pieces like that composite latch, we have separate replacement pieces as well available on our website. But today what we saw was a look at the rebuild or repair kit for your Demco EZ Latch couplers. This is available for your two-inch couplers or your two and 5/16th couplers here at etrailer. My name's Evangeline. I hope you enjoyed this journey.
Customer Satisfaction Score:
96% were satisfied with this product
4% of customers were not satisfied
Ratings & Reviews

HELLO,
RECEIVED NEW DEMCO DM 14793-81 COUPLER VERY FAST LOOKS GREAT. THIS IS NOT A DIRECT FIT ON A BIG TEX CH600 HAD TO EXTEND FRAME RAILS AND MOVE JACK GUIDE.
YOU SHOULD PROMOTE A SAFETY CAMPAIGN "CHECK YOUR HITCH" TO GET TRAILER OWNERS TO TRY A NEW BALL TO CHECK FOR WEAR.
ATWOOD 0644 WORE OUT IN APROX 3500 MILES CAME UNHOOKED WHILE LOADING ..NOT A GOOD SITUATION.
I WOULD SEND CUTOFF NOSE OFF OLD HITCH TO YOU FOR SHOW.
THANKS AGAIN FOR YOU FAST AND FRIENDLY SERVICE.
DOUG
The supply and availability of the item was a major setback. Once that issue was solved, the product was the exact replacement and worked as well as the original. Many thanks for the extra effort in providing detailed communication and shipping the item ASAP.
it went together just like the vidio

James W.

12/31/2023
it is still working just fine no issues

I liked it, it's a quality product.
Jenny N.
10/5/2022
It seems you are not satisfied with the latch kit. I am happy to help in any way.
Great fast service, thank you
Correct part are they were fast to deli ver
Great turn around time on this! Thanks guys!
Only wanted/needed plastic latch.
Info for this part was:
At etrailer we provide the best information available about the products we sell. We take the quality of our information seriously so that you can get the right part the first time.


Doug A.
11/15/2019
PERFECT!!