

 Arrives before Christmas
 To see if this custom-fit item will work for you please tell us what vehicle you'll use it with.
Thank you! Your comment has been submitted successfully. You should be able to view your question/comment here within a few days.
Error submitting comment. Please try again momentarily.
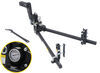
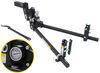
These custom-fit, stylish nerf bars are the perfect solution for accessing your truck or SUV. The 4" drop and die-stamped design provides strong traction. Steel tube with black, electrostatic base coat is made to withstand the elements.
Features:
Specs:

California residents: click here
Videos are provided as a guide only. Refer to manufacturer installation instructions and specs for complete information.
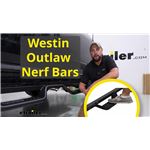
Hello neighbor, this is Curt with etrailer and today we're taking a look at the Westin Outlaw Nerf bars with the drop step on our 2024 Toyota 4Runner. Now if you have any experience with these particular Nerf bars, please leave it in the comments below. We'd love to take those experiences and share them with our other neighbors in order to help them to make the best decision for themselves. Now these Nerf bars are all steel. There's none of those plastics or rubber or anything involved like some of the other Nerf bars and things that are out there on the market. It's e-coated to help with corrosion resistance and help 'em looking nicer longer.
And they do have a bit of a great grip for your shoes and boots here as you're getting in and outta the car. So they shouldn't cause any slippery conditions or anything like that either. Now, one of the reasons that getting a set of Nerf bars with a drop step might be important to a forerunner owner is that it is quite a significant leap to get up into your vehicle without something to assist you on the way. Now a lot of running boards that are on the market are really gonna bring that step here. It's only gonna drop at about seven inches for you, which is a help, but not nearly as much of a help as these would be.
So we figured out that to get up into the vehicle, you got about a 22 1/2 inch step to get up into it without any kind of Nerf bars or running boards. This is gonna drop that significantly. You're gonna go from a 22 inch step to about a 12 and a half inch step and then from there, only a 10 inch step up into the vehicle. Now with a drop step like this and you're a 4Runner owner who likes to use it for those kind of more adventurous journeys, maybe you take it offroading sometimes, you're probably interested in what kind of ground clearance you're gonna have once you have these on. You're still gonna maintain a decent ground clearance of about 11 1/2 inches.
So bear that in mind if you're ever gonna take it on an off-roading adventure. Now some people might be concerned with the size of these steps in that it's not a running board that runs the entire length of the vehicle wheel to wheel. I could say that really, I mean you, you've gotta have a pretty significant shoe size in order not to be able to really fit it on here. So stepping on and off is not a problem. I like the distance that it comes out from the vehicle.
It's not too far past the tires, but it is enough to actually make this step getting in and out pretty easy. One thing that we did kind of realize though, that if you have children getting in and outta the car, or if you're somebody with a smaller shoe size, this gap right above the step might present some issues getting in. If you're not being conscious of it, you could get your toe under there and maybe trip on your way in the vehicle. On the way outta the vehicle, I don't really see any issues like that happening, but it is something to be conscious of. So we showed you already how well the front step covers the front row. I wanted to show you a little bit about the coverage on the second row. Now, while this is still placed in a really good spot as far as helping me get in and outta the vehicle, you do wanna be a little bit conscious that it doesn't quite go back as far as some folks might expect. And it does have this kind of upward taper right here that you're gonna have to be a little bit careful of. If you do get your heel or anything on that as you're getting out, it can be a little bit awkward, but generally speaking, as long as you're conscious of that, this is right where we want it to be. And one more thing I want to talk about is the maintenance of these Nerf bars. Now there are a lot of Nerf bars and running boards out there that could be really hard to keep clean and gunk free. I don't consider these to be one of those options. This option actually has really nothing underneath to really catch and cake a lot of that stuff on. As you're going up and down the road, this should be a really easy set to simply spray off. You'll just wanna make sure that when you are spraying your car down, you want to get underneath the step as well. And in order to avoid a lot of that gunk and buildup from happening in the first place, having a decent set of mud flaps on your vehicle is a great way to help keep the underneath of these clean. So now that we've gone over some of the features and how it looks and fits on our vehicle, let's go ahead and take a look at how we got it installed. Now before we begin, it's always a good idea to kind of lay out all the components we're gonna be working with. What we're gonna be installing for you today is the driver's side. So we'll have the Nerf bar or running board itself right here. You could tell the driver's side because this longer extended part is gonna go toward the front of the vehicle. So that's how you can identify it from the passenger side. The other thing that we're gonna have is our brackets. Now the brackets are also going to be side specific and the way that you could determine that outta the box is that the bracket that's going to go on the very front, the tabs will be facing toward the rear of the vehicle. The second and third bracket, the tabs are gonna be facing toward the front of the vehicle. So that's an easy way to kind of determine which one goes where. We're going to be fastening our brackets first by using this bolt configuration, which is gonna consist of our 13 millimeter bolt, flat washer and a lock washer. We have six of those laid out here. It'll take six of them to place the brackets onto the vehicle. After that, we're going to be attaching our Nerf bars to our brackets using this bolt configuration here. But we'll be getting to that shortly. The first thing we need to do is take our 12 millimeter socket and we have to remove the factory bolts that are underneath the vehicle. So let's start there. Now, just to give you an idea of the location where these bolts are after we get underneath there, the front foremost bracket is gonna be placed roughly right here. And then the middle and third bracket are here and here respectively. Now we'll go ahead and get under there and get those bolts removed. So right now we're at the front of the vehicle and if you're looking at your front bracket, you see that it's got a wider bolt spread than the middle and the third bracket. So the middle and the third bracket are gonna be located back here. And this is what the bolt configuration will look like. You got another set of bolts just like this further back toward the rear wheel, but we're gonna start up here at the front and remove the factory bolts for our front bracket. Now that we've got our factory bolts removed, all six of 'em, we're gonna go ahead and grab our front bracket. And remember the tabs for the front bracket on the driver's side are going to be facing toward the rear of the vehicle along with two of our bolt setups with the lock washer and the flat washer and get them secured underneath the vehicle. Now to take these bolts off, we needed the 12 millimeter socket. These bolts will take a 13 millimeter socket. So we're gonna get that switched out and then get under the vehicle and secure our brackets. Now this bracket is gonna go in place right here where we remove those factory bolts. And if you notice the bolt holes are a bit ovular. That is gonna be for adjustment to go in toward or out away from the vehicle once we get our bars on. So when we put these up right now, we're going to get the bolts started. However, we're not gonna tighten them down completely because we want to have that little bit of adjustability down the line before we torque everything and we're ready to hit the road. So I'm gonna start by hand threading these in and just getting our brackets in position. Okay, now I've got these in just enough to be secure and have that maneuverability. We're gonna continue on to our middle and furthest back bracket. Putting it up the same way. The bolts are a little bit close together, but it is the same general idea. And once we have those in and you know kinda loosely threaded a little bit, we're gonna go ahead and get our Nerf bar ready to go onto the brackets. Okay, so we're on our third bracket now. We've already installed the middle and we're just getting this tightened down a little bit. However, again, I do wanna leave it loose enough to get it back and forth. This should be good to go for now I think. And that's gonna give us plenty of maneuverability. It's still gonna be sturdy enough to get the bar on there. And I think I wanna start out by trying the brackets in the furthest away position first anyway, if they're not really sticking out too far, that's usually the best place for 'em. A lot of times you go for the most inner bracket, you don't end up getting enough step. So we're gonna try it at it at its furthest reaching first. So the easiest way to get these on are definitely gonna be to have a friend with you to do it. However, if you are on your own, it is still possible to get these installed. So what I'm gonna do is I've got our running board here for the driver's side. I'm gonna line this up so that the bracket is in front of the tab that we're running the bolts through. And what I'm gonna do is set it on there just like that. And I'm just gonna kinda let it balance by getting it around that lip. And it's actually gonna sit here in a pretty sturdy position actually. Now I'm gonna get under here and I'm gonna maneuver my way through and I am going to just throw the bolts in. I'm not gonna screw down the nuts and tighten them. I just wanna run the bolts through while I have it suspended so I can get it lifted into that position. So I'm gonna grab four of my bolts and I'm going to do it with this and this bracket. Now we're going to be attaching the running boards to our brackets using the flange hex bolts. The instructions asked for a 17 millimeter socket for this. However, we found that was a little loose and we got all the way down to a 15 millimeter socket to get the most snug fit. However, regardless, it's still a good idea to take your socket set and just double check whatever the most snug fit is. You don't want something too loose on here where you might damage your bolts. So with that said, I'm taking four of these without the nut and I'm gonna go right under here and I'm gonna thread those through so it'll help kind of prop our Nerf bars up in place. So as you can see, we've got it resting kind of on our brackets here just to keep it suspended. And what we'll do is we'll take our other hand and we'll just kind of prop it up like this. And all we wanna do right now is run our bolts through. So I've got the one running through there, I'm gonna run it through the second hole. Now this isn't gonna prop it up completely, it'll take tightening them down to do that. But this is a way to get all of your bolts run through if you're on your own. Once we do that on all three brackets, we can come back and do our adjustments and tighten them down and get them at the angle that we want them. Okay, so now that we've got all six of our bolts through, what we'll need to do now is secure our nuts into place. So to do that, what we're gonna do is kind of put some pressure on it with our one hand here and basically this lip we want to go flush until it's butted right up against that bracket. At this point, I'm gonna start on my nuts and get those started. And this is really just to kind of make everything easier so that you can only, you know, kinda use one hand at a time to maneuver the nuts and bolts in your socket wrench. But if we get these started on here and we repeat this process in all three, what I'm gonna be doing next is, again, I want to be keeping some pressure with it over here so that it's laying flush for me. And then I'm gonna be socketing these down and tightening them to make sure that they stay in this position. Once I have that done, we'll torque everything down to spec and we should be ready to go. So now that we've got our bolts in place from our bracket onto our running board, we've got them tightened down enough, not torqued down mind you, but tightened down enough that the running boards aren't drooping or falling under their own weight. We've got them stationary and parallel to the ground. So they're gonna be level for us when we do torque 'em down. But remember, however, when we originally put our brackets onto the vehicle, we left them a little bit loose for adjustment. It turns out that furthest from the vehicle adjustment was the correct one. So we've still got 'em in place there. But now I want to tighten them down a little bit with my 13 millimeter socket, not tighten down all the way 'cause we still want to get those to torque spec as well. But I'm gonna use the socket to tighten them down a little bit first. Then we're gonna get our 13 millimeter socket on our torque wrench and get them torqued to spec. So now that we've got all six of our bracket bolts up here, torqued into the vehicle, we're gonna go ahead and torque down the bolts that are holding our running board onto the brackets themselves. Now pay very close attention to your instructions. These bolts that we're about to torque down have different torque specs than the bolts we tighten down into our vehicle frame. So bear that in mind that you're gonna want to change that up. It does take a higher torque on these bolts here than it did on the vehicle frame. It could be a tight fit down here with a torque wrench too. So just be mindful. You might have to get creative and patient, but it is important to make sure that these are tightened down for your safety. Now aesthetically, I think these look great on the forerunner. It's a bit minimal, which is kind of a cool thing. There's not, I mean, as capable as this vehicle is, there's not a whole lot of extra frills and things going on on the exterior of it. I also wanna mention that this is a stock SR5 model, so there's no lift on it. It doesn't have, you know, aftermarket big tires on it or anything like that. There are other options in the forerunner that will create a higher lift on the vehicle. In which case I think the drop step then becomes even more important. The main concern though would be if you are using it in those off-road situations, just being wary that your ground clearance has dropped some. But otherwise I think this is an excellent choice for any Toyota 4Runner owner. Once again, this is Curt at etrailer. Thanks for stopping by.

Instructions that came with the package did not work. The video you posted online helped alot.
Amazing service amazing help amazing professional and understanding people who help me get what I want fast.
And it’s fit beautiful, just as it said. Can’t be more happy.
Very happy with product! Quick delivery and easy-peasy install! Thank you Etrailer for another fine product!
Arrived in excellent shape. Very well p acked.
Exact fit, looks great!
Nice running boards. Fast shipping. Excellent pricing!
I really like the nerf bars but I’ll have to try and touch up the scuffs from damage incurred during shipping.
The running boards are of good quality and all of the parts arrived to completed the installation. It was relatively easy to install. I would recommend having a second person to help put the running boards onto the support brackets. The instructions were flawed, and the brackets for the center two supports need to be swapped from passenger side to driver side to make everything line up correctly. Other than that, happy with the purchase and quality of the product.
Item arrived quickly, was exactly what I ordered and fit perfect. Very happy with how these running boards look on truck, the eTrailer video was very helpful.
Fast shipping, great communication and fit and finish excellent!!!

Love these nerf bars most functional best looking I've ever bought
Great quality steps that fit my vehicle perfectly. My only suggestion is a minor addition in the instructions from Westin that would show the difference in driver and passenger step assemblies. Maybe a subtle "D" or "P" on the backside of the tube assembly.
The Nerf Bars were excellent. Installation was very easy, instructions were perfect. The issue I have is Etrailer’s customer service. When I ordered the bars, it showed in stock and I would have them the next day. They didn’t show, so I called that evening and talked to a representative who informed me that they were not in stock and they would have to be shipped from the manufacturer. I understand this, as inventory numbers can be off, but the original salesperson could have called back to inform me of the situation, but they didn’t. The representative I spoke with that evening said she would call me the next morning to let me know what the status was. No phone call. So I waited an additional day and left a voicemail for the sales manager because now my order online says pending with the manufacture. So do they have them, are they going to be shipped, when will they arrive? No email or phone calls on the status. Finally, 5 days later they showed up. If they would have informed me this, I would have been okay with it, but I had already had a time set up for help to install them and I had to cancel. Again, the product was excellent, customer support was not.
Perfect fit, looks great, and easy to i nstall.
Condition: Like New
Notes: May have damaged packaging or minor cosmetic blemishes.
Info for this part was:
At etrailer.com we provide the best information available about the products we sell. We take the quality of our information seriously so that you can get the right part the first time. Let us know if anything is missing or if you have any questions.


Gwendolyn Y.
12/2/2024
The nerf bars look awesome on your 4Runner, Bill!