

 Arrives before Christmas
 To see if this custom-fit item will work for you please tell us what vehicle you'll use it with.
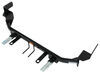
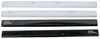
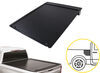
These custom-fit award-winning nerf bars feature a notched bar design. The step pads are wider than on competitors' nerf bars and their die-stamped design provides strong traction. Steel construction with a textured black finish.
Features:
Westin's HDX Drop Nerf Step Bars provide the rugged look and function that truck owners need and want. They feature a solid 1-piece steel construction and heavy-duty punch plates creating high traction step areas. The HDX Drop Steps also feature Westin's notched bar design which allows for more than 2 inches of additional toe/heel placement over its competitors. Available in a textured black finish that complements Westin HDX Bumpers. The HDX Drop Steps have vehicle specific applications and include vehicle specific mount kit, installation hardware, and instructions.

California residents: click here
Videos are provided as a guide only. Refer to manufacturer installation instructions and specs for complete information.
Hi, Matt with etrailer. If you have a 2024 Ford Bronco, and if you have some more beefy tires on here, or maybe you have your Bronco lifted up a bit, then the Westin HDX running board's gonna be a great option because it's just gonna make your life a little bit easier getting in and out of your vehicle. What's really nice is it's gonna add a really rugged look to what we have today. So let's take a look at it, and then later on I'll show you how to install it. Now let's actually test it out. So right off the bat, this isn't a super high step for me.
I can take this pretty easy. Now my leg is up there a little bit, but this is definitely gonna make my life a lot easier. And you can see right here, I'm not really struggling too much to get in. If I try to just step in here regularly, definitely, I'm definitely taking a longer step. I have to kind of reach in here a bit.
My knee's hitting part of my dash. So this is just an easier way to get in and out of your vehicle. And while we do have this rugged look, this is still gonna be pretty recessed to our vehicle. And really just from the bottom of our door right here, it's only gonna sit at about four inches out. So that's pretty compact to our vehicle.
It really doesn't stick out anywhere past our tire. So there's a lot of pros and cons to that. So the pros are gonna have that cleaner look. It's gonna be less likely getting caught on anything, and you don't have to worry about it sticking out while you drive down the road. Now, some of those cons are really just stepping on it.
So right now, I'm just in some tennis shoes, and with the door closed, the most I can get is just the ball on my foot, which is really all I need. But if you have some bigger feet or some really hefty boots on, you might just be able to get your toes on there. So that might just be a little bit difficult for you. And both of these are gonna be different sizes. So that one in the front is gonna be a little bit bigger than the one in the back. So really, that's gonna be more so for the smaller people getting in the back. So that's what I also like about the two-door version, is that if you have any kids around and they struggle getting in the back of your car, it should actually help them out a bit with trying to get in these back seats. And since we're talking about these steps, let's get a couple measurements. So I'm gonna get the length real quick. This will mean how much space you have to really step on it. That's gonna be at 16 inches. That's a decent amount of space for your foot to get on. Now for your width, that's only gonna be at four inches. So like I said earlier, trying to get your toes on here might be a little bit tough if you got those bigger boots on. Now we're gonna get a measurement of the length of our rear ones. And these really are just gonna stick at just about 11 inches. So like I said earlier, not as much room, but if you have kids, that should be plenty of space for 'em. We can get another measurement of the total height this sits up. So from the ground to the top of these steps, that's gonna be just slightly over 13 inches, which is just something to consider when stepping up here. It's gonna be a lot easier to step in here as opposed to what we had before. If I get that measurement going from the ground all the way up here to that step, that's gonna be about 24 inches. So you're saving about half that space stepping up there. And today we just had more of a stock vehicle. We don't have this lifted up at all. The tires aren't too big. So this is pretty standard. And taking a closer look at these steps, a few things to note that they're gonna have this textured powder coat surface to it along with this punched plate design. So what that's doing for us is just kind of giving us a little bit more traction for when a foot is up here, along with that powder coat is also giving us a little bit more protection from rusting. And something else we noticed too, we not only have this area here to put your foot, but if your foot is small enough or you don't have boots on, you probably stick it a little bit past that point. So you have a little bit more room to place your foot. Now, something we did notice is we poured some water into some of these holes and it does pool up a bit. And if you're maybe on those lighter rainy days, that water doesn't really have anywhere to go. It could pool up there for a long time and make it more prone to rusting. So while that powder coat will protect these, it won't be able to protect it forever if you have water just pooling in here. And on the subject of rust, we have had neighbors reach back out to us about actually this type of running board before and how theirs after some use did start to rust. And that might be a big issue for you, especially if you are looking for a more rugged, cool look on the outside of your vehicle. Now, if that is an issue, I'd recommend checking out either an aluminum option or a stainless steel option. Now, something to still consider with that though is with them being out in those rainy, snowy, icy, or just rocky conditions, especially with all that dirt and grime and rocks hitting these constantly, eventually these, they are gonna get some wear and tear on even if they are made of aluminum, they will start to eventually corrode. And if they are made of stainless steel, you're probably gonna see some rusting on them eventually with a long time passing. But I do like the way these do feel and they do feel pretty strong. So to really show you what I mean, I'm a bigger guy and even with me stepping in here, putting my weight on it, you expect it not to really move. But even when I really kind of put some weight in here and really bounce on it, I really don't feel it shifting really at all. That's something really important, especially if you are a bigger person or you constantly are getting in and out of here, you want something that's gonna perform well the entire time you use it. And the way this is gonna secure to your vehicle is we're gonna have that running board that bolts up into place using some existing holes. And we're just gonna have three brackets that uses a few bolts and that's gonna connect to your rocker panel. And speaking of installation, what I do like about it is it's not gonna require any drilling, you won't have to do any really major modifications or any trimming at all. Now, something to think about is when you're putting these on that you're gonna face a lot of tight spots and the instructions are a little bit lacking on how to deal with that. Now, we installed both of these and we found a few tricks and tips to kind of deal with that. So if you are curious to see what that looks like, just stay tuned, we'll walk you through the process. To start off the installation, I like to lay everything out and you probably noticed too that I only have one set out here and that's because I already installed the passenger side because it's gonna be the same process for either one. Now, what I'm gonna have in front of me now is gonna be the running board itself and then I'm gonna have all the hardware. So I'm gonna have all the brackets. I like to organize mine beforehand. So I'm gonna have the front, center and back. I like to keep in this orientation so I don't lose track of where they go. And then I'm gonna have the hardware all organized. I like to keep all my M8 hardware together or put together with that M8 bolt, that lock washer and flat washer. Same thing for your M10 hardware. Now I like to keep the sockets that I'm gonna use with them. So right here, I'm gonna have my 16 millimeter socket and then I'm gonna have my 13 millimeter socket. Now for that 13 millimeter socket, a lot of times you're gonna find some really tight spots. So I like to grab a smaller one as well as long with a pretty small ratchet. And in some cases, you might even need just a standard wrench. And to make sure everything is torqued down correctly, I recommend grabbing a torque wrench. You can find one from one of your local hardware stores or you can even rent one too. Now, if you have a two door version, this is gonna be the same process. You're just gonna have a few different things. And that's mainly just the brackets that come with this. So instead of using three brackets, you're gonna use two brackets and one of them will be different. So you can actually find out how those will be oriented in your instructions. So we're gonna start putting on our brackets and just in case you got it mixed up, I'll just take it out again. So a good trick to figure out how these are gonna attach, the two holes on the bottom, they're right next to each other. They're always gonna be facing out because that's how a running board is gonna attach. And for the front one, you know this is gonna be different because we're gonna have this slot cut out from the bottom side, and that's gonna be in the center. And we're gonna have this longer hole at the top. It's pretty much just gonna grab on or attach to the bottom of your vehicle like this. Now I'll show you exactly where this is gonna install. You're gonna have two holes on your rocker panel and you might have some N10 bolts that are already installed. I didn't have any in this installation, but you might. If you do, just take some of your 16 millimeter sockets and remove those. Once you have those off, then we can start putting this on. And I'm just gonna grab my bracket and just line it up with those holes. It doesn't have to be perfect at this point. Then I'm gonna grab my N10 hardware, making sure I got that lock washer and flat washer on there. And we're just gonna loosely install this. We're just kind of getting this hand tight or as tight as we can with our hands and tighten down both of these. And this is gonna be pretty much the same process for the rest of the brackets we have. Now something that kind of tripped me up a little bit when I was installing the passenger side is these actually aren't mirrored. From each other, they're the exact same bracket. So since they are the exact same bracket, they're kind of gonna be reversed. So where we have this flat panel on this bracket, on the driver's side, that's gonna be facing the front. On the passenger side, this flat part is gonna be facing the back. And now I'm holding that center bracket and the rear bracket. As you can tell, there is a pretty clear difference. That center one is much larger. Make sure you get these in the right spots. Like I said, laying them out beforehand is gonna help you a whole lot too. But the installation process for these are gonna be the exact same as the front one. Now we're gonna start to get our running board on our vehicle. First, I'm gonna prep a few things. So first off, we wanna make sure it's in the right orientation. So here at the very front of it, where it says HDX, I want that to be near the front of my vehicle. Once I've established that, I'm gonna come to the back end of this and I'm gonna flip this around now. And we're gonna find these holes on the back end. And there's gonna be another way you can tell this apart from the other side is on the back end, this is gonna be the only place where we have these weld nuts that have a plate. The rest of them are gonna be indented like this. But at this point, it's a good idea just to grab a wire brush and really try to clear out any debris that's in here. Maybe grab some penetrating oil, try to spray some in here if you're having any issues and run some of these bolts in. And if they're going in there pretty good, you're on track. That's gonna just save you a headache later on. But I am gonna leave just one of these in, making sure this is an M8 bolt with my lock washer and flat washer on. And I'm gonna go to the back end and put it on the top one. Making sure that's in the top hole, we're just gonna lightly put that on just by a few threads, leaving this spot. And I'll show you why here in just a second. We'll come back to our vehicle and we're on the back end on this back bracket. Notice how we have this cutout right here. That bolt we just put on our running boards is actually gonna slide into this point. And this is kind of a double-edged sword and I'll explain. So that's gonna make getting this on initially pretty easy. So you see where that bolt is That head and washers are just gonna go around that top hole in our bracket. And what's pretty nice about this is it's gonna be able to hold itself up. Now it is kind of like a double-edged sword and the bad side or the bad thing about it is since the middle and the front aren't on those plates that are furthest out, they're more indented. They're gonna be a lot harder to reach with our bolts and they're gonna be a lot more difficult to tighten down. And you'll see here right in a second. Where I like to start is gonna be on the front side. I'm gonna try to get to that bottom hole there and I'm gonna have to pull this forward towards me and kind of angle it a bit with my other arm. And this can be a little bit tricky for the first one at least. And we're gonna use this M8 hardware to stick in here and thread it on. That's part of the reason too why we tested this out or tested the threads out before we got here 'cause if you have any issues at this point, this is gonna be a real pain to get to. With that started on, I'm just getting this hand tight, not too tight. I'm gonna come back through, grab another bolt, M8 hardware, do that same thing on the top side too. And then we can move over to the central bracket. Now the center one can be a little tricky too. You might actually have to move this center bracket around a bit. Just get it to work with you and lift up on here too. Again, this is gonna be pretty tight. I might even have to slide this forward and back a bit. This is how I can line up all my holes. And then we're all the way back at the back bracket again and we're gonna put this last M8 bolt in. Remember, you are gonna be using two M8 bolts per bracket that connect to your running board. And we're just doing this hand tight so we can make some adjustments later on. And what I mean by those adjustments is just really coming over here and seeing how it looks. And really, if you're gonna be living with this every day, you're gonna want this to be pretty easy to access. So how you can adjust it is in two ways. The first one is gonna be a little bit more minor. That's gonna be back and forward some. So really, you're gonna have just a slight bit of play there but if that really matters to you, you might as well adjust it now. And then the second one is just gonna be what angle it sits at. So how high or low it sits. And once you really figure out what you want, then you can go back underneath with some sockets and wrenches and just kinda tighten up a bit more. Afterwards, once that's pretty tight, then you can go back in with a torque wrench and tighten it down to the specifications in your instructions. And when you're really tightening these downs or torquing them down, you're probably gonna run into a few situations where things are just really tight on either side of these running boards. So something that we found to help us out a bit was just grabbing a couple extra tools. And that's why I recommend grabbing an extra small ratchet and a pretty small socket to go along with it. 'Cause some of those spots are gonna be really tight. And if you can't get your torque wrench in there, there are some add-ons you can get that get into those really tight spots. But if you don't want to invest in something like that, what I'd recommend doing is tightening down some other ones to the correct settings and using the smaller one to get to a semi-closed spot, just so you know how tight it feels. Now you might run into another spot too where you're gonna need a wrench because you won't be able to get a socket into that location because it's just gonna be so tight. So the same thing's gonna apply to this wrench as well. But after when you have this fully tightened down, then you should be ready to hit the road. With that, let's take a look at the installation and some of the features of the Westin HDX Nerf Bars on our 2024 Ford Bronco. I'm Matt, thanks for watching.


Easy to install! Look great!!
Great Product.
Exactly what we were looking for.
Top quality, well finished, perfect fit!
Do you have a question about this Nerf Bars - Running Board?
Info for this part was:
At etrailer.com we provide the best information available about the products we sell. We take the quality of our information seriously so that you can get the right part the first time. Let us know if anything is missing or if you have any questions.


Thank you! Your comment has been submitted successfully. You should be able to view your question/comment here within a few days.
Error submitting comment. Please try again momentarily.