

 Arrives before Christmas
 To see if this custom-fit item will work for you please tell us what vehicle you'll use it with.
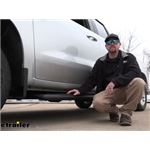
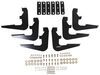
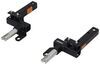
These rugged, steel running boards provide a 5-1/2" wide step for entering and exiting your Dodge Durango. Integrated step pads blend steel with non-skid, poly tread. Black powder coat finish. Custom mounting kit included.
Features:
Specs:

California residents: click here
Videos are provided as a guide only. Refer to manufacturer installation instructions and specs for complete information.
Hi, Matt with etrailer. Today we're gonna be talking about the ARIES AscentSteps running boards on our 2024 Dodge Durango. Now this can be great if you're someone who's just looking for a cleaner finish to your vehicle overall. You want something that's just gonna be easier to live with and work with, especially if you ever do need to get on top of your roof. Now running boards are great for a lot of reasons. One, like I said, they just kind of give you more of a clean or rugged look to your vehicle.
And two, they're just gonna help you out with getting inside your vehicle. Like if you look right here, for me, that's not too much of a step, but if you just need a little bit more assistance, this is gonna help you out with that process. But a big reason this is great too is gaining access to your roof. 'Cause this already has the built on roof rack. So if you are someone who is pretty outdoorsy, you like to carry a lot of accessories, but you can't fit everything in here, then getting access to your roof is gonna be more manageable with these.
About what I specifically like about these running boards are that we're gonna have this nice tread on top and this is gonna be more centered on where you're entering your vehicle. With this, you're gonna have this more rubberized tread, so that's gonna give you a little bit more traction where your foot is stepping on here. So it's gonna be less likely of sliding off like in a section like this. And your passengers are gonna have some assistance too with getting in the back 'cause there's gonna be two sections of this and this is extra long. As you can see when I open up my door this kind of fits perfectly right here.
Especially great for if you have any little ones around that kind of struggle getting in here that's just gonna help 'em get in place and gonna be less likely scratching up anything on the outside of your vehicle. But let's talk about a few measurements. So when you are living with this on a daily basis, we want to make sure you have enough room to place your foot here. The space of or the width of this, it's gonna be around 5-1/2 inches, but depending on where you place this, I have mine in the furthest out position from your vehicle where your foot can really sit, that's gonna sit about seven inches. So that should be enough room for most people.
So you can see I can get the ball of my foot on here, so that's gonna be great for giving a lot more stability. And if I open up our door, we can kind of see how this is gonna affect the height of our step. Like I said earlier, this is a pretty high step for some people that's gonna be roughly around 22 inches give or take. But the height of this is gonna be currently a little bit over about 10-1/2 inches, which is perfect because that's gonna pretty much cut this step in half. So that's gonna be saving you a lot of time and the effort. And for the construction of this, this is gonna be made of steel so it's gonna be very durable. On top of that, it's gonna have this black powder coat finish to it. That finish is just gonna help it last longer because if you are driving around outside, you're gonna experience a lot of road salt, water, snow, ice and this is just gonna make it stand up to the test of time. Now in my opinion, I think this is a pretty solid choice when it comes to running boards. Me personally, I like the look of this one compared to other ones more just 'cause it's more of a clean finish and we have that rubber tread on top which will give you a little more traction. Now if you want something that looks a little bit more rugged, ARIES has another option and that's gonna be the RidgeSteps. Those are great because instead of having any type of rubber on top, but this is more rounded design, it's gonna have more of a type of sharp tracks on it. So when you do step on here, you're gonna have a good step to it and it just kind of makes it look a bit more appealing to anyone who is looking for that real rough rugged look. But it just really depends on what your preference is. Now when it comes to the installation, they'll all gonna be the same. The biggest thing to watch out for with this is it's gonna be a little bit of a tight fit underneath your vehicle. So if you do need to, you can actually jack it up so you have a little more space to work with, but it's not completely necessary. Today we're not gonna be jacking up our vehicle just to show that it still can be done. To start off the installation I like to lay everything out. So right in front of it we are gonna have all the hardware that's necessary for this. I just like to lay this out just to make sure we have everything, nothing's missing or damaged. And then we're gonna have our brackets too. You're gonna have two sets of these. This is only one set we have right here, but they're all gonna have specific points that will go in your vehicle. Right here we're gonna have our rear one. Next to that we're gonna have our center one. And in front of that we're gonna have the front one. The way you can tell which ones which there's gonna be a indicator on them. It's gonna be a little letter just like that. It's gonna be labeled F, C, and R for which location to go. Then we're gonna come over here to our vehicle now and we're just gonna start prepping. And what we need to do is remove some adhesive tabs underneath our vehicle because they're gonna be covering up some holes we're gonna be using. Now there will be a few under here. You will have some spots marked in your instructions. It's kind of vague, it's roughly gonna be placed like this. Now yours might be a little bit different. The best way I find to really figure out how I'm gonna do this is I'm gonna go to the front most hole. I'm gonna remove that tab and then there's gonna be a series of them underneath and I'm just gonna go with every other tab. So there should be a tab here you remove, leave one, remove one, leave one, and then remove one. Now I'm gonna show you how to take off one of these tabs. They might be a little bit different for you, but with this series this is gonna be a very thin tab and I find it's best just to get a flathead screwdriver and stab into the center of it just like that. Once it's in the center, then I'm just gonna apply force to the side. This should kind of pop out just like that. And then you'll repeat that process on the other two. And now we're gonna grab this little bolt that's gonna be welded onto a plate. And what you're gonna do is when you remove those little plastic tabs where there's adhesive tabs you are gonna place it right there. With that in place, I'm gonna take a little plastic retaining clip and slide it on. Gonna be a little bit tricky to do. I'm gonna block the camera just for a second. There we go. And it's gonna hold in place just like this. This is gonna prevent this from pushing through when you put your brackets on. When this is done, then you're gonna repeat this process on the other two holes. When you're putting your brackets on, they're all gonna go in the same way. So you're gonna line up that bolt with that hole on top of your bracket just right there. Right now I'm working on the center one. With the other ones like your rear and front you're gonna have a tab that wraps around the back right here. Starting off with a flat washer, a split washer, and then I'm gonna put on my bolt or my nut. Once you have it on there, you'll just kind of keep threading it. Eventually you're gonna reach a point where you're gonna get a little bit of resistance. That's gonna be a good time to stop. Now if you feel like it's just kind of sliding around and it's not gonna tighten up at least a little bit what you can do, is just pull down as you're tightening that nut so that plate doesn't spin around on you. And now I can move over to the other brackets. And for this next part, this is gonna be kind of hard to see underneath our vehicle. So I'm gonna show you the hardware now. We're gonna have our M6 hardware. So that's gonna consist of this bolt. You're gonna have two flat washers on here. One is gonna go on first and then the next one will go on with your split washer and then your nut. And I'm gonna show you that a little bit more in depth now. Now we're gonna start using that hardware. So I'm going over to my brackets again and you're gonna find that on your vehicle you have this little hole here. That hole is gonna line up with a hole on the side of this bracket. I've already lined mine up, but if yours isn't lined up, you can just simply push it back and forth until it is. That's why you leave this a little bit loose when you're starting off with. As you can see, I only have one washer on my bolt at the time being and I'm gonna push this through the other side just like that. The reason I do it this way is 'cause it's gonna be a little bit easier to put my nut into place from the side. Now I'm gonna put on my washer and lock nut. We're gonna move back over to our bracket now and you're gonna find that you have this hole on your vehicle. It's gonna be underneath. This hole should be lined up with the hole on your bracket. If it's not, you can just simply push this over to the side either which way until it is. That's why we didn't tighten this down all the way. Now I'm gonna show you our M6 hardware again. I only have that one washer on it right now because one is gonna go on one side of the bracket and try to push that through. With that through, I'm gonna put that other washer and that split washer on. Get on just like that, I'm gonna grab our nut and thread that on. Again, we're only gonna do this hand tight. There's gonna be two of these that go on each one of your brackets. And once you're done with that, you repeat that process, for the other two brackets. And what we're gonna do from here is we're gonna grab our running boards now and place it next to our vehicle 'cause we wanna make sure it's in the right orientation. So you wanna make sure that you can read ARIES right side up just like this. And we're just gonna flip it around and we can start following our mounting plates. So you're gonna have three per side. And the way this is gonna go in is we come over here. You notice we have these bars on either side, this is gonna go in an angle, rotate and seat into place just like this. Once you have one in we'll just install the other ones. And what we're doing here is kind of just roughly placing 'em in here, line 'em up to this. Now if you have one that doesn't wanna go in, 'cause I'm finding a lot of resistance, what I'll do is just find another spot and just slide it over into place. And with them all on, I'm just gonna lift up on this, flip it around and set it on top of my brackets just like that. To fully install this we're gonna use our M8 hardware, so it's gonna be your larger bolts and we're gonna use a split washer and then a flat washer on top of that. And you wanna use two of these per bracket. The way we're gonna do this is we're just gonna screw these bolts into that mounting plate just like this. When we're first doing this, we're just gonna loosely install them so we could make our adjustments later on. I'm gonna show you what it's actually gonna look like. Here it is now. We're gonna have this channel right in our bracket and we just wanna line that up with our plate and gonna push this bolt through until it lines up completely. There we go. And we'll just thread it on. I am just gonna get a couple threads on there 'cause I'm gonna put my next one on too. What I'll do sometimes is stick the bolt through to try to grab that hole on that plate. If I can't, I'll just kinda push the plate a little bit until it is lined up. With this in place, we're gonna just adjust it now. We wanna try to get this as centered as possible. So just think about this when you're trying to use this on a daily basis, where you might want this to sit. You can just slide this back and forth. Sometimes if you tighten a little bit too much, it might not shift as much as you want, so just kind of loosen those bolts a little bit. Just like that. There we go. You can even pull it in and out some. Just find the right spot for you. And this is looking pretty centered on my vehicle. And from here we're just gonna tighten up all that hardware. First we're gonna start with our brackets and then we'll move over to the running board itself. Something I found too is it's kind of hard to get some sockets in here, even if you have the extended ones. So what you could do is even grab a wrench and tighten it up that way. You're just gonna have to use this in small increments. It might take a little bit, but that's only if your sockets won't fit in here. It's also gonna be pretty tight by our 10 millimeter hardware. So what I'm gonna do for that is I'm gonna use our socket and wrench on one side and just a 10 millimeter wrench on the other side. And this way I can actually get the space that I need to tighten these in place. And you just repeat this process for the rest of them. And when you go to tighten down the running board completely, you'll find that you're gonna need a 13 millimeter socket and wrench to do that. Again, there's probably gonna be a couple tight spots to get into. So in those cases I recommend just using a wrench. But when it's all in place, then we can just kind of test it out, make sure it feels pretty sturdy. And if it does, you can take it out for a ride. But that's just a look at the ARIES running board on our 2024 Dodge Durango. I'm Matt, thanks for watching.

Very nice look
Doesn't sit down to low or stick out to far. Just right.
Great company
Only received side steps but no installation hardware. I like the look of side steps but I will update this post when I receive the rest of my order.
I really like the look it gave my Silverado. Big asset to it. Installation was pretty simple. You supplied all the necessary hardware to do the job.
Very well made, attractive and simple.
Andy at “e-Trailer “ confirmed the size, and was very knowledgeable about this product. Told me to call him with any questions or problems with installation.
Written instructions shipped with product are detailed with an option of an on line instruction video.
I have not yet installed the running boards, as I am waiting for my truck to be delivered.
I want to thank all those involved with my order, Kerri, George, and Nicholas. Originally I ordered the 75" bars (which shipped the same day I ordered and arrived 2 days later. After rain delays at my end began installation but found they were too short (I had mistakenly ordered for and extended cab not a crew cab.) I called and spoke with Nicholas and he found a set of the 85" rails and got them shipped that day and I returned the shorter rails for credit, I had to pay the return shipping but heh, it was error. Everything went together with no problems and looks great. I still paid considerably less than MFG retail. Thanks all!
Easy installation on my F-550 1 hour total time. Good foot base to enter and exit. Would have done 5 star but they were scratched on arrival
great service-Britney went above and beyond
thank you
they r great and the only thing that would make them better if they were electric and trimmed in red

I love them and the look so natural, like it came with the car. They were extremely easy to install. 100% worth it.
Info for this part was:
At etrailer.com we provide the best information available about the products we sell. We take the quality of our information seriously so that you can get the right part the first time. Let us know if anything is missing or if you have any questions.


Thank you! Your comment has been submitted successfully. You should be able to view your question/comment here within a few days.
Error submitting comment. Please try again momentarily.