
To see if this custom-fit item will work for you please tell us what vehicle you'll use it with.
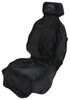
These premium mud flaps are easy to install and digitally designed for a perfect fit. Protect your vehicle and your trailer from road debris. Flaps are constructed of durable thermoplastic resin.
Features:
Precision fit, durable components and ease of installation make WeatherTech NoDrills your first choice in mud flaps. Installing mud flaps has never been this painless.
Videos are provided as a guide only. Refer to manufacturer installation instructions and specs for complete information.
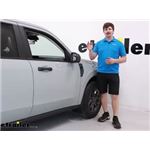
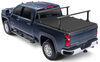
Hi everyone, Aiden here with etrailer. Today we're gonna be taking a look at and showing you how to install the Weather Tech no drill mud flaps for your 2022 Ford Maverick. Now there's gonna be a set, we've got the front ones installed right here but if we go to the back of the vehicle, we've also got a set for the rear. So it's gonna be full coverage for your vehicle, both sides, obviously, we've got the passenger side installed right now and it's gonna be the same process on the driver's side. It's gonna give us a nice layer of protection to make sure we're not kicking up rocks and hitting the back of our vehicle. Let's check 'em out.
Now this is gonna be a rigid mud flap. You can see, knocking on it right now, that there's really not any movement here. It's a pretty firm structure. It's custom fit for the Maverick, so it follows the contours of our vehicle all the way up to here, even, where we've got a small divot and matching this indentation between the plastic piece and the body panel moving up to the top. So it's a nice custom fit on both sides, the front and the rear, and it uses factory mounting locations for the install.
It's gonna be a thermoplastic resin material, keeps it nice and sturdy and UV resistant. It's gonna be very similar in color to the black plastic that's already on your Maverick. My truck here is a little bit dirty right now, but if it we're cleaned then this would match quite nicely so it blends in and you really don't notice 'em as they're on the vehicle. And like I mentioned before, it comes with the front and the rear. And the installation process for both is gonna be very similar.
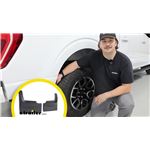
There is some minor differences in what pieces we're gonna be removing from the factory hardware on the front and rear, but we'll cover all those differences in the install. So let's check out and see how we did those. We're gonna start our installation on the front end of the vehicle in the wheel well here. There's gonna be three push-pin fasteners we need to remove, one at the bottom right here, one in the middle, shortly above that, and then up a little bit above this divot, one right there. It's just the first three from the bottom.
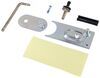
Take a trim panel tool, that's gonna be the most helpful for this. Pop the middle part up and then pull it out by the base and repeat that for the other three locations. We can then take the fender liner and pull it back. Now on these two metal tabs for the middle and the top mounting holes, we're gonna have some clips to install that come in your kit that look just like this. Pop those onto the tabs so that we can thread into them. We can then take the mud flap. RH is gonna be passenger side, LH will be driver's side. You can see that the back here, we've got a bunch of contours. They're gonna match up to the wheel well here, particularly this extrusion here will match up with the indent on the wheel well and the fender liner right here. So it's easy to tell what matches up to what, put it in place and secure it down. The top two locations are gonna get new screws provided in your kit that'll be tightened down with a six-millimeter socket, let's get those started and threaded in. And then the bottom hole's gonna get one of these push pin fasteners new in your kit. Just pop that in, then push the center section down to expand and secure it. Now the rear mud flap is gonna be much of the same process, a little bit different in the hardware, though. The bottom two locations are going to be factory screws. Remove those with the exact same socket as before and then we're gonna save those for re-installation. And then the top mounting location is another one of those push pin fasteners that we'll need to remove. Much like we did on the front, that one top location is going to get one of these clips that lines up over the hole. Put the fender liner back in place, grab the appropriate mud flap for that side and then use the new screw provided in your kit for the top hole and those factory screws for the middle and bottom holes. And once that's in place, I always like to shake 'em, just make sure that none of the mounting locations are loose, checking that I'm getting a good fit all around the shapes of the vehicle. And once I've verified that I am, you can repeat that process on the other side. And that'll complete our our look at and installation of the Weather Tech mud flaps for your 2022 Ford Maverick. Thanks for watching.

Great
Info for this part was:
At etrailer we provide the best information available about the products we sell. We take the quality of our information seriously so that you can get the right part the first time. Let us know if anything is missing or if you have any questions.


Thank you! Your comment has been submitted successfully. You should be able to view your question/comment here within a few days.
Error submitting comment. Please try again momentarily.