
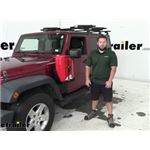
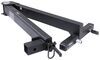
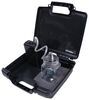
MORryde Jerry Can Mount for Jeep Wrangler JK and JKU - Driver Side
Item # MR86MR
Retail:$257.05
Our Price: $224.99
You Save: $32.06
Confirmed to Fit
2009 Jeep Wrangler Unlimited
Will this fit?
To see if this custom-fit item will work for you please tell us what vehicle you'll use it with.
This item qualifies for Free Shipping
In Stock


- All Info
- Reviews (1)
- Q & A (0)
- Videos (3)
- Photos
2009 Jeep Wrangler Unlimited - MORryde Jerry Can Mount for Jeep Wrangler JK and JKU - Driver Side
- Cargo Mounts
- Jerry Can Holder
- JK
- JKU
- MORryde
- Black
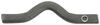
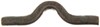
- 14-1/4 Inch Wide
- 7-1/4 Inch Long
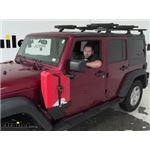
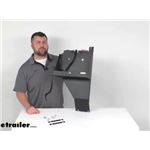
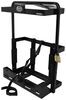
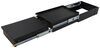
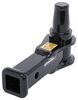
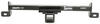
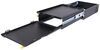
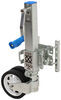
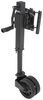
This jerry can mount lets you carry fuel so you can fill up when you're off the beaten path. Works with NATO-style or Scepter fuel cans. Also compatible with a RotopaX fuel mounting panel. Installs behind the driver's-side fender.
Features:
- Durable jerry can mount with tray lets you transport fuel in a Scepter or NATO-style gas can
- Compatible with RotopaX fuel mounting panel (sold separately)
- Maximizes the storage space inside your Jeep
- Ratchet strap holds jerry can in place
- Rugged, black powder coated steel stands up to the elements
- Bolt-on installation behind the driver's-side fender - no drilling required
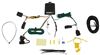
- Uses included and factory hardware to install in your Jeep's preexisting holes
- Made in the USA
Specs:
- Overall dimensions: 7-1/4" long x 14-1/4" wide x 24-5/8" tall
- Tray dimensions: 7" long x 14" wide x 11-1/4" tall
- 1-Year limited warranty
JP54-018 Fuel Can Holder for Jeep Wrangler JK and Jeep Wrangler JK Unlimited - Driver Side
Installation Details Alternate Instructions


Video of MORryde Jerry Can Mount for Jeep Wrangler JK and JKU - Driver Side

Videos are provided as a guide only. Refer to manufacturer installation instructions and specs for complete information.


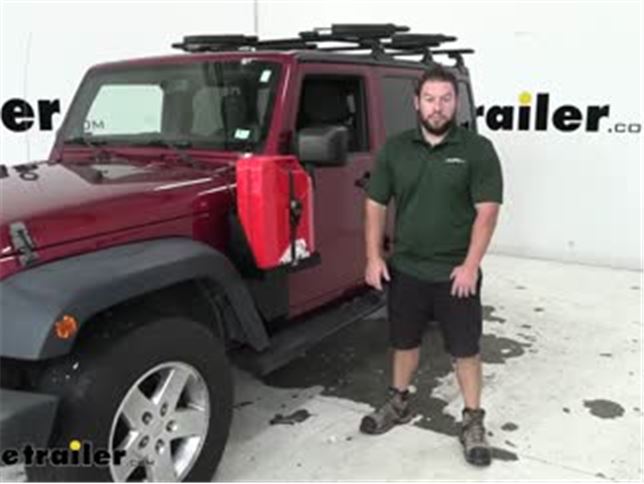
Video Transcript for MORryde Driver Side Fender Mounted Jerry Can Holder Installation - 2013 Jeep Wrangler Unlimited
What's up everybody. It's AJ with etrailer.com Today we're gonna check out this MORryde fender mounted, Jerrycan holder on this 2013 Jeep Wrangler Unlimited. And this is going to hold the gas can right here for a designated spot, which is really handy. You don't have to worry about trying to find space for it in your Jeep or any on your cargo carrier up top or back there. Your car probably not going to have off-roading, cause that's gonna cut down on your ground clearance. So this is a dedicated spot for it.
Stays there nice and tight. It's not going anywhere. Let's check it out. It's gonna be great if you off-road a bunch or even if you like to go over landing, you always want to make sure you have that gas with he had just in case you get too far away from the gas station. There's not one anywhere near, you wanna have this so you can get back.
So this is a good option because again, if you're off-roading or over landing, you know. If you're over landing you might have a tent up top, so that's going to limit your space up there. You can't have a cargo carrier up there, and then you can't have a cargo carrier on your hitch either cos if you're off-roading, then you're gonna go with those inclines. You don't have that ground clearance with a cargo carrier. So you're not going to put anything on your hitch.
This is the best spot for it to go because it's out of the way and secure. What it's made for is it's made for gas cans up to five gallons. So we have it kind of maxed out right here with the NATO style gas can. It will also work with Scepter gas cans and it comes with this ratchet strap included. So it's got the points here at the bottom for the hooks to go in there.
That way you can get this really tight. You can see we're shaking back and forth. There's a little bit of movement but not much at all. I can actually shake the whole Jeep from the mounted position back and forth. So that's not going anywhere either. Adding it onto your Jeep, it is going to add about an inch from the fender well here. You can see it sticks out a little bit more, and that's with standard Jeep tires. So chances are if you have bigger off-road tires, they're going to stick out a little bit further anyway. The one issue we found though and that's because we have the maximum gas can in there too, by the way. If your gas can's smaller you're not going to have this issue, but the door does hit. But the doors pretty open for that to happen. So we're about here is where it makes contact. But if you come over here and look, this is pretty wide open here. I mean, that's, you can still get in and out of Jeep just fine. You just won't be able to fling that door open. The whole thing's gonna be made of a black powder coat steel. Let's get some measurements here on the inside from inside to inside. It's going to be 14 and a quarter inches here from here to here. And then from the back, it's going to be seven and a quarter inches from right there to right there. As far as installs go, it can be a little intimidating when you're first going over the instructions, but it really isn't that bad. You're going to be taking some bolts out and some panels out here. You're gonna have to remove the entire running board down here, install this bracket. But the good news is you don't have to drill. You're really just removing bolts and replacing those bolts when you add these brackets on there. But that being said, this is one of those things that once you get it installed, it's staying there in place. So it's not gonna be one of the things you can easily just take off and put on whenever you want. That being said, though, just follow along and see how we did it. First thing we're going to do for the install is get this J-nut installed up here at the Jeep, but to do that, we have to move some of these bolts along the way to be able to pry this out. So coming up with my ratchet, I'm gonna go, I'm gonna remove these bolts here. Now I went ahead and removed some of the other bolts around here just to get a little more space to rip all this panel. We even removed some of the bolts up here too. We want to get this just so it's easier to pull this out. You can see it and get a little bit more out of it now. And that's just what we need to slide in our J-nuts. So we're going to put that in with this side facing down. So this open hole is here at the top. So, with one hand I'm going to pry it out. The other hand I'm going to try and push that on there. I've been trying to keep my hands out of the way so you can see it, but I might get in the way a little bit. Kinda just pry against it, now it's almost there. I just wanna make sure I line it up right. Push on it and then I can kinda push it into place like that. There we go. Now we went ahead and replaced all the bolts, put them all back in. After we had gotten this J-nut installed and leaving this one out, cos we're gonna need that to attach the bracket. Down here at the running board we're going to remove this bolt here. That's the arm. And then these two nuts right there. And then we're going to repeat that process all down the line on the arms to fully remove this running board to install our bracket. With all that hardware removed now I can go ahead and remove the whole running board and set it aside. Back up top here we're going to do some assembly with our canister holder and the bracket. So what we're going to do is I'm going to set this into place and we're going to use these holes. Here is the ones that we're going for. Cos these at the top, both here kind of makes a square and that's going to give us the most clearance and that's what we need for our Jeep. So I'm going to set it here, in the place, line up those top holes. Looks like they all four line up here and down there too. So now I can start adding the bolts and how this is going to work is you're gonna put a washer on both sides of it. So we'll start here, put our bolts through there and then repeat that for your other three holes. Let's go ahead and this is going to help keep it aligned when you go to tighten up on the other side. All right, now those are there. It's gonna hold it in place so you won't shift around as much. And come back on the under side with these washers and nuts and put a washer up there and then a nut behind it. So it's gonna go like this on the other side of the bolt, kinda lift up one side so I can show you exactly what we're doing. So the washer and then the nut. So you can kinda give them a hand tight, at least started, so I can come back and tighten them down. Now that I can start them on hand tight, gonna come back with the ratchet and a wrench to hold the bolt head on the other side and start to tighten them down. And we're repeat that on all three of the other bolts. Now it's time to go ahead and set it up on our Jeep. So, I'm gonna set this, lining up, these holes on these tabs and then try and show you before I do it. This one is going to go right there on that J-nut we installed earlier. And then this one's gonna go on the side of the Jeep. So, let me talk about how about I just set in place to show you. And this kind of helps you cos that sits on the top. So you don't really have to hold this and as much. So that frees up a hand to grab one of the bolts to run that in. So this is the hardware they gave you drop that bolt in there, get it hand tight. And the J-nut you might have to move this around just a little bit. There we go. Now, it's turning in there pretty easily. And then I got that one run down. Okay, I'm going to go ahead and fill this one so don't have to hold this anymore. Just going to take the factory bolt that we removed earlier, put it through this one. Again, you want to make sure that it's pressing up against that bolt. It's kinda keeping it from going in there straight. So I will adjust it. I've got my knee here at the bottom, kinda moving it up and down as I find the right spot for it. There we go. Now we're going to go ahead and bring our running board back up. We're going to line up with the holes and our bracket. Now we left those bolts that we installed loose on this bracket, so it has a little bit of movement. And we're gonna put this back in. Just make sure you kinda aim them all the same time. And it's far easier see. Just push that in and that'll hang there as we put the hardware back on there. Now back under here, we're just gonna replace all our hardware that we removed before. Back up top, we're gonna come back and tighten down the hardware we installed now that everything's put back into place. And now we can put our rubber stops there. We're just gonna push them into place. You can see once you get past this cone shape they're going to stay right in there if you get it in that groove, you just kinda got to push on it. Maybe twist it a little bit, but not too much, cos you don't want to break off. They're just rubberized. So you just push it in like that, goes into place you see, it'll stay right there. We're gonna do the same thing with this one as well. If we we're going to permanently install this we would go ahead and peel off this back part and it would be sticky, so you can stick it to the bottom here. And this is a pad, so when you set your Jerrycan in there that it doesn't rattle around. It's going to work in combination with these rubber parts. But since we're just temporarily installing this to show you how to do it I'm just going to set it down in there. Overall, It was a little bit more of an in-depth install than I thought it was going to be originally, but it wasn't too bad. We got it done pretty quickly. It's on there, nice and tight. I can just shake the whole Jeep from this mount. So it's not going anywhere. That in combination with the strap, the ratchet strap it comes with, holds it in there nice and tight too. There's not going to be rattling while you're driving down the road and it's got those rubber stoppers in there with that bottom. So there's not going to be a bunch of clanging, rattling while you're driving. It's there, it's nice and mounted. You have somewhere to put your gas can now that's not inside your vehicle or trying to find space for it somewhere else. It's got a dedicated spot so it's going to be here and out of the way saving room and other places. Plus it just looks cool and makes your Jeep look even more utility. Well, thanks for hanging out. And I hope this helped..
Customer Satisfaction Score:
91% were satisfied with this product
9% of customers were not satisfied
- Wrong item was ordered
Customer Reviews
MORryde Jerry Can Mount for Jeep Wrangler JK and JKU - Driver Side - MR86MR
Average Customer Rating: 5.0 out of 5 stars (1 Customer Reviews)
This jerry can mount lets you carry fuel so you can fill up when you're off the beaten path. Works with NATO-style or Scepter fuel cans. Also compatible with a RotopaX fuel mounting panel. Installs behind the driver's-side fender.by: Robert 03/28/2021
1
1
See what our Experts say about this MORryde Jeep Storage
- MORryde RotopaX Mount For Carrying Fuel on a 2007-2017 Jeep Wrangler JK or JKU The MORryde Jerry Can Mount for Jeep Wrangler JK and JKU is capable of carrying a Nato-Style Jerry Can which is 20liters or 5.3 gallons(40lbs depending on can). We carry both the Driver Side # MR86MR and Passenger Side # MR26MR. If you use the RotopaX mounting system the Driver Panel # MR96MR or Passenger Panel # MR46MR, MORryde recommends not to exceed 50lbs of weight on the bracket.
view full answer...
Info for this part was:

Test Fit:
Andrew K

Video Edited:
Jacob T

Video Edited:
Chris R

Edited by:
Daron K

Updated by:
Alex H

Updated by:
Konnor K

Installed by:
Michael B

Written by:
Matthew E

Video by:
Aidan B
At etrailer.com we provide the best information available about the products we sell. We take the quality of our information seriously so that you can get the right part the first time. Let us know if anything is missing or if you have any questions.
Product Experts Available Now!
Call 1-800-940-8924
Thank you! Your comment has been submitted successfully. You should be able to view your question/comment here within a few days.
Error submitting comment. Please try again momentarily.