
To see if this custom-fit item will work for you please tell us what vehicle you'll use it with.


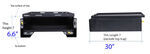
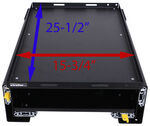
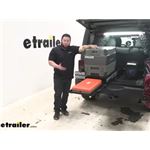
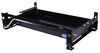
Cook meals on the trail with this slide-out camp kitchen for your Jeep Wrangler. Modular system supports a portable fridge and a 2-burner propane stove. Nesting trays are easy to open and lock in place while stored to prevent movement during travel.
Features:
Specs:

Customer Satisfaction Score:
96% were satisfied with this product
4% of customers were not satisfied
Ratings & Reviews


Great to use. Made good.
Product arrived, bent and damaged out of box. Box seem to arrive in good condition no indication of damage during shipping Top tray is bent and scratched slides. Don’t operate as smooth as they should. I will include some pictures to show damage I would appreciate a phone call from a customer service rep to decide what I want to do. Overall, the product is what I expected just not the quality thank you and look forward to hearing from you. Email response is fine also.
Fast delivery, and fit like a charm
I like the design and find it useful. Once again, there were quality issues with this unit. The first one I received had the slides that accept the extended table missing. Was not even mounted in there. Morryde sent me a replacement and I was eventually able to get everything installed an working
Fast forward several months and many miles on rocky roads and plain old pavement. I have had one rivet fall out. Was able to replace it with a bolt. I just now found that the driver side slide no longer locks when sliding all of the way out. Frustrating. I will see if I can fix it myself, but the pop-rivet assembly method does not make things simple. May see if Morryde will fix it under warranty.
It works fine. But, Morryde has quality control problems. Of the various components I ordered for the trail kitchen, every single one sans the molle panel had an issue. On this one,the part that goes closest to the tailgate did not have the right size holes. I had to drill them out to make it fit. Also, there was an alignment problem with the bolt that goes into the passenger side. I had to go to the hardware store to get a button head bolt that did not require the tolerance needed. Otherwise no matter what I did the threads would cross.
Very robust and well designed bolt-in kit for my MORryde Trail Kitchen. The instructions were good and included photos of each step. I had to trim the white spacers by 1/4” to allow them to fit with my factory cargo area carpet still installed.
Very well thought out design. Works great with the separately sold base plate. I used this with the my Dometic CFX 35 and it works great. The installation video was much needed, as the manufacturer provided guide is all wrong. The straps that come with the kitchen will work for any portable cooler that has handles.
My only question will be if this holds up to the many, many miles of rocky overlanding we do every weekend. I leaped for this alternative to Goose Gear’s custom kitchen that cost 3x and would get delivered after Labor Day. This one arrived 3 days after ordering. I’ve purchased many items from etrailer and they exceed all expectations in every encounter I have with their team.
Info for this part was:
At etrailer we provide the best information available about the products we sell. We take the quality of our information seriously so that you can get the right part the first time.


Thank you! Your comment has been submitted successfully. You should be able to view your question/comment here within a few days.
Error submitting comment. Please try again momentarily.