
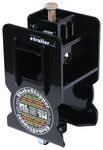
EcoHitch Hidden Trailer Hitch Receiver - Custom Fit - Class III - 2"


To see if this custom-fit item will work for you please tell us what vehicle you'll use it with.


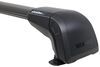
This custom-fit trailer hitch with a hidden cross tube installs behind your vehicle's rear bumper, leaving only the receiver visible beneath it. Aluminum and steel alloy construction is durable and eco-friendly. Powder coat finish resists rust.
The main cross tube is completely concealed behind your bumper, so the only visible part is the receiver itself. It keeps the vehicles original look intact - no bulky metal sticking out - while still giving you full towing functionality.
This hitch lines up with factory holes in your vehicle's frame, so there's no drilling or trimming required. That means an easier install with fewer tools and no risk of damaging the body or undercarriage.
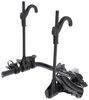
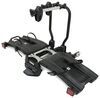
The 2-inch receiver fits a wide range of common accessories like bike racks, cargo trays, and ball mounts. It's the most universal size, so you can easily switch between gear without special adapters.
EcoHitch is built with a mix of recycled aluminum, stainless steel, and steel - all blended to reduce waste while maintaining strength. It's a hitch that helps you carry more and waste less.
A corrosion-resistant primer made from eco-friendly materials is layered beneath a black powder coat to protect the hitch from rust, chips, and harsh weather. It holds up to road salt, grime, and long drives.
This hitch is assembled using domestic materials at facilities in the United States, supporting local manufacturing and consistent build quality.
Limited lifetime warranty
California residents: click here
Videos are provided as a guide only. Refer to manufacturer installation instructions and specs for complete information.
Hi, this is Scott with etrailer. Today we're taking a look at and installing the EcoHitch on our 2025 Toyota Camry. Our EcoHitch on our Camry is a pretty good looking hitch. For the most part, It's pretty much hidden. you're not gonna see any cross tubes. It's gonna have a matte black finish on it, so it's not gonna stick out a whole lot once you get it installed on the back of your Camry.
This is gonna be a 2" hitch, so it's gonna accommodate most of your common accessories that are out there on the market. And another nice thing about it is everything's really accessible on this one. You're gonna have access to your pin holes and your safety hooks real easily. Hitch is gonna have a 5/8 pin hole opening and that's gonna lock in any of your accessories. Now this one won't come with a pin and clip, so you can pick one up here at etrailer.
Another nice option is a locking pin. With that, you'll be able to lock your bike rack onto your car while you're down out on the trail. You don't have to worry about anyone taking that off of the back while you're gone. This hitch is gonna have really heavy duty welded on safety chain loops. It's gonna accommodate either your S style hooks or your clevis style hooks.
So that is gonna accommodate your trailer towing needs. Now as far as measurements go, from the center of the pinhole out to the edge of your bumper, it isn't very much. You're only looking at about an inch and three quarters. Now with that measurement, you'll be able to figure out that any of your accessories that fold up and stow away will make any contact with the back of your vehicle. Now from the top of our hitch to the ground, we are looking at right around 13" for that number.
Now with that, you'll be able to decide if you need any rise in the shank of either your bike carriers or your cargo carriers, for clearance in the back of your vehicle. As far as weight ratings for this hitch, we're looking at a tongue weight rating of 350 pounds, that's gonna be the weight pushing down on the lower section of your receiver. That's gonna be the total weight of your bike rack with your bikes on it or your cargo carrier loaded down with all of your gear. Now for a trailer weight rating, we're looking at 2000 pounds gross trailer weight rating and that's gonna be the weight of your trailer and everything that you have on that. Now keep in mind it's always a good idea to take a look in your owner's manual and make sure you don't exceed the maximum towing weight that you have in there. So best bet is usually to go between the lowest number between your hitch and your owner's manual. If you have any questions or comments about this hitch, feel free to leave any questions or comments down below in the comment section, or you can get a hold of one of our experts here at etrailer. As far as installation goes, from what I can see, this is gonna be about the only 2" option that's gonna be on the market for this vehicle. This hitch is very complicated to put on and this was kind of an all day thing for me and I put on hitches every single day. Now if it's something you don't feel like doing yourself, you can always take a look at our dealer locator and have something done for you locally. If it's something you feel like tackling yourself, stick around, watch our video and we'll help you get it installed. Start our installation, we've got our trunk open and we're gonna need to get our taillights out of the way because we're gonna need to remove our whole entire fascia on the rear. All we're gonna have is these little plastic covers and we just want to get these popped out of the way. Let's keep behind those, pop those out and we'll do that on both sides. Behind that cover we're gonna have three, 10 millimeter bolts. We'll just go ahead and get those out of the way. (drill whirling) (drill whirling) (drill whirling) After our bolts are out, you just want to carefully remove our tail light, just pull back. Now we'll have our wiring harnesses in here. Just wanna push in on the tab, pull back on those and get those out of the way. Both of those, you just push down on the little tap and pull those back. Now we can set our light safely outta the way. On both sides of our vehicle we're gonna have this tiny little clip and we need to get our finger in behind that. It's gonna be really small little clip and you can use a small screwdriver or whatever you have just wanna pull out on that, just wiggle that back and forth and that'll pop out for you. Make sure and put that where you're not gonna lose it 'cause that is a really small clip. Now on our model we're gonna have this mud flap, so I'm gonna go ahead and get these out of the way as well and that way I can make sure there's no other fasteners behind our flap. Now I'm using an angle driver to get this backed out. You can use like a a little handheld type deal to get these out 'cause it is kind of a tight space. Just get these out and set these aside. (drill whirling) If we had one more screw underneath, now we can just pull this out of the way. Now I'm gonna check and see if I have any fasteners behind here and it looks like I do not. So I could probably get away with just taking out the two. This one on the inside and then this bottom one, we should be able to just leave the rest of that on, on the other side. underneath of our vehicle, we're gonna have this large underbody panel. We're gonna need to get this out of the way as well. So what I'm gonna do is just kind of go along and see where it's attached and we're gonna have a whole bunch of these little plastic clips. And best way to do these is just try and get in there with a flathead screwdriver and this work goes back and forth until that center section comes out. And once we get that to come down, pull down on our fastener and that'll come out. Now I'm just gonna follow that along all the way around and get all of our plastic clips out and then we'll move on to our plastic nuts. On the inside part of our panel we're gonna have some 10 millimeters., just want to get those removed. And some of these are gonna be plastic nuts, so don't put a lot of upward pressure on it and if you have to, you can pull down on the panel just a little bit. (drill whirling) Now here in the middle of our panel, we're gonna have a different size. These are gonna be 13 millimeter. (drill whirling) And again, they're gonna be a plastic nut so if you have to, you can pull down lightly with a little bit of pressure, you just don't wanna be pushing up on 'em. (drill whirling) Now with those loosened up, we can remove our panel and get this set off to the side. We're gonna need to lower our exhaust a little bit to make room and remove a heat shield. So what we're gonna do is we're gonna use a cam buckle strap and we're just gonna find a good place to get this underneath. We're gonna need this to help support our exhaust when we remove our mounts, get that hooked in place, pull that tight, that's gonna help support our exhaust when we remove our mounts . 12 millimeter socket, we're gonna have our bracket that's kind of hidden up in here. You're gonna see two bolts for that. We just want to get those removed. (drill grinding) (drill whirling) For the bracket on the back of our vehicle, I still like to hold onto the exhaust when I get down to my last one, even though we do have the strap. (drill whirling) I like to do that just to be sure. (drill whirling) Carefully let that down. Now we're gonna have a heat shield under here. We just want to get that removed. (drill cranking) That's gonna be two 10 millimeter nuts. (drill whirling) Now we're gonna remove that and set that aside. To remove our fascia, we just wanna start on the edge and just pull back and it's gonna pop out along our edge. (plastic bolts popping) All the way across the back. Now once we get that pop back, you may have an electrical connection. We have one here, just wanna pull in on that clip, push down on your clip, pop back. Now we can remove our fascia. On our bumper beam, we're gonna have this foam. We just want to pop that off. That's just gonna slide into these holes. Remove that for now. We'll get that set aside. We're gonna have these end caps, plastic. We want to get those removed. Those are gonna be a 10 millimeter socket. Those will just slide out the ends and you're gonna have this little plastic tab over here that's gonna be in the way. You can bend that up a little bit just to get that to slide out of the way. With that out of the way, we're gonna have this plastic cap. You're gonna have a little tab right here in this little square. Take a screwdriver, push that down and then you can rock that back. We'll do that on both sides. To get our bumper beam out of the way, we're gonna have six 14 millimeter bolts. (drill whirling) (drill whirling) (drill whirling) Once we get down to the last one, we wanna make sure we're holding our bumper beam in place so it doesn't fall off. (drill whirling) With all those out, now we can remove our bumper beam. We're gonna have this hole where there was a rubber plug. We just wanna remove that, it's kind of midway back on our frame. We just need to enlarge this a little bit 'cause we're gonna need to get a little plate to go through there. And this one's just not quite enough to do it. So I'm gonna use a step drill and I'm gonna enlarge that a little bit till I get it to where I need it to be. (step drill grinding) That should do it for it there. I'll come back through with a little black paint and just get that covered up so we don't have any corrosion in the future. On the passenger side we're gonna have this backup warning alarm speaker in the way. We want to get that removed because right below that is the other hole that we're gonna need to enlarge. (drill whirling) I'll just tuck the speaker up out of the way and I'll do the same thing with the en enlarging on the passenger side. For our hardware that's gonna go in the holes that we enlarged, we're gonna have our gold-colored bolts. We're gonna have a lock style washer that goes on top of our black spacer. Now we're gonna take our fish wire that comes in our kit and we're gonna thread that onto the end of our bolt. Now we're gonna do what is called a reverse fish wire. We're gonna push our plate up through the hole, push our bolt up through. Now we can pull our bolt back through our plate, carefully remove our fish wire 'cause we will be using it on the other side. In the rear of our vehicle, we're gonna have this sealant. We're gonna have some on the outside and on the inside. We're gonna wanna remove this. So I'm just gonna take multi-tool and just kind of run up this and get that removed. You can use a putty knife or whatever you want to use. I'm just gonna use this and we'll go ahead and get that removed. (cutting tool whining) After we have all that cleared up, you're gonna see a little bit of bare metal. I do recommend you come back through with a little bit of paint and just touch that up and let that dry and I'll do that on the inside and the outside. We have our heat shield and I went ahead and marked out the cuts that we're gonna make in it. We need to make clearance for where the hitch is going to be and also for where our bolt is going to come through, that is in the enlarged hole area that we made. We have that bolt going through there. So I'm gonna go ahead and get this hole drilled out and then I'm gonna snip this area out and we'll see how that fits. (step drill grinding) I am just gonna take some tin snips and run across down here and you can use either a dremel or snips work as well. Whatever you have, this stuff's pretty thin. So it's gonna cut pretty easy for you. I do recommend this stuff can get pretty sharp and 'cause it's thin, I would make sure you have some gloves on before you start doing this so you're protecting your hands. Now we have that all cut out where we need it to be and this should work out for us really well. It again, I do stress that you gotta be careful with this stuff, especially when you're cutting it with snips. This stuff gets really sharp, you're gonna get some jagged edges, so just be careful of that when you're trimming this up. Now we did go by our measurements in our manual, so we're gonna go ahead and test fit it up and that should be where we need it to be. If not, we can always come back through and trim it up or widen any of the holes that we need in case we got off just a little bit. So it's no big deal, but we'll go ahead and we'll get it put in place. Now we'll just line up the studs where our heat shield mount goes and that looks like it's gonna line up very well. Now we'll get our hitch lifted into place. Now make sure you be careful not to push that bolt through the frame. We wanna make sure we don't have that go through. Now getting your hardware in place with this one is really very tricky. Just getting your holes to line up and you're gonna have to have your exhaust hanger off of your isolator and ready to get mounted here because this is where it's gonna go with your bolts that you're running up with your hitch. Now keep in mind it's gonna take maybe a couple of your buddies to help you out with this to get it, everything moved around to get it put in place 'cause it can be really tricky. Back here with the bolt that we had run through our frame, we're gonna have our flat washer, our lock washer, and one of the gold colored nuts holding that in place on both sides. For now, we're gonna come back through and torque down our hardware that we have underneath of our hitch and then we'll move on to the next step. So what you're gonna want to do is go through your instruction manual and make sure, because you have different torque settings for different sized hardware. So you're gonna want to pick your way through that and pick the right setting for each piece of hardware that you're torquing down. Now if you don't have a torque wrench, you can always pick one up here, etrailer. We have a few options available for those, but if it's something you want to get done right away, you can always take a look at your local auto parts store and you should be able to rent one there. (torque wrench beeps) We are gonna take our backer plate and we're gonna have a large hole and a small hole. We're gonna take it and run it through. We're gonna have our bolt with our washer. We're gonna run that through that and we're gonna take one of our large gold washers, run that onto our bolt, follow that up with a lock washer and then our nut and we're just gonna get that loosely in place for now. With those in place for our upper hole, we wanna enlarge the hole that's there or drill a hole to 3/8. (drill whirling) We can take our bolt, it's gonna be the smaller gold bolt, a washer, run that through, make sure you're holding up your plate in the back, let that go through there. Then we're gonna follow that up behind with a flat washer, a lock washer, and then the nut. Now that we have our hardware in place here and snug down, we'll come back through and torque down our hardware to our specifications in our instruction manual. (torque wrench beeps) Now we'll get our exhaust put back into place. Just wanna start by getting our rear hanger slid over, our exhaust hook that we put back on, and don't forget, we have our rear exhaust bracket as well, get those put back in place. Now we'll get our bumper beam put back in place the same way that we took it off. (metal clacking) Now we got our foam piece put back in place and our end caps, we got everything good to go there. Now we're gonna finish trimming up and we're gonna end up having to put this up in place here. We're gonna get that screwed in place and we'll show you where we're gonna do that. We couldn't get the hole over here where it's supposed to screw in into with the supplied hardware to work, it just wouldn't line up. I just took a self tapper and self tapped it just in behind our hitch and that's gonna work just perfect for us and I will move on to our next step. To finish up our installation, we had to trim a little bit more out of our bumper just to get that to work, but we left quite a bit in here because if we we inchesre cut anymore it wouldn't really look right because it was in this bend so we left it. Other than that, we had to trim out our belly pan and get all our fasteners put in for that and we had to pull it back off and trim out some more and it got a little bit tricky, so be prepared to have to trim up a few times when you're fitting these things back together. It can be a little tricky and time consuming. Other than that, we put everything back together in reverse order and now we have everything all done for our installation. And that was a look at the EcoHitch on our 2025 Toyota Camry. I'm Scott with etrailer and thanks for watching.
Customer Satisfaction Score:
94% were satisfied with this product
6% of customers were not satisfied
Ratings & Reviews

Well, I just finished installing this receiver on my 2026 Toyota Camry Nightshade. Hitch look amazing BUT it took me 4+ hrs to install and I'm a licensed professional engineer! Study the video carefully before ordering. While the receiver looks great and is well constructed I'd probably take it to a muffler shop or professional installer next time and just weld it on. Level of complexity due to vehicle disassembly was 4.8 out of 5
Do you have a question about this Trailer Hitch?
Info for this part was:
At etrailer we provide the best information available about the products we sell. We take the quality of our information seriously so that you can get the right part the first time. Let us know if anything is missing or if you have any questions.


Thank you! Your comment has been submitted successfully. You should be able to view your question/comment here within a few days.
Error submitting comment. Please try again momentarily.