
To see if this custom-fit item will work for you please tell us what vehicle you'll use it with.


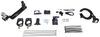
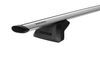
This custom-fit trailer hitch with a hidden cross tube installs behind your vehicle's rear bumper, leaving only the receiver visible beneath it. Aluminum and steel alloy construction is durable and eco-friendly. Powder coat finish resists rust.
Features:
Specs:
The EcoHitch Hidden trailer hitch is designed to be as inconspicuous as possible. The hitch's cross tube bolts onto your vehicle's frame, behind your rear bumper. No drilling or welding is required. Once the hitch is installed, only the receiver will be visible beneath your bumper. This means that your vehicle can maintain its stylish, from-the-factory look, and you won't have to do any major modifications to its body or frame.
With a combination of aerospace-grade aluminum, steel, and stainless steel, each EcoHitch is made of a strong metal alloy that will withstand the test of time. The lightweight alloy is composed of recycled materials. Traditional steel hitch manufacturing can use coal or oil, which can contribute to harmful gas emissions. The EcoHitch's recycled materials limit the carbon footprint during manufacturing, so you get a sturdy trailer hitch while also helping the environment.
This EcoHitch trailer hitch is tested for durability and sturdiness. Using Finite Elemental Analysis (FEA), individual points of stress on the hitch can be detected and remedied. Designers can accurately test the hitch to ensure that it will meet or exceed SAE J684 standards. The EcoHitch Hidden trailer hitch is carefully researched and strength tested for a durable, high-quality hitch that can resist damage while on the road.
At etrailer.com we're committed to the products we sell, and to our customers. Our experienced and knowledgeable staff are available via both phone and email to address your questions and concerns for the lifetime of your hitch. The technicians at etrailer perform hitch installations on a daily basis, making them a valuable resource for do-it-yourselfers. The one-on-one, personal service you'll receive comes straight from an expert in the towing and automotive field. We've installed it, we've wired it and we've towed with it, so whatever your question, we can answer it.
California residents: click here
Videos are provided as a guide only. Refer to manufacturer installation instructions and specs for complete information.
Hey there, neighbors. Kevin here with etrailer. And today, we're gonna be taking a look at and showing you how to install the EcoHitch, Trailer Hitch Receiver here on our 2023 Hyundai Palisade. The Hyundai Palisade is a great family vehicle. It's got plenty of seating so that you can take everyone along with you, but when you have everybody loaded in there, there really isn't that much room for all the gear that you need to bring with you. So that leaves you with the question of how you're gonna get that there.
The best option that it's gonna be for our Palisade is going to be installing a Trailer Hitch Receiver, just like our EcoHitch, which we put on today. And that's gonna allow us to either haul a cargo carrier, a bike rack, or we could tow a small trailer behind us, as long as we have the correct components to go along with that, which would be, at minimum, our four pole wiring. Now a receiver tube is going to be a two inch by two inch opening, which is gonna fit the majority of accessories out there on the market. Now there are a couple of one and a quarter inch accessories that you might also wanna throw in here, but you can easily just pick up a reducer sleeve that would slot into the inside of our receiver tube, dropping it down to that one and a quarter inch sizing so that way, you can install your accessory. Now there are a couple of measurements that are pretty important when it comes to our trailer hitch, the first one being our ground height to make sure that when we hit a steep incline or decline, we're not gonna have the shank of our accessory bottom out and scrape against the ground.
So what we like to see is a minimum of 12 inches. Otherwise, you're probably gonna need to use an adapter to raise that height up. So right now, I'm getting roughly 12 and three quarter inches, so we know we're not gonna need an adapter here. We are gonna be good to just slot that right in and not have to worry about it scraping the ground. Now the other half of this is going to be whether or not this is a folding accessory.
So for those folding accessories, what we want to do is measure from the center of our hitch pin hole, out to the furthest point on our fascia, which looking at our fascia, it looks like it's this point right here, right at the lift gate. So measuring from there, looks like we're sitting at less than four inches, probably about three and a half. So what we would need to do is just look at the accessory. We would go from the center of our hitch pin hole, out to the closest part of that accessory, when it is folded up into the folded position, and then we'd be able to determine if that's gonna be enough clearance for us to fold up our accessory without scratching the back of our vehicle. Now the trailer hitch isn't going to come with a hitch pin, so you will wanna make sure that you pick up a five ace hitch pin and clip so that way, when you're installing your accessories, whether that's that bike rack or a ball mount, like what I have right now, you can easily pop that in, put in your clip and know that it's nice and secured.
Now, I typically like to recommend getting a locking hitch pin so that way, no one can ever come by and just take off with your accessory that you spent all your hard-earned money on. So I would definitely look into that. Now, the accessories might have a different fit when it comes to the specific pin. So a lot of bike racks will typically come with their own specialized hitch pin, so you may need to take that into account too. And depending on that accessory, also find that locking version of it so that way, no one takes off with it. Now what also is gonna go along with that is safety chains. So let's take a look. We'll see if our larger Clevis style and our S hooks are going to fit with our tow loops. All right, so our S hook, that's gonna fit in there, no problem. Not really getting bound up on anything, not an issue, but we might have some issues with the larger Clevis style. You can get it on backwards, but not the easiest, not the best, like what I'd really like to see. Let's see if we can get it from the front too. All right, so we can't get on there with the larger Clevis style. This would definitely be the one situation where I'd probably looking to get in some quick links, which would be just essentially a little extension that's gonna come off of here. You can get it so that you have clips on both sides so that you can easily take it off when you're not towing. And the other part of this is that the whole receiver tube itself is gonna be removable. Now I wouldn't really recommend doing that too often because you have to take the bolt out and then torque it every single time. But if you're that person where you're not towing too often, I would probably pull that out, just to keep it nice and clean, prevent anything from kicking up from the road and accidentally denting or scratching it up, especially if it's in the winter and you got a lot of salt all over the road, you don't want to have that sit there and corrode up your trailer hitch. So in terms of the capacity, our trailer hitch receiver here is going to have a 6,000 pound gross towing weight capacity, which is going to be that force from pulling a trailer. And then for our tongue weight capacity, which is gonna be the downward force on the inside of our receiver tube, so that's your bike racks, your cargo carriers, any thing where it's not gonna be on the ground, that is going to be 700 pounds. Now just because the trailer hitch can handle that amount of weight does not mean your vehicle can. So definitely make sure that you double check your owner's manual and figure out exactly what your safe towing weight is for the vehicle, and then make sure that you're maintaining that. Palisade is a super easy vehicle to install trailer hitches on, regardless of what brand you go with. So this is one where I definitely think you could do it at home. The only thing specialty wise that you would need is just a torque wrench, which you can easily pick up here at etrailer, or most local auto parts stores will have some kind of tool rental program so that you could borrow one and be able to get it all torqued down to spec, and then just return it so that way, you're not out the added cost of that. Overall, if you feel like you're just not that kind of person that really wants to get down and dirty under their vehicle and you don't really have the mechanical skills to do so, definitely feel free to use our dealer locator and you can enter in your zip code to find a shop near you and get it professionally installed. Now if you are wanting to do this yourself, stick around and I'll walk you through the process. Starting off our install, I've already lowered our spare tire. I've got that. It's kind of just hung up there to keep it outta the way. I'm gonna now take a cam strap and I'm gonna run it from one coil spring over to the other. And what that's gonna do is help provide support for our exhaust because we're gonna be removing the river isolators. There's gonna be three of them, one right back here, there's one right by our passenger side rear tire, and then another one right at the end of our exhaust right here. So what I'm gonna do is spray those down with a little bit of silicone lubricant, help them transition off, just a little bit easier. And then you can either grab a pry bar, or in our case, we have a specific tool for removing rubber isolators, and it's just a little prong with a flat piece so that we have something to kind of press against. So we'll sit here and pop each one of these off. And then our exhaust is gonna rest on our cam strip. Now over on our driver's side, we're gonna have this plastic cover here and this is gonna need to come down. It's gonna have three push pins, and then two plastic nuts that are kind of up there. So I'm gonna use a 14 millimeter socket with an extension. And with those plastic nuts, you kind of have to also apply a little bit of pressure. So I would honestly start by pulling out these three push pins first, so that way, you don't have it potentially pop back up into place once you already have it out. And then kind of just pry on it a little bit, not like a ton of pressure or anything, just just enough to keep it nice and firm. As you twist that down, it should start working its way off. There we go. And we'll set this aside. Now on both the passenger and driver's side frame rail, you're gonna have two vertical holes, and those are gonna have weld nuts in them. We're gonna clean those out so that way, when we go to put our hardware in, we don't have to worry about it getting caught. So I'm gonna spray a little bit of penetrating oil up in there, and just take my wire brush and clean out the threads. I'll do this on both sides. Now we're gonna take our four half inch hex bolts and we're gonna throw on one over the flat washers. Once we get this through, we'll have another flat washer and then our nut, but we wanna get this up into place first. So these are gonna be the ones that are going horizontal through our frame rail, and you'll have two per side. So driver's side pretty easy, not a lot of stuff in the way, but passenger side, there is the heat shield, which you're gonna have to fight. So what I like to do is I'll push that flat washer all the way to the tip of the bolt so I can get it past the heat shield. And then I'm gonna have to sit here and try and fight the hex bolt past it. Sometimes, you can kind of just push it in and be good. Sometimes you gotta come back with a hammer and just give it a little love tap to get it all the way through. All right, so like I said, we're gonna be throwing on that flat washer. I did forget to say that we'd also have a split loss washer. We'll throw that on and then our nut, and we can then snug it down. But we're gonna wait on that because I might need to kinda shift the hitch around because we do still have those two vertical bolts on each side. All right, now for M10 bolts, we're gonna be throwing on a split lock washer as well as a flat washer. We can then start getting those threaded into our weld nuts. This is gonna be on both the passenger and driver's side. And then we can take a 17 millimeter socket and snug these down. Once you have your M10 bolts snug down, you can come back with your torque wrench and torque those to spec. And then we'll switch back over to our horizontal bolts and those are gonna require either a 19 millimeter or a three quarter inch socket and wrench. So we can swap right on over for our torque wrench with our socket on the nut side and our wrench over on the bolt head side. Oh, need to change my torque spec. Next, we're taking our receiver tube and our five ace bolt, our five ace split lock washer and our five ace flat washer. And we are going to slot up our receiver tube and get our bolt threaded in, and we can come back with our wrench. We'll snug it down and torque it to spec as well. For this one, you're gonna be needing a 15/16th socket. And with our receiver tube in place, all we have left to do is then reinstall the isolators for our exhaust so that way it's nice and properly supported, remove our cam strap, reinstall our plastic trim piece that's gonna cover up this factory wiring here. And then all we have left is to just put our spare tire back in place and we're all good to go. That's gonna do it for our look at and installation of the EcoHitch Trailer Hitch Receiver, here on our 2023 Hyundai Palisade. My name's Kevin. If you still have some questions about what's gonna be the right trailer hitch receiver for your Hyundai Palisade, please feel free to reach out to us via our ask the experts link to comment on this video or a phone call to our customer service department, and we'd be happy to help you out on your journey.

easy to install and it is barely showing below the bumper and no trimming of the valance was required. picture shown is without the receiver attached - so truly hidden when not in use
Info for this part was:
At etrailer we provide the best information available about the products we sell. We take the quality of our information seriously so that you can get the right part the first time. Let us know if anything is missing or if you have any questions.


Thank you! Your comment has been submitted successfully. You should be able to view your question/comment here within a few days.
Error submitting comment. Please try again momentarily.