
Curt Trailer Hitch Receiver - Custom Fit - Class III - 2"


To see if this custom-fit item will work for you please tell us what vehicle you'll use it with.
This hitch lets you bring more on your adventures - tow a trailer, haul bikes, or carry gear. The 2" receiver fits accessories for work and play. Bolt-on install means no welding, and the powder coat finish resists rust for lasting use.
This hitch is ideal for towing mid-sized loads, including utility trailers or small boats. With a 3,500 lbs gross trailer weight capacity and 525 lbs tongue weight rating, it provides a secure towing solution for moderate applications. The 2" receiver size offers versatility for various towing setups.
Perfect for bike racks and cargo carriers, this hitch allows you to transport bikes, camping equipment, or extra luggage with ease. The 2" receiver accommodates a wide range of hitch-mounted accessories, enhancing your vehicle's cargo capacity for road trips and outdoor adventures.
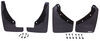
Skip the stress - this hitch features an easy bolt-on installation with all necessary hardware included. No welding or complicated modifications are required, making it a straightforward project whether you're in your garage or driveway.
From road grime to unpredictable weather, this hitch is made to withstand the elements. The dual-layer finish - an industry-leading powder coat over a protective base - helps prevent rust, chipping, and wear, keeping your hitch looking great and performing reliably for years.
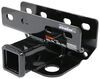
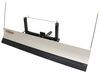
No bulky hitch sticking out - this model features a concealed main body that tucks neatly behind the bumper. The result? A clean, factory-style appearance without sacrificing strength or towing capability.
Keep your hitch in top shape with an open-back receiver design that allows for easy cleaning. Say goodbye to dirt and debris buildup inside the hitch tube, making it easier to maintain and use over time.

California residents: click here
Videos are provided as a guide only. Refer to manufacturer installation instructions and specs for complete information.
Hi, everyone. Jesse here with etrailer. Today we'll be taking a look at and I'll show you how to install the CURT custom-fit trailer hitch receiver on our 2025 Ford Bronco Sport. Adding a hitch to a vehicle like the Bronco Sport really makes a ton of sense. There's not a whole lot of storage space inside the vehicle, especially if you have all the seats filled up. So adding a hitch allows you to add some extra storage space outside the vehicle.
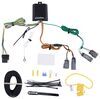
With this hitch installed, you can throw in accessories, such as a bike rack or a cargo carrier, or you can even do some light-duty towing with it. Just remember, if you plan on doing any kind of towing with your vehicle, you will need to add on trailer wiring to stay safe and legal out there on the road. I like the CURT kit. You just simply plug it into your factory taillight wiring, then run a power wire up to the front and you're good to go. Here's a closer look at our hitch installed on our neighbor's vehicle.
You can see, this hitch installs behind our bumper here, so all you can really see is your receiver. That's gonna be your standard two inch by two inch receiver opening, so most of your accessories will slide right in there. Then behind that, we have another standard 5/8 inch pinhole. The pin and clip, not included with the hitch. However, we have many options available here at etrailer.
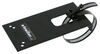
Also, any accessory that you add on will most likely come with one included. On the bottom for your towing, we have a wire type safety chain loop, very easy to access with whatever style safety chain you might have, like an S-style like that or even a large clevis like this. Now we'll take some quick measurements. Starting with our ground clearance, from the ground to the top of the inside of the collar, we're sitting at about 17 3/4 inches, which is another nice reason that this sits behind the bumper. It is gonna sit up a little bit higher.
Then from the center of our pinhole to the edge of our bumper is at about four inches. That's a number you want to keep in mind for any folding accessories that you might add on to ensure they don't make contact with the vehicle. As for the weight capacities with this hitch, we have a gross trailer weight of 3,500 pounds. That's the amount of weight that you can pull behind the vehicle. Then we have a maximum tongue weight of 525 pounds. That's the amount of weight pushing down on the hitch. Always be sure to double-check your vehicle's owner's manual, compare those numbers, and go off the lowest rated component to ensure that you're safe on the road. If you're looking to add a hitch to your Bronco Sport, you really can't go wrong with a trusted name like CURT. If you have any questions or concerns about this hitch or anything else we offer here at etrailer, feel free to reach out to us. We'd be happy to get you pointed in the right direction. When it comes to the installation with this hitch, since it mounts behind our fascia here, you do have to remove the fascia, so there's quite a few steps to that. I'd understand if that's not something that you're looking to do yourself, check out our dealer locator. You can find someone local to you that would be happy to get you set up. If you are looking to see how this gets installed, then follow along and I'll walk you through the process. To begin our installation, we'll need to remove both of our taillights, so the process would be the same on both sides. We'll have this plastic cover here we just need to pull this straight back. It's kind of tricky to get your fingers behind it. Once you do, it pops loose pretty easily. And then behind that, we have two 10 millimeter nuts to remove. (drill whirring) Get those removed. (drill whirring) And from there, it's just held in by some clips. And once again, we're gonna be pulling straight back with it. (clips popping) Just try to get at least one of them released and then work on the other one. (clips popping) Just pull that out and flip your taillight over. We need to disconnect this plug here. So just push in on this tab, pull out to separate, and set this aside. Now with the taillight out of our way, we do have a push pin fastener right here to pop loose. So just pop that center portion up and then the whole thing will come out with it. And at this point, anything we do on one side, we'll do the same thing on the other. Underneath our vehicle, we have some seven millimeter screws to remove. So it's gonna be two on both sides. (drill whirring) (drill whirring) And then a handful in the middle. So just work your way from one side to the other and get those all taken out. (drill whirring) (drill whirring) (drill whirring) (drill whirring) Inside of our wheel wells here, we have some more push pin fasteners to remove. And they're a little bit different but same concept. Just pop that centerpiece out and then the whole thing will come out. And we'll just work our way from the bottom to the top and getting all these removed so we can peel back our wheel well liner. (fastener popping) Now that we have those removed, we can kind of peel back on this liner here. And we need to pop back this liner 'cause there is a screw holding our fascia in back here. So to get access to that, we need to pull back on this. There's gonna be two clips here that are pretty easy to pop out, and then our third clip right about here that you wanna make sure you're pulling straight back on. And just depending on your vehicle, it could fight you, like this one is for me. Just keep pulling straight back and pop that loose. And that's about as far as we can go, but our eight millimeter screw is tucked in right here. And this is pretty tight to get to. So I'd recommend using 1/4 inch eight millimeter socket. (ratchet cranking) I'd recommend grabbing an set of hands. I have my good friend, Joe, here to help me out. We're gonna start on both corners, popping our clips loose. So just try to get your fingers underneath there and pull straight back and just work your way towards the middle. (fascia popping) And once you get to where our taillight was, you will have to kinda lift up in order to get it around that guide pin. And these clips, you can kind of push back on. (fascia popping) Once you get to the center, just firmly pull out and flip your bumper over. Just double-check. It looks like we have a connector here as a push tab. Just push it in and you can fold that plug off. This plastic support piece needs to be removed, so we'll just go from one side to the other with an eight millimeter socket (drill whirring) and get all the screws holding it on removed. (drill whirring) (drill whirring) (drill whirring) (drill whirring) (drill whirring) Once you have those removed, there is a small pin kind of holding it in. Just pull that straight back and we'll set this aside. In order to remove our bumper beam, we have two nuts on the top here. They're gonna be 15 millimeter. Those ones are easy. They're on the bottom. We're kind of reverse, so we have studs here and then the nuts are on the backside. So these ones are a little trickier. Just get a 15 millimeter socket. Should fit right in there and break those loose and get them removed. (ratchet cranking) Once you have all those bottom nuts removed, we'll move onto the top ones and get them removed. Then we can pull our bumper beam off and set it aside. (drill whirring) (drill whirring) (metal clacking) (drill whirring) (drill whirring) Now we can lift our hitch into position, just sliding it over those studs. And then for the two top studs, we're gonna retain the factory nuts. So let's get those threaded on on both sides. (metal clacking) On the bottom holes, since we no longer have those studs, what we'll do is take one of the bolts from our kit with the conical tooth washer, make sure those teeth are facing towards the body of the vehicle. Get that pushed through that hole and then reinstall the factory nut on that bolt. (metal clacking) Once you have all that hardware set up, we can tighten it down with our 15 millimeter socket. (drill whirring) (drill whirring) If these bottom bolts are spinning on you, then you don't really have to put a socket on the back. That might help. But I found that if you just push against it with your finger, that conical tooth washer will bite in and allow you to get it tightened down. (drill whirring) (drill whirring) (drill whirring) (drill whirring) We need to go over everything with our tor wrench to ensure that it's torque down to the specifications in the instructions. (torque wrench cranking) (torque wrench beeping) Before we can reinstall our a fascia, we do need to cut it out to allow clearance for our hitch. So there's a diagram in the instructions. It's gonna be 3 1/2 inches wide at dead center. And then you'll measure two inches up from this corner here. So two inches up from there. And we will be doing this cut using a multi-tool. You can just use a Dremel or whatever you have that will cut through this. (multi-tool whirring) (multi-tool whirring) (multi-tool whirring) And now that we have that cut out, I'll just come back through with a file or a razor blade and clean up all my edges. All that's left is to reinstall our fascia and our taillights. It's really just the opposite of how we took it off. Other than that, that's gonna do it for our look at and installation of the CURT custom-fit trailer hitch receiver on our 2025 Ford Bronco Sport.

I was hesitant about installing myself, but followed the video and found the self install to be quick and easy. install took under 2 hours. Perfect fit for my 2025 Bronco sport.
Hitch Receiver was well protected - packaging was awesome!
etrailer has been very accommodating. I've had to return one hitch because it was wrong for my vehicle (my fault)
I returned one because I wasn't satisfied with it. They took both back no problem. The Curt I just received is what I have been looking for. You can use etrailer.com without concerns.
They will make it right.
Construction and fit to vehicle is exce llent.
Just a fit
Cam quickly and fit.
Info for this part was:
At etrailer we provide the best information available about the products we sell. We take the quality of our information seriously so that you can get the right part the first time. Let us know if anything is missing or if you have any questions.


Thank you! Your comment has been submitted successfully. You should be able to view your question/comment here within a few days.
Error submitting comment. Please try again momentarily.