
To see if this custom-fit item will work for you please tell us what vehicle you'll use it with.
Thank you! Your comment has been submitted successfully. You should be able to view your question/comment here within a few days.
Error submitting comment. Please try again momentarily.


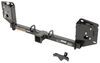
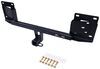
This fully welded trailer hitch receiver bolts onto your vehicle's frame with no welding required. Powder coated steel is sturdy and corrosion resistant.
Features:
Specs:
At etrailer.com we're committed to the products we sell, and to our customers. Our experienced and knowledgeable staff are available via both phone and email to address your questions and concerns for the lifetime of your hitch. The technicians at etrailer perform hitch installations on a daily basis, making them a valuable resource for do-it-yourselfers. The one-on-one, personal service you'll receive comes straight from an expert in the towing and automotive field. We've installed it, we've wired it and we've towed with it, so whatever your question, we can answer it.

California residents: click here
Videos are provided as a guide only. Refer to manufacturer installation instructions and specs for complete information.
Hey, everyone, Ryan here at etrailer. Today on our 2021 Tesla Model Y, we're gonna be showing you how to install the CURT trailer hitch receiver. Before we do that though, let's take a minute, check this one out, and even compare it to some of the other hitches that are available. So, with that said, if you're looking to use hitch-mounted accessories or maybe even pull a small trailer around with your Model Y, you're gonna need a way to do that, right And that's where a trailer hitch is gonna come into play. And with this particular one, I feel like it's gonna be a great option for those of you looking to do those types of things while still maintaining, you know, a good appearance back here. I said because the hitch is going to sit behind your fascia and behind this removable panel here.
So, with this hitch though, one of the things is that the panel remains completely stock. There's no handle mechanism or anything like that on it. So, it's real easy to put in, right, to hide it. Just snaps into place. But when you go to take it out, you know, you'll have to work it outta there.
One of the things, if you end up going with the hitch like this, I recommend getting a little trim tool, and that'll make it a lot easier to get removed by kind of prying up on it here, working it back out. So, it's really cool that you're able to do that. But as you could see, you know, if you're gonna be constantly taking an accessory in or out, you know, you'd probably end up just leaving this off, kind of defeating the purpose. But I think it would be really good for those of you that, let's say might leave a bike rack in for the riding season, just leaving in all the time. And that's really all you're doing with the hitch.
Whenever it's off season, you pop the cover on and not really a huge deal, right You can't see the hitch at all. It'll stay protected from the elements and things like that. Not really a huge deal to have to do this one or two times, you know, a few times a year. On the other hand, some of the other hitches like the EcoHitch, they have you modify this piece and they have little handles on there that make it a lot easier to remove and pull right out, getting access quickly to the hitch. But it's all just gonna depend on what you're looking for.
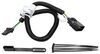
You know, if you don't wanna modify this and see a big handle or anything, then this is a good option. If that's not gonna bother you, you wanna put the panel back often, use the hitch a lot, and don't really mind that handle, then the EcoHitch might be a better solution. The hitch is gonna have a two inch by two inch receiver tube opening. Super common size. So, a lot of stuff should work with it. And it's going to use the standard 5/8 pin and clip. You have to kind of reach in there to get that in place. But that's pretty much standard for all the hitches for the Model Y. Just something you kinda have to deal with. Hitch doesn't come with a pin and clip. If you need one, not a huge deal. You always get it here at each trailer. A lot of times too, if you end up buying a new accessory, they'll come with one. And the safety chain openings, where you put the hooks from your safety chains on your trailer, they're tucked up here a little bit. Kind of hard to see, but not too bad to get to. And, you know, just about any size hook should be able to reach up there and and clamp onto it. (metal clacking) As far as the weight capacities go, the hitch is gonna give us some pretty good numbers, and that's one of the differences with this one compared to some of the others, it has some higher capacities. The maximum gross tongue weight rating is gonna be 525 pounds, which will be the amount of weight pushing down on the hitch. And that's good for just about any size bike rack or cargo carrier, to give you an example there. And for the maximum gross trailer weight rating, it's gonna be 3,500 pounds, or the amount of weight pulling on the hitch. So, that will be the weight of your trailer plus anything that you might have enter on it. I do always like to suggest, it's always a good idea just to check with your vehicle's owner's manual. That way you can make sure your Tesla can handle that amount of weight safely. Grab a couple measurements now, and these will help us figure out what type of accessories will work the best. So, if you go from the ground to the top inside edge of the receiver tube opening, that's gonna be about 15 inches. You can probably use items that have a straight shank or even some with a rise in it. Buy a little more ground clearance back here. Either way, I think you'd be fine. If you go from the center of the hitch pin hole to the edge of our rear bumper, that's gonna be about six inches, which really isn't too bad considering that the hitch is kind of tucked up underneath the vehicle. But if need be you can use that to help figure out exactly if any of those folding type accessories that you might have can be stored in that upright position without hitting the back of your Model Y. Other than, that pretty nice trailer hitch. You know, it's gonna be great for those of you that are looking for something that is heavy-duty and trying to maintain a completely stock appearance on the back of your Model Y. As far as the installation goes, believe it or not it, it really wasn't too bad. It was definitely a little time-consuming 'cause you have to take a lot of stuff apart. You know, the fascia has to come off and everything, but really wasn't complicated. You know, a lot of the fasteners are pretty easy to get to, really no crazy tools needed, or anything along those lines. So, if you set a little bit of time aside, something you should probably be able to get done. If not, you don't wanna mess with it, don't have the place or time to work on it, you can always use our dealer locator network, and that can help you find a shop in your neighborhood. I can do something like this for you. But if you're gonna do it, hang around, we'll go ahead, pull into the garage, and get started on it now. So, to begin our installation, we're gonna be underneath the back of our Tesla, and we'll have this big underbody panel that we need to remove first. And there's several fasteners. Six of 'em are gonna be this push pin-style. We'll have three on each side. And I wanna mention from this point on, whatever we do to one side of our vehicle, we'll also do to the other side. Setup the same way. To get these out, you can just use a flathead screwdriver, pry underneath the head, pull the whole base out. We'll do that same thing for these ones here. Sometimes too if you happen to have a trim tool like this, we'll make it a little bit easier to get some extra leverage to get 'em worked out. Moving to your wheel well, behind your rear tire, there's gonna be four more push pin fasteners. So, we'll do the same thing to get all these removed. (push pin popping) (push pin popping) You can grab a 10 millimeter socket now and we're gonna have a handful of these bolts here that just kind of run around the whole edge of the panel. (electric ratchet whirring) We'll get all these removed. (electric ratchet whirring) (electric ratchet whirring) (electric ratchet whirring) (electric ratchet whirring) We are gonna have a couple more, more towards the center here. (electric ratchet whirring) (electric ratchet whirring) (electric ratchet whirring) (electric ratchet whirring) I believe that's all of 'em. So, we'll try to separate our panel here. (panel popping) I'm just kind of pulling it forward. It might actually help to, this panel's kind of holding it up. If you remove a couple of those, it might give us some more room there. (electric ratchet whirring) (electric ratchet whirring) (electric ratchet whirring) Should make it a little bit easier to get this kind of pried out. So, we get that front part down, pull towards the front, this whole panel drop out of position, we'll set it to the side for now. What I'd like to do now is just take some painter's tape and put it all around the areas that we're gonna be working. That way we just don't, you know, accidentally scratch anything. We need to release this piece of wheel well trim here, maybe about halfway up or so. And to do that, I just kind of start to grab it and work it a little bit. And then if you kind of grab it and start to push it forward, can take a little trim tool, something along those lines. Start to kinda work it free. There's some plastic fasteners in here. And if you kind of just work your way around, you should be able to get 'em to release. Other times, you might have to, you come in with a little screwdriver or something and just help 'em out. This is about where we need to pull it up. And I like to just take a piece of foam or a paper towel or something, kind of jam it in there to keep this pulled away. And the reason that we did that is to not only release cyst from our fascia but also to get access to this bolt here. (ratchet cranking) I grabbed an eight millimeter socket. (ratchet cranking) Go ahead and get this removed. (ratchet cranking continues) We are gonna need to remove our taillights. So, a few things that we need to do inside to get access to 'em. We'll remove this floor covering here. Get that out of the way. And then we can remove this piece. This is a threshold piece. And a lot of times, if you're just kind of snap into place. Take a little trim tool or something and start to work down. (panel popping) We will just popping this free, releasing all those clips. If one happens to fall out or come out, like this one here, not a huge deal. You just take it, pinch it, slide it back in. We'll go ahead and move this floor covering out of the way too. I'm just gonna push it up like that. And then we'll have these little side pieces, and you just pull straight up on. We'll get both of those removed. We've got a couple more push pins. We'll have one right here, pry that out. And then this one right here, once you pull that one out, you should be able to grab this piece. We'll slide that out of the way as well. You start to kind of pry on our panel here to separate it, and just gonna use a trim tool. Let's get everything on snapped. And what we're trying to do is just get it out far enough. That way we can get access to the fasteners holding our taillight in place. We're gonna have two fasteners in here. These little eight millimeter nuts. (ratchet cranking) Go ahead and get these removed. There's also a connector in here that we'll have to unplug. I think what I'm gonna try to do though is actually get the light pulled out, some, and unplug it that way so it's, you can see what's going on a little bit better. Have these little caps right here need to remove, and they'll pull up if you work it like this. And it helps, sometimes what I did, earlier sprayed a little soapy water down here, and that allowed this just to pull right off, actually. Sometimes, you might have to get a a tool like this and help pry it off. Do now take the light and just start to kinda lightly work it back and forth. And it should be able to pull this out. It feels like that connector inside might actually be holding it up. I don't wanna force it out and break anything. So, being that it's extremely difficult to see, I'll unplug it. Maybe you can pop or light out, and I'll show you how you can unplug that connector. Here's a look at that sail light connector. You'll see a red tab on there, and you'll pull that tab all the way out like that. And while you're pulling this out, you can apply backward pressure to it to release this connector from the taillight. So, now we should be in good shape and like I said, spraying a little bit of soapy water down in this area helps out a lot 'cause these little pins are just pressed into these pockets. And over time, they can kind of just get hung up. So, a little bit of moisture there to help lubricate. It makes us much easier to get removed. Taillight out of the way now, that exposes a 10 millimeter head bolt that we'll go ahead and get removed. (electric ratchet whirring) To actually get the fascia removed, this is gonna be pushed into these little snaps here, kinda all along the edge. You can start at the edge, where your wheel well liner or wheel well begins. If it's really tight, I like to start up here. Doesn't really matter. But you can, you know, use that soap water trick again and definitely helps just loosen everything up a little bit. We'll just kinda work our way down here. Let's carefully kinda start to feel this back. And then usually, once you get to about here, this corner, that's when we'll have to start moving from this edge up. It's gonna work the same way, (panel popping) just work your way down. Get everything unsnapped. Just take your time with this. You know, that way you don't break any clips or anything. They're stronger than you think, but you gotta be careful when you're trying to kind of pry on 'em. (panel popping) So, with this side free, do the same thing to the other side. Definitely easier if you have someone that can help you with this part. But we're just gonna continue to kind of pull the fascia off. And you'll probably have an electrical connector. In our case, it looks like we do over here on the passenger side. This red tab, pull back on it, and then push down there to disconnect it. And with this free, we can set it off to the side. We can grab a 10 millimeter socket now, and we have this sensor bar here. We can remove it. There's four 10 millimeter head bolt. (electric ratchet whirring) Pull all these out. (electric ratchet whirring) (electric ratchet whirring) And we should be able to, we'll pull this away from our vehicle. We're just gonna kind of set it up in the rear hatch for now. We'll get our bumper beam removed. So, up top, you have one 15 millimeter head nut. (electric ratchet whirring) And on the bottom, we'll have two of them. (electric ratchet whirring) I removed the one's on the driver's side already, so I'm just, you know, holding the little force on the beam. And I take this last one off. (electric ratchet whirring) It should be the last thing holding it in place, which it is. So, we'll just slide this off the back of our Tesla. We'll grab our hitch now, and this is gonna take place of our bumper beam. So, this is gonna slide on the existing studs. We'll take our factory hardware and get all these started hand tight. I am gonna make sure that the hitch is centered now because when the bolts are hand tight, you can move it from side to side a little bit. So, just center it up. And once you're happy with that, then we can snug all this hardware down. (electric ratchet whirring) (electric ratchet whirring) (electric ratchet whirring) You wanna make sure to come back with a torque wrench and tighten it down completely to the amount specified in the instructions. (torque wrench cranking) (torque wrench beeps) (torque wrench cranking) (torque wrench beeps) Now that the hitch is installed, we can put everything back together the opposite way that we removed it. And if I happen to run into any issues or things like that during this, we will touch base on it and kind of go from there. One thing I thought about before putting the fascia back on, since the hitch is going to live behind this little removable panel, if you've never had it off before on your vehicle, before you put the fascia on, it'd probably be a good time to remove it. That way you can at least kind of break it free and just be a little bit easier, you know, in case it's really stuck on their good. But what you can do, you know, just push down on these tabs, and that'll free it up. And, you know, once you take this off once or twice, it'll continue to get easier from then on out. And, of course, you know you're gonna be able to remove this from the outside as well. But just to give you a better look at what's actually going on in here. Don't forget to plug any of your electrical back in. We'll get this fascia snapped back in place. (fascia thudding) Got everything put back together, didn't run into any issues or snags. So, we're in good shape. And with all that done, that'll finish up our look at and our installation of the CURT trailer hitch receiver on our 2021 Tesla Model Y.
Customer Satisfaction Score:
98% were satisfied with this product
2% of customers were not satisfied
Ratings & Reviews

Have had orders from etrailer before and they never disappoint. This time around some hardware was missing. Amber from etrailer was on top of it and resolved it quickly.
Stuff happens but how you fix it matters. Appreciate quick response and resolution.
It took more than 2 hours to install and dismantling the bumper was a bit daunting but it was pretty straight forward. Saved me close to $1000 over the Tesla hitch receiver!

Gwendolyn Y.
1/29/2026
High-five on the install, Min! What are your plans to use the hitch for?
Product shipped fast, seems to be of good quality, and the installation video was great. I’m not a car person, but was able to get this installed in an afternoon. Pay careful attention to the required tools list- I didn’t and was lucky my neighbor had a long 15 mm socket I could use while my car was dissected.
This is my second hitch from etrailer and both have been of excellent quality. The fit was perfect and the installation was straightforward. The installation video was very helpful.
As advertised. Tesla install requires removal of bumper but hitch receiver wasn't the issue -- great produce
Info for this part was:
At etrailer we provide the best information available about the products we sell. We take the quality of our information seriously so that you can get the right part the first time.


Claire H.
5/15/2026
Thank you for the kind words :) I'm glad we were able to get this resolved for you!