
To see if this custom-fit item will work for you please tell us what vehicle you'll use it with.
Thank you! Your comment has been submitted successfully. You should be able to view your question/comment here within a few days.
Error submitting comment. Please try again momentarily.


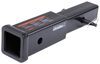
This hitch lets you bring more on your adventures - tow a trailer, haul bikes, or carry gear. The 2" receiver fits accessories for work and play. Bolt-on install means no welding, and the powder coat finish resists rust for lasting use.
This hitch is ideal for towing mid-sized loads, including utility trailers or small boats. With a 3,500 lbs gross trailer weight capacity and 350 lbs tongue weight rating, it provides a secure towing solution for moderate applications. The 2" receiver size offers versatility for various towing setups.
Perfect for bike racks and cargo carriers, this hitch allows you to transport bikes, camping equipment, or extra luggage with ease. The 2" receiver accommodates a wide range of hitch-mounted accessories, enhancing your vehicle's cargo capacity for road trips and outdoor adventures.
Skip the stress - this hitch features an easy bolt-on installation with all necessary hardware included. No welding or complicated modifications are required, making it a straightforward project whether you're in your garage or driveway.
From road grime to unpredictable weather, this hitch is made to withstand the elements. The dual-layer finish - an industry-leading powder coat over a protective base - helps prevent rust, chipping, and wear, keeping your hitch looking great and performing reliably for years.
No bulky hitch sticking out - this model features a concealed main body that tucks neatly behind the bumper. The result? A clean, factory-style appearance without sacrificing strength or towing capability.
Keep your hitch in top shape with an open-back receiver design that allows for easy cleaning. Say goodbye to dirt and debris buildup inside the hitch tube, making it easier to maintain and use over time.

California residents: click here
Videos are provided as a guide only. Refer to manufacturer installation instructions and specs for complete information.
Hi everyone. Jesse here with etrailer. Today we'll be taking a look at and I'll show you how to install the Curt Custom Fit Trailer Hitch Receiver on our 2025 Toyota Crown. There's really not a lot of options out there as far as hitches for the Crown, but Curt is a trusted brand that's been making hitches for a long time, so you really can't go wrong with this as your hitch option. Adding a hitch to the Crown really makes a ton of sense. It does have a lot of storage space inside, but that doesn't mean you don't need to be able to add some extra storage space to the outside of the vehicle.
And with this hitch, you can throw an accessories such as the bike rack or a cargo carrier, or you can even do some light-duty towing. The cross tubes are completely hidden behind the fascia, so you really have a nice clean look on the back of your vehicle with this hitch. This receiver opening here is your standard 2" by 2" opening that's gonna fit most of your accessories. And behind that is another standard 5/8" pin hole. The pin and clip are not included with the hitch, however, we have many options available here at etrailer.
Also, any accessory that you add on will most likely come with one included. And we have a wire-type safety-cable loop here. Very easy to access with whatever style safety cable you have. For example, an S or a large clevis like this. A question we get asked a lot is, once the hitch is installed, will my hands-free tailgate assist still function properly And the answer with this hitch is yes, it will.
You'll just have to kick to one side of the hitch to make sure you're not kicking it, but you'll just do it as normal and your hatch will open right up. Now for some measurements, we'll start with our ground clearance number. From the ground to the top of the inside of the collar here is right at 13". And then from the center of our pinhole to the edge of our bumper is about 7". That number you want to keep in mind for any folding accessory that you add on to ensure they don't make contact with the vehicle.
As for the weight capacities with this hitch, we have a gross trailer weight of 3,500 pounds. That's the amount of weight that you can pull behind the vehicle, and we have a maximum tongue weight of 350 pounds. That's the amount of weight you can have pushing down on the hitch. Always be sure to double check your vehicle's owner's manual to ensure that your vehicle can handle that weight safely. If you have any questions or comments about this hitch or anything else we offer here at etrailer, feel free to reach out to us. We'd be happy to get you pointed in the right direction. As for the installation, it's honestly a pretty simple process, but you do have to lower your exhaust down and do a little bit of trimming on a panel underneath here. So if it's not something that you're looking to do yourself, check out our dealer locator. You can find someone local to you that would be happy to get this set up for you. If you are looking to see how this gets installed, just follow along and I'll walk you through the process. We'll begin our installation by removing this plastic cover here. It's just held in by a series of these push pin fasteners, which if you have a flathead screwdriver, you just wanna get into the middle of it and pop that center portion out. Sometimes it helps to have an actual trim panel tool that is made for this. Pop the centerpiece out and the whole thing will come out and we'll just work our way down the line, get all these removed. And once you've worked all those out, we can set this aside. Now we need to lower our exhaust down, and before you do that, you wanna make sure that you have something supporting the exhaust. I have a lift, so I'm up in the air. I'm using a cam strap to support it. If you're on the ground, you can just use a jack stand or something like that. We'll start with our rear hangers here. There's gonna be two bolts on the brackets and there's gonna be one of these brackets on both sides. And I'm removing these bolts with a 12 millimeter socket. (wrench clicks) Now our mounting holes are covered up by some plastic caps to protect the threads. Those come off pretty easily with a flathead screwdriver. Just get up under it and pry it away. There's one there and one towards the front. And then once those are out, I like to take our hardware and thread it in and out a few times, make sure that it's nice and smooth so we're not fighting those threads with the hitch above our head. While I have the hardware here, we'll talk about it. So both of those holes on both sides will get a bolt and a conical tooth washer. We want those teeth on the washer facing towards the hitch so they bite down and hold on. That's a good idea to grab a big strong friend. That's why I have my friend John here to help me lift our hitch into place. We just have to work around that recovery hook on this side and get it tucked up into place. So we did have to fight getting around this recovery hook and also getting up and over this heat shield here. Once you do that, we can line up our mounting holes and get some hardware started on both sides. And that's gonna hold it up so we can get the rest of our hardware installed. Now we'll tighten our hardware down with a 19 millimeter socket. (tool buzzes) Now we use our torque wrench and torque all of our hardware down to the specification in the instructions. Before we can reinstall this plastic panel, we will need to cut it out. There's kind of a diagram in the instructions, but it looks like we're just cutting out this rectangular piece here. I'm just gonna use some tin snips for that. This plastic's pretty easy to cut through. So we'll cut that out and then mock it up, make sure it fits and then we can reinstall it. (plastic snaps) All that's left is to get your exhaust hung back up. But otherwise that's gonna do it for our look at and installation of the Curt Custom Fit Trailer Hitch Receiver on our 2025 Toyota Crown.

The hitch fits beautifully and would be invisible if I did not attach the hitch plug--see the photo. Installation was quick and a great value by your affiliate RC Auto here in Northern Virginia. Will use it to add Hollywood Racks bike carrier for tandem bikes. Not my first purchase from etrailer and I'll be back if I need anything else. Thanks
Took about 3 hours but was working without a lift on the garage floor. Found it helpful to use a jack stand and a scissor jack to help position as I was doing this by myself (with some tool fetching help from my wife!). Found the video quite helpful and hitch was shipped very quickly. Thanks etrailer! Wm
The hitch arrived with the bracket ends both sticking out of the box, causing some chipped paint on the corners - some cardboard pocket sleeves could be applied then that should cure it. Everything else is first rate with this. From start to finish took a generous 45 minutes, being very careful. You will need a helper to hold one end up. 2 head-scratch moments involve the plastic cover - Firstly you cut alongside the 3 plastic ribs on the INSIDE, with the 4th cut along the crease where the flat part ends of this “RR” cutout. Second then involves getting the small cutout over the hitch… After you have the square hole in the plastic shield, you need to slide the first chain-loop into the cutout and spin the plastic 45 degrees and gently work the 2nd loop into the opposite corner of the cutout. Next spin the plastic back straight and gently work the plastic toward the rear of the car until it clears the hitch and can move upward. It can then be gently slid forward to clear the front of the hitch, with the holes to aligning for reinstallation of the 10 clips.
Easy installation and looks great. All you see is the receiver. The only thing I did different was put the hitch up and just loosely install the two bolts toward the front of the car. Then cut and put the underbody panel around the hitch. Lift the hitch up and install the other two bolts and finish installing.

Gwendolyn Y.
6/16/2025
Hitch looks great, Ralph! Are you planning to just carry the bike rack or do you have any other plans for the hitch?

Easy installation of the hitch receiver. Took less than an hour. The wiring for the trailer lights will take longer.

Brooke M.
6/18/2025
Looks great, Jon! Goes nicely with the '25 Crown Signia. :) what are you going to be towing once you get the wiring done?

Perfect fit just like oem. Great product A+.

Lazer S.
4/14/2026
Glad you like it, Jose! What are you going to be using it for?
Looks well made. Installation is straight forward per the instructions. Drove the car up on 4" tall blocks which provided plenty of working room. Used a jack to hold it in place for installation but two people could probably hold as well. (the orange in the pictures is reflection not rust)
Brooke M.
5/28/2025
Looks FANTASTIC on your '25 Toyota Crown Signia, Wally! Do you have a bike rack you'll be using with the new hitch?

Straightforward installation with easy-to-understand instructions. Perfect fit!
I love etrailer products and support. I highly recommend!!
Brooke M.
6/27/2025
Looks like you nailed, Paul! Way to be. What will you be towing that you have your hitch installed?

Very easy install, looks like it came from the factory with this hitch (why didn't it???!!!).
I did it by myself but I would definitely recommend a second person to help do the alignment - it's a bit awkward by yourself.
Ordering the right hitch was easy. It arrived late morning on the day expected. Packaging was good. Finish could’ve been better. Directions were great, and fit was perfect. It was easy enough for a 68 year old 167 lb. man to install by himself. I’ll mainly be using it for a 2 bike rack, and a 500lb load capacity flat rack. I doubt that I’ll carry more than 300 lbs.
The hitch fit perfectly. I was quoted a price of $1200.00 to install a hitch at the dealer. I found a hitch at ETrailer for $235.00 . It took me a hour and a half to install it . I’m a happy customer !!
The hitch was much easier to install than I anticipated. It fit the car without a glitch. I was able to install it alone. I am very satisfied and this hitch is a much better design than the one offered by the dealership.Too bad that I was not able to upload some pictures.
So far I can only rate it for shipping and installation. Shipping was very fast. While well protected, there was still some cosmetic damage on the horizontal main bar from shipping. Installation was very straight-forward. I think most folks could accomplish it within an hour while taking their time. Having vertigo...took me a little longer. I only plan on using this for a bike rack but I'm quite certain that it would have no issues towing a small trailer. Overall, I'm very satisfied with this hitch.
Excellent fit and directions. About 1 hour to install with extra help to hold hitch. This is my 2nd Curt hitch. Great product. Bike rack only usage.
Great product and relatively easy to diy install. Very happy with this - much better than the oem activity mount from Toyota
Note: it helps to have a second set of hands when putting the trailer hitch in place, car ramps to give yourself extra room to work, and a solid torque wrench to hit the ft-lb requirement
Well packaged and looks like all part are there. Will actually have more to say after I install the hitch.
With the help of a jack to hold the muffler and rope to hold one side of the hitch., I was able to do this myself. I do have a drive up ramp that raises the car by a 4 or 5 inches and a headlamp so I can see better which also helped. Used a 3/8 torque wrench with a M18 to screw the bolts in. Used an M12 to remove the muffler per the provided instructions. Took me 2 hours. It was easier than a RAV4 I used to have.
The only frustration I had was with the stock OEM hitch that hung too low. Removing it was a pain. But installation of this aftermarket hitch from etrailer was a breeze and it looks great… particularly compared to the stupid looking OEM crap! I highly recommend this item.
fit great. was able to install myself with some prep and a floor jack, jack stands. shipping cardboard box could have been better reinforced at the hardpoints. punched through in several spots
Pretty easy install. Only involved a cut in the plastic for the actual receiver portion.Jacking up one side of car was all that was required to access attachment points. Will be used for bike rack until I can get wiring harness installed.
Well made, very easy to install. Took me less than an hour.
Hitch appears to be of good quality. Directions were superb, went on without a hitch (sorry for the pun!).
Like the fact it's made in the USA. Great product.
Well made and very good custom fit. The only thing visible is the 2" receiver. I would recommend to any Crown Signia owner.
The instructions online were clear and detailed to make the installtion easy. The pictures in the instruction paper copy that came with the hitch were black and white and could not clearly see what needs to be done. Overall, it was a perfect fit and took an hour to install. Good price and quick delivery.
Easy install, great fit fast delivery
Do you have a question about this Trailer Hitch?
Info for this part was:
At etrailer we provide the best information available about the products we sell. We take the quality of our information seriously so that you can get the right part the first time. Let us know if anything is missing or if you have any questions.


Heather A.
4/11/2026
Looks great, Doug. Nice job on the install. Love hearing RC Auto took good care of you too. Where are you headed with it first?