
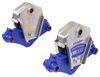
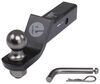
Blue Ox Trailer Hitch Receiver - Custom Fit - Class III - 2"


To see if this custom-fit item will work for you please tell us what vehicle you'll use it with.
Thank you! Your comment has been submitted successfully. You should be able to view your question/comment here within a few days.
Error submitting comment. Please try again momentarily.


This fully welded trailer hitch receiver bolts onto your vehicle's frame with no welding required. Textured black powder coat over e-coat shields against rust and corrosion. Mounting bracket for wiring is welded on for a clean look.
Features:
Specs:
At etrailer.com we're committed to the products we sell, and to our customers. Our experienced and knowledgeable staff are available via both phone and email to address your questions and concerns for the lifetime of your hitch. The technicians at etrailer perform hitch installations on a daily basis, making them a valuable resource for do-it-yourselfers. The one-on-one, personal service you'll receive comes straight from an expert in the towing and automotive field. We've installed it, we've wired it and we've towed with it, so whatever your question, we can answer it.
California residents: click here
Videos are provided as a guide only. Refer to manufacturer installation instructions and specs for complete information.
Hi, Jesse with etrailer. Today we'll be taking a look at and I'll show you how to install the Blue Ox Trailer Hitch on our 2023 GMC Terrain. If you're looking to add some extra versatility to your Terrain, adding a hitch like this Blue Ox is a great way to do that. It's gonna give you the ability to add on some extra storage space to the rear of the vehicle, whether it be with a bike rack or a cargo carrier, and you can even do some light duty towing. Here's a closer look at our hitch. As you can see, it has a nice matte black finish, the cross tubes are mostly hidden behind the fascia, so all you'll see looking at the rear of the vehicle is the standard two inch by two inch receiver opening.
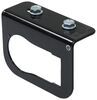
And behind that we have a standard 5/8 inch pinhole, the pin and clip not included with the hitch, however, we have many options available here at etrailer. Also, any accessory that you add on will most likely come with one included. And behind that, we have our nice sturdy safety cable loop here. Super easy to get access to and get whatever safety cables you might have. Also built into the hitch is this bracket, and this bracket's here to mount any wiring that you might have for your towing.
So if you have trailer wiring, instead of having to find a way to mount it up down here, Blue Ox was nice enough to include this bracket. A question we get asked a lot is, will my lift gate assist still work, the hands-free lift gate assist The answer with this Blue Ox hitch is yes, you can just give it a kick there in the regular spot and it works just as it did before the hitch was installed. Now for some measurements from the ground to the top of the inside of the collar is only 10 and 3/4 inches. So just keep that in mind, any accessory that you add on here, make sure you get one with a rise to it. And as far as the center of the pinhole to the edge of the bumper, looks like it's about five inches.
So that number keep in mind for any folding accessories that you might add on to ensure they don't make contact with the vehicle. As for the weight capacities for the hitch, we have a gross trailer weight of 4,500 pounds, that's the amount of weight that you can pull behind the vehicle and a maximum tongue weight of 675 pounds, that's the amount of weight pushing down on the hitch. You do have the ability to add weight distribution with this hitch, however, those numbers will stay the same. And also be sure to double check your owner's manual to ensure that your Terrain can handle that weight safely. All in all, if you're looking to add a hitch to your GMC Terrain, you really can't go wrong with the Blue Ox, especially if you're planning on doing any towing since it has that built in bracket that's really convenient.
As far as the install goes, it's a pretty simple process, you just have to fish wire some carriage bolts in and have the help of a friend to lift the weight of the hitch. So if it's not something that you're looking to do yourself, maybe you just don't have the time, the space or the tools to do so, feel free to check out our dealer locator. However, if you are planning on getting this installed yourself, feel free to follow along and I'll show you how we set up ours. We'll begin our install here. Under the vehicle, we have two T15 torque screws to remove, there's one here and one here. Let's pop those off. (tool whirring) Now we're gonna have to lower the exhaust down a bit, so I'd recommend having something under it to support it. I have a cam strap here so I can control lowering it down. If you're working on the ground, you could also use a jack stand or something like that. And we have two exhaust hangers here, one on each side. They have 15 millimeter bolts on the back holding 'em on. So find something to get back in there and loosen them up. (tool whirring) We have another exhaust hanger here, this rubber isolator, so I just sprayed some lube on it, you could use some soapy water or something like that. Just find a way to kind of slide it off. Helps to use a pry bar, and that should give us enough clearance there. We'll need to work the exhaust down below this part of the fascia here. So I'm starting on the passenger side, just kind of pulling down on both the fascia and the exhaust and we got to that point. Over on this side, I have our kick sensor here, so I just wanted to be a little more careful so I unplugged it, it just has a tab that you'll pull back and a pin that you pushed down on. Again, this is the kick sensor, so if you don't have that option, you shouldn't have to worry about it. But then same thing, just be a little more careful trying not to damage that module. Pull it down, and now we're below the fascia with the exhaust out of our way. In order to get our carriage bolts in place, we'll actually have to enlarge this hole. We'll see it doesn't quite fit up in there, so I just have a bur bit on a drill, you could use a rotary tool or something like that. Just whatever you have that will be able to cut into this hole, so I'll just work on getting it a little bit larger, then keep taking our carriage bolt and making sure it'll fit. (tool whirring) We didn't really have to make that hole much larger, just enough to fit our carriage bolt through, as you see it fits up through there. And also, I double checked our spacer block and that will slide right through, also. Now that we have our access holes enlarged on both sides, we're ready to take our fish wire, our spacer block, and carriage bolts. So we have three holes that we're going to be pulling the carriage bolts through, one on the very back, one right here, and one right next to our access hole. I'm gonna start with the farthest one away. Actually send our fish wire with the coiled end up through there. Pull it out through our access hole here, and take our spacer block and just kind of throw it up into our access hole for now. Take our carriage bolt, thread it onto the coiled end. Then I didn't make my access holes very big, so I actually put our bolt in backwards. Just feed it up there and pull this end of your fish wire. (metal clanging) Then we'll repeat that process with the other two holes on this side and then the three holes on the other side of it. Now for this step, you'll need an extra set of hands or at least helps to have one, I have my friend Shane here to help me. So we'll just take our fish wires, get them fed through our holes, Make sure you put them in the correct holes. (metal clinking) So as you can see, we kind of lifted one side into position, then lifted the other side. Once you have it up into position, you can pull your fish wire off and we'll just get one of the nuts in place for now. (metal clanging) With a 19 millimeter socket, I'll get all of our hardware snug down. (tool whirring) With a torque wrench, I'll go through and torque all of our hardware down to the specification listed in the instructions. If you don't have your own torque wrench, we do have some available here at etrailer or you could always rent one from your local auto parts store. (tool beeping) Once we have everything torqued down, we'll just need to hang our exhaust back up and put our two screws back in our fascia. Otherwise, that's gonna do it for our look at an installation of the Blue Ox hitch on our 2023 GMC Terrain.

Perfect fit, easy installation if you read the instructions.
Fit perfectly
The instructions good. Easy to follow
I thought it was easy to install
Im missing 3 nuts and 1 plate and box was busted open

Mike L.
9/20/2025
I see that you've been in contact with our Customer Service folks who are in the process of getting replacement hardware shipped out so it looks like everything is being taken care of. Please let me know if you need further assistance!
Info for this part was:
At etrailer we provide the best information available about the products we sell. We take the quality of our information seriously so that you can get the right part the first time. Let us know if anything is missing or if you have any questions.


Brooke M.
4/15/2025
Glad to hear that, Andrew! Thanks for sharing the process via photos :)