
To see if this custom-fit item will work for you please tell us what vehicle you'll use it with.
Thank you! Your comment has been submitted successfully. You should be able to view your question/comment here within a few days.
Error submitting comment. Please try again momentarily.
B&W is known for building hitches people trust. Made in the USA and made to last. This one bolts right on, with the receiver just below the bumper for easy access. Powder-coated steel holds up against rust, grime, and plenty of road trips.
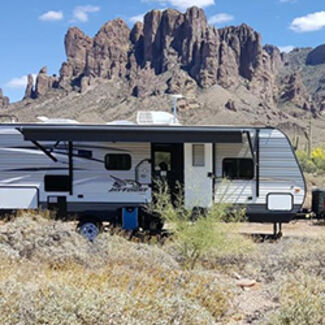
With a 675-lb tongue weight, this hitch is ready for your multi-bike rack or a fully loaded cargo carrier. Whether you're hauling electric bikes or extra gear for a weekend trip, it handles the weight with ease.
The 4,500-lb towing capacity makes it ideal for hauling small travel trailers, utility trailers, or lightweight boat trailers, giving you the flexibility to take your adventure wherever you want.
This custom-fit hitch lines up with factory holes, and the 3-piece bolt-on setup makes installation quick and drill-free with no special tools or welding needed.
California residents: click here
Videos are provided as a guide only. Refer to manufacturer installation instructions and specs for complete information.
Hi, I'm Andy with etrailer. And today, we're gonna take a look at the B&W trailer hitch for our 2025 Subaru Crosstrek. Now, this hitch does have a two-inch by two-inch hitch receiver opening, which will accommodate most of your accessories, like bike racks, cargo carriers, or even ball mounts. Now, the gross trailer weight on this hitch is gonna be 4,500 pounds. That is your trailer plus whatever's inside of it. And your tongue weight is gonna be 675 pounds.
That is the max weight pushing down on your hitch receiver. So that's not gonna be a problem if you wanna do some bike racks or cargo carriers. Now, I'll go ahead and get you a couple measurements you may need to know. (tape measure whooshing) So from the ground to the top of your hitch receiver opening is about 14 3/4. So that's important to know if you have some longer accessories, like a cargo carrier, and you wanna make sure, when you're going up a steep incline, that it doesn't bottom out.
Now, your next measurement here is from the center of your hitch pin hole to the outside of your bumper. That's gonna be about 4 1/4. (tape measure whooshing) So that's important to know if you have a folding accessory and you wanna make sure that doesn't come into contact with your bumper. If you decide to get this hitch for your Subaru, then please send in some pictures of you and your adventure with a review or comment. Now, getting onto the install, it is very simple.
This one is, actually, it does have side brackets that will bolt on separate. Now, it doesn't affect the weight capacities, but it makes the installation actually a lot easier and manageable to do by yourself. But if you don't have the time or tools to do it yourself, please feel free to check out our dealer locator. We can find a professional to do it for you in your area. But without further ado, let's get on the installation.
All right, and first off, we're gonna wanna remove this cover on this hole back here and there's gonna be one up here. So I'm just gonna get a trim panel tool. You could use pliers for this or a screwdriver. Get that one removed. (tool clinking) And this one as well. (tool clinking) we are gonna have to fish our hardware through this back hole here. But as you can see, it is a little too small. So what we're gonna do is get a die grinder burr bit and I'm gonna widen this out a little bit. (grinder whirring) And now that you've opened up both holes on both sides, I'm gonna hit them with some spray paint, just to prevent some corrosion or rust down the line. (can spraying) (can spraying) When you're waiting for this to dry, you can remove some of this caulking back here, either with a flathead screwdriver, a blade, or anything to get this off. (screwdriver clinking) And this might get in the way of when we raise our hitch up to sit flush against the rail here. (blade thudding) We're gonna get our fish wire and go through our rearmost hole. And I'm gonna bend it just slightly, just to make it a little easier to go through. I'm gonna feed this through and come out the hole we enlarged. (wire clinking) I'm gonna bend the end as well, just so that doesn't come back through. I'm gonna get our square washer on here as well as our bolt threaded on. Put our spacer up through our hole. (spacer clanging) And then, our bolt. (bolt clinking) (bolt clinking) I'm gonna fish this down. For the other hole that we enlarge, we're gonna do it a little bit differently. First, we're gonna get our fish wire through our square spacer, and then we're gonna thread on our hardware. (bolt swishing) And now, I'm gonna push the bolt through. (hardware clinking) Then, the spacer. (hardware clinking) And use that fish wire to put it through. So next, you're gonna wanna grab your bracket. We are gonna start on the driver's side here. And there is gonna be a washer that comes in the kit and this is gonna be a spacer. So you're gonna wanna put this on that rear hole here, (tape crinkling) facing the front of the vehicle. And I'm gonna tape that on just so it's easier to feed this into place. (bracket clanging) Now, I did leave one fish wire on and pulled the front one off. It's gonna make this a lot easier to get this into place. (bracket clanging) So I'll line the front one up. (bracket clanging) And with that front one in, (bracket clanging) I'll pull the back one out. And now, I'll get my hardware on. I did find it easier too to pinch it with your bracket. That way, it won't spin on you while you're getting your hardware on. (hardware swishing) Get that tightened down. (bracket clanging) Now, I'll take our fish wire off. (hardware clanging) And get our nut on. (nut clinking) (nut clinking) (nut clinking) (nut clinking) Now, I'm just gonna hand tighten these two and repeat this on the passenger side. And now, you're ready to lift the hitch into place. It's easier to have help when doing this. I got Zach here helping me. And you just wanna get that square tube in that bracket. (hitch clanging) And we're gonna get one of our carriage bolts through, (bolt clinking) just to hold it in place. We can go ahead and put the rest through and get all of our hardware hand tight. (hardware clinking) (hardware clinking) There is a little bit of play in this hitch, (hitch clanging) from side to side. Just make sure it's centered and you like how it's looking. And now, you can tighten and torque everything down. I'm gonna start with the ones going up into the frame. (tool clinking) (impact wrench whirring) (tool clinking) (impact wrench whirring) (impact wrench whirring) Torque all the hardware down to the specs in the instructions. If you don't have a torque wrench at home, you can purchase one here at etrailer, (torque wrench ratcheting and beeping) or you can usually rent 'em from your local auto parts store. (torque wrench clanging and beeping) (torque wrench beeping and clanging) (torque wrench beeping) And that was a look at our B&W trailer hitch on our 2025 Subaru Crosstrek.

Fits like a glove, a little confusing at first but once laid out No problems. Do wish you add the socket because of the long bolts. ( would have payed a little more to have had it ) Thanks to everyone from the YouTube, taking order to shipping.
Super easy install, everything fit as it should, no rubbing/vibrating with the muffler. Used a simple file to bore out the holes in the frame a small amount and everything went together as described
Nick S.
11/3/2025
That is great to hear, I am glad the install went as it should with no issues! What are you planning to use the hitch for?
I have a 2024 Crosstrek Wilderness. Like the other review the muffler initially vibrated against the back of the hitch once the muffler heated up. (See Picture)
To fix it I had to loosen the frame mounting bolts and pull the whole hitch mount forward. So if you have a wilderness once you torque up the cross bar bolts loosen the frame mounting bolts again and pull the whole thing forward.
Came quick I followed the instructions and video for 2025 Subaru CrosstrekI didn’t have a lift or jack stands which would have made it more easy but managed to get it installed. I like this hitch because it only showed the 2” receiver which made it a cleaner look.Seems heavy duty.Will mainly use it to haul my Catrike on a converted hitch hauler.
Install advice DO NOT use a Die Grinder Burr Bit as the install video suggests. Instead use a #5 (1/4"-1 1/8") Step Drill Bit. You will also need a 6" extension to access the frame on the driver side. The passenger side is the easiest to access. With a Die Grinder Burr Bit it took me 40 minutes to widen the hole big enough to get the bolts to fit on the passenger side. Also note the the carriage bolt is 1-2mm wider than the metal tab. On the driver side the exhaust is in the way (I tried removing it, which is a huge pain. I would not recommend) No matter what I tried I could not get access with the Die Grinder Burr Bit with the exhaust and manifold in the way. So, I went to Harbor Freight and got the step drill bit. With the 6" extension I was able to make the hole big enough in about 10 seconds vs 40 minutes with the burr bit die grinder. Installed it fits great. I like how there aren't any metal bars hanging down like on some of the other options on this site. Its got a low profile look like the tow hitches that cost 2+ times as much. Definitely recommend. Bummed that I spent $35 at the local hardware store on die grinder burr bit then $40 on the step bit though...
The BW trailer hitch was a great product came nicely wrapped in its box and insulation was very easy.
I’m truly glad I chose this trailer hitch receiver. There were several factors I considered before making my decision:
• Towing capacity: I wanted a hitch rated above my vehicle’s limit so it’s ready for any future needs.
• Warranty: Lifetime limited warranty is the standard I expect.
• Design: The crossbar shouldn’t be visible or hang too low.
• Made in the USA
• Strong customer reviews
• Reasonable price
• Ease of installation
• Reputable manufacturer
This B&W Hitch Receiver met all of those requirements perfectly.
The installation video on etrailer.com made the process look simple, but it required using a tool to widen one of the frame holes. Since I didn’t have that tool (and preferred not to modify the frame), I chose the alternative method—removing the rear bumper and accessing the holes from the back.
The installation wasn’t too difficult on my 2025 Subaru Crosstrek Wilderness, though it took about four hours to complete with help from my son. Before starting, I watched a few bumper removal videos for the 2024 and 2025 Crosstrek Wilderness models, which helped a lot.
As some other reviewers mentioned, the rear bumper plastic touched the crossbar slightly. However, it wasn’t a big issue. I simply pressed the bumper cover back into place and secured the retaining clip—problem solved.
Overall, I’m completely satisfied with this hitch receiver. The quality is excellent, and I really enjoyed completing the installation myself.
Great hitch and I saved $$$ over the dealer's price. IT was easy to install, however on a Wilderness Crosstrek, two odd protrusions on the underside of the bumper interfered with the corners of the side plates. This was remedied by simply trimming the plastic of the bumper with heavy duty scissors. I only had to remove about 1/2 square inch of material for a great fit, and it doesn't show or weaken the bumper. I'm mostly using the hitch for my Thule bike rack, but I also have a cargo rack and 8' utility trailer that will be used when needed.
Seems like a solid hitch receiver, and the install went pretty smooth with the help of the video, but it sits really close to the muffler on the 2024 Crosstrek Wildeness. I'm not sure if other trims have more space, but the muffler rattles against the receiver. I had to do some jimmy-rigging to create some space and stop the rattle. Overall, I do recommend this hitch receiver, but prepare yourself in case it sits too close and rattles against the muffler.
This hitch was very easy to install, with minimal tools. I like the low profile look of it. It works for my needs perfectly. I do wish it was matter black to blend better with the fla black plastic trim on my Crosstrek, but that is a less than minor issue.
Was able to do install myself, no helping hands needed. My drill didn’t quite fit in the space under the car needed to grind open the forward holes, was able to do this with a Dremel and a metal cutting disk. Also was able to install with the car parked flat, no ramps.
Easy to install, great instructions. Don’t skimp on your carbide burr bit if buying a new one for this project! Make sure to get a quality bit, you’ll be happy you did.
Do you have a question about this Trailer Hitch?
Info for this part was:
At etrailer we provide the best information available about the products we sell. We take the quality of our information seriously so that you can get the right part the first time. Let us know if anything is missing or if you have any questions.


Lazer S.
3/3/2026
Glad it wasn't too bad, Michele! And I hear you about the socket. I'll see what I can do about that moving forward. What are you going to be using the hitch for?