
Thank you! Your comment has been submitted successfully. You should be able to view your question/comment here within a few days.
Error submitting comment. Please try again momentarily.
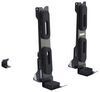
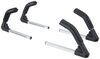
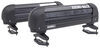
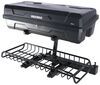
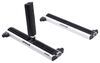
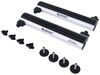
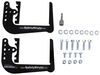
Expandable watersport carrier holds 1 stand-up paddle board with rubber-coated, ratcheting arms and an adjustable base - no need for load straps. Integrated locks secure your board to the carrier. Includes clamp-on and top channel mounting hardware.
Features:
Specs:
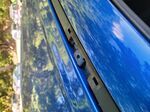
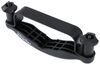
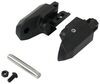
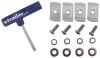
To install the carrier with the adapters, set the carrier on top of your crossbars with the top portion of the adapter clamp already attached to the carrier base. Then hold the bottom portion of the clamp under your crossbar and tighten the clamps down with the included hardware and tool.
Built-In Security
LockRack carriers have security built-in with locks in the base of the carrier, securing the ratcheting arms. Once you've locked your SUP in the carrier by pushing the arms tight against your board, the arms will stay locked until you remove them with a key. 
This carrier comes with 4 identical keys. Once the arms are locked in place, insert a key into the locking mechanism in the carrier base. Rotate the key to unlock and release the ratcheting arms. If you ever need a replacement key (sold separately) you'll need to know your original key number. This number is not located anywhere on the carrier so be sure to make note of the numbers printed on the inside of the original set of keys.

Videos are provided as a guide only. Refer to manufacturer installation instructions and specs for complete information.
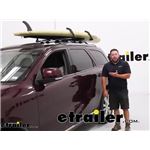
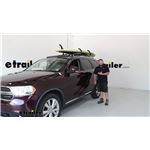
What's up, everybody It's AJ with etrailer.com. Today, we're gonna be checking out this Lockrack Universal Mount SUP Carrier. So this is gonna attach to round bars, elliptical bars, or even factory bars to help you load up your standup paddleboard and get on the road. Let's check it out. So Lockrack's system's pretty unique. You have this base system that you have arms that you push in towards the side.
So these arms are what's holding the standup paddleboard in place. You see I can shake the whole vehicle back and forth. That's how tight they are. It's not coming loose. And then we have the universal clamps down here going around my factory bars to make sure that's not going anywhere.
And then that's really tight to the vehicle, as well. Something I like about the Lockrack system is that you can build on it. So right now, we've got a standup paddleboard. Maybe down the line, I wanna get a kayak. I don't wanna have to buy a whole new setup.
All I have to do is buy different arms for the Lockrack. They'll slide into the base and then I can use it to haul a kayak. Focusing on the arms, they are rubber coated here. So this is what's making contact with the standup paddleboard, so you don't have to worry about it damaging or scratching anything when you push these in to get it tight. You get a plastic key that comes with these.
That's what unlocks the arms. So they are all keyed to the base. You slide it in there and turn it, now it just slides out. I like how easy that it is and also goes in a storage position like this when not in use. So you slide down, you'll see this is where it's gonna stop it. So it goes all the way in and takes up very little space on the roof of your vehicle. With the Lockrack in the storage position, I like it how it doesn't take up a whole lot of space here on the roof. It only adds about two inches to the top of these factory bars. Now, that might be different for your vehicle and your bars, but that's not a whole lot. So I can leave that up here and not worry about any clearance issues when I'm driving around. Now the base is gonna be made out of a lightweight aluminum, so that means it's not gonna rust or corrode when it gets exposed to the elements. So putting your paddleboard back up here when it's wet and getting some water on there or even being on the top of the vehicle when it rains is not gonna bother it at all. You also have the rubberized pads that slide in here covering up the bolts on the bases, and that's gonna help protect the board when you go to set it in a place. So this is what's gonna be making contact, just like the arms, so you don't have to worry about scratching it or damaging your board. The Lockrack base can handle up to 175 pounds, so just keep that in mind when you're loading your standup paddleboard. But also go by the lowest common denominator, so check your owner's manual if you have a factory roof rack or your roof rack to see what its weight rating is, and go by that if it's lower. Looking a bit closer at the clamps, there's gonna be a rubberized pad on the inside, on the top and bottom, that'll protect whatever bars you put them on. You also have bolts that go in both sides here and use a five-millimeter Allen wrench to tighten those down to get a good hold on the bars. This is what it's gonna look like when you get your Lockrack outta the box. So there's a lot of pieces. It's not as bad to put together as it might seem. So we're gonna go through it step by step. So first off, we have the two main parts of the base with the center bar in there. Now, this is what you're gonna need to figure out what you're carrying. So depending on your standup paddleboard is gonna be how much length you need in the middle. Ours is pretty wide, so we're gonna put it at the widest spot. So that means it's gonna be the last hole on this bar. It's gonna slide into the base of the Lockrack. And you wanna make sure you line it up with that first hole. Pass it up there. Right there is where we're gonna want it. So it's gonna have this much of a spread to set our standup paddleboard onto it. I've already assembled one of the clamps. This is how you're gonna get these. You're gonna make sure that you put the disc in between, and the end result will be putting it into place with the base. So I'm gonna slide that bolt through. We're not gonna tighten down yet. I'm putting it there just to keep the bar in place. Now I can't, make sure that it doesn't move back and forth on us as we assemble the clamp. So going to the clamp that's not assembled yet, it's pretty easy to do. You got the rubber pads that are gonna go on the inside, and that's gonna protect whatever bars you put this around. So it's not gonna be just plastic scratching 'em up. One's gonna go on top. Before we put that in place, we have our bolt with the flat side here. Now, this usually goes in the channel for channel mounts, but they actually let you run it up through the clamp. You're gonna see the side that has the hole here. We're gonna make sure that you get it seated right in there like that, line it up square, and then we'll put our pad to cover that up. Now we'll take our disc as a spacer, put it on top. We're gonna do the same thing you saw me do earlier and go underneath the base. And put it through the back hole here. Now since I didn't tighten this one down, I have to put this one back into position. So we'll push those down into place. Make sure you push up if there's not a lot of it coming through. Then we can add one of the nylon lock nuts. So let's start it by hand to keep it in place. Point it straight, front and back, as you tighten it down. We got the rubber pads we're gonna add in next. So this goes in the channel. You see on the underside they got the holes to match up with where the bolts go. So you wanna feed one side in first and kind of just work in the other side from there. Now make sure you put one bolt and nut in each side to hold the clamps in place. That way, you can just swing 'em around the bars when you go to set it up there. You will still have to tighten it up. You'll also have to move one of these, but it'll make it easier when you go to set it in place. You see that I got the bottom brackets all outta the way so I can just set it down on the bar and then I can line up with one we've already installed in the front. So once I get them even, we can start to swing the bottom brackets over and then add our bolts. We'll drop them through the top so you can put the nut on the bottom and then tighten down with an Allen. We're gonna do it evenly on both sides. So just go back and forth on each one of these. Now we're gonna move the arms so we can load up the standup paddleboard. So we got our key. We're gonna put it into place. It only fits one way. The tab here there's an opening, so make sure that's faced up. It should go right into place like that. You can turn it. That will release the arm and allow you to remove it. Looking at the arm, you can see that there's one notch here, that's the storage position, and then several options here for adjustment points when you put the standup paddleboard in place. Something that's gonna be helpful when you're loading up your standup paddleboard is to put your arms back in but put it in the furthest out position, so just this first hole. Remove the key, slide it in. Make sure it snaps into place. 'Cause you don't need the key to actually push it in. So it being this far back, I'm gonna set up the same one here, so when I go to load the standup paddleboard from the other side, it's gonna hit these and not just come off the roof. Just gonna make it easier for me when I'm just getting into place. Now I'll take the paddleboard and load up on the roof. Might need a second set of hands, depending on the paddleboard you have. But this should be okay just to set it up there on the base and then I can push it the rest of the way. Now I can continue pushing the paddleboard into place. You see it's hitting one of the arms on the other side, but that's okay cause it's locked in and it's not gonna go through or fall off. Now I can do the adjustment from front to back. Looks like it needs to come forward just a little bit more. And even using it and adjusting it on these pads, those rubber pads on the Lockrack base really do help. It didn't just slide easily across. It stayed right in place, so I know there's extra grip when it's sitting up here. I think that looks good right there. And at this point, we'll take the other set of arms and slide them into place. It's nice you don't need the key. Push up against there. With both of these, I'll get 'em started. Try and push to get that one extra click, if you can. But as you can see, I can shake the whole vehicle back and forth. It's not going anywhere. Overall, the install's not so bad. You do have to climb up there with a couple tools that can make it a little difficult, but you only really have to do that once because you can pull the arms out and make them even with the top of the vehicle. So it's not really in the way. I actually drove around with it a couple days on top of my vehicle and I was fine. I pulled the arms down, didn't get in the way, no clearance issues. I didn't have anything to worry about. I didn't have to worry about storing it inside the vehicle. So I do like the Lockrack setup, one, 'cause it holds the standup paddleboard really tight when you push those arms in. Still gotta use straps on the front and back. But really easy to set up and take down when you're done. I think that does it. Thanks for hanging out and hope this helps.


The lock rack system works perfect for my Paddle board.
Easy install that enables a secure way to transport paddle boards
Looks like a great product.
I installed the racks on my vehicle and the Rubber for Lockrack 9-7/8" Base blew off of the racks before I ever got to put a board on them now they want $80 to replace all four of them… I just spent over $400 for the rack and I’ve already got about $80 worth of replacement parts. I guess I should’ve glued them on also it may say they lock but anybody else who buys one will have the same key plus the installation bolts are not tamper proof either.
Do you have a question about this Watersport Carrier?
Info for this part was:
At etrailer we provide the best information available about the products we sell. We take the quality of our information seriously so that you can get the right part the first time. Let us know if anything is missing or if you have any questions.


Jenny N.
3/26/2024
Honestly I am surprised to hear that with this carrier. I will have our Customer Service team reach out to you for assistance.