


To see if this custom-fit item will work for you please tell us what vehicle you'll use it with.


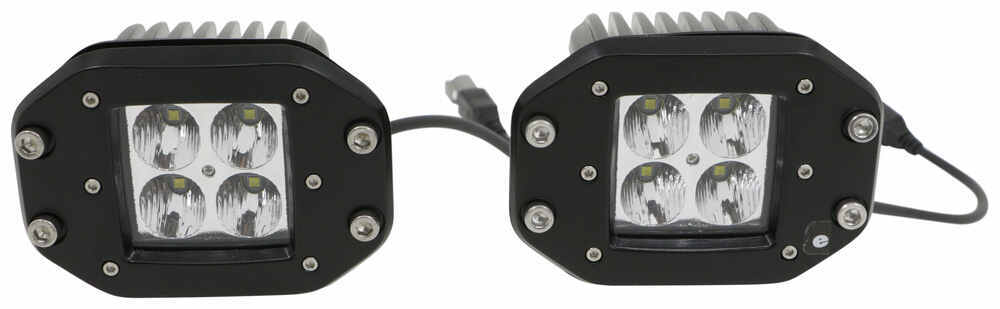


This replacement bumper gives your vehicle a rugged look, perfect for your custom build. Pre-drilled holes for attaching tow hooks and D-rings have a working load limit up to 9K lbs to help with help with recoveries on the trail. LED lights included.
Features:
Specs:
Videos are provided as a guide only. Refer to manufacturer installation instructions and specs for complete information.
Hi, this is Scott with etrailer. And today we're gonna be taking a look at our Aries TrailChaser bumper brush guard kit for our 2022 Jeep Gladiator. The Aries TrailChaser bumper is gonna come as a kit, as we see it here. And this is a modular system so you can change it around if you want, if you feel the need to change things up. Start out, it comes off, comes with our end caps here. And our end caps are also made of aluminum, just like our bumper.
And we do have our pods that come with the kit, and these just basically bolt in. They're LED pods. They're kind of cool. What they do is to have their own standalone switch so you can just kick 'em on. And say you're out on the trail or whatever, you can just kind of turn these on and they shoot off down the trail so you can see what's going on off to the side.
They're LED so they're pretty bright. They put out some pretty good light. I was kind of impressed with how bright they are after we got 'em all hooked up, and they end up looking pretty good. And those just bolt onto our center section here. Our center section has pretty much a lot of options as you could change up on this.
It's kind of neat. We did go with the round tube on this one. And everything just bolts right to this, and this is where it's gonna be your starting point of your kit. We ended up going with our round tube on this one. I think it looks pretty good on this style Jeep.
It does have your light mounts up here, so if you want to go with some additional, you know, little light pods or something up on here, or even a light bar that goes across here, you could do that. It's kind of a neat option you could go with. Our center section here does allow us to use our factory fog lights. So we do have them in. And then all they really do is just pop right in place, and it does retain the factory adjusters. So if you wanted to adjust where your light's pointed, you could do that also. And then those just run off our factory switch on the inside, so that's pretty cool. Installation on this one, really wasn't too bad. We put everything together sitting out on the bench and put it all together, and had another guy or two come in and help bolt it up, and went right in place real nice. But I will mention on this one, we did end up putting the optional winch plate in just to see how it fit. If you do eventually want to get a winch, I would recommend possibly getting that first because what that's gonna do is it's gonna keep you from having to take the bumper off to end up putting the winch plate on. So we just went ahead and put it on to see how it fit, and ended up fitting really nice. But that's definitely an option I would look at if you're looking at this bumper system. Being this is a modular bumper, it is gonna come in different boxes here. You're gonna have three or four different boxes it's gonna come with, and you're gonna have instructions for all your different components. You're gonna have instructions for your end caps, you're gonna have instructions for your lights, you're gonna have instructions for your center section and your bull bars. Basically, just follow along, and you'll be able to get it together with no problem. It's not really too hard to get together. If it seems like something that you may not want to be doing yourself, you can always look at our dealer locator and find a place that'll do that for you. That's a really nice option that we have. But once we get back to the installation, we will show you all the stuff that's gotta come off. Your factory bumper has to come off, and we literally have to take the whole entire bumper apart. You're gonna end up with a pile of hardware, you're gonna have a pile of parts and plastic and pieces. Basically, to get the fog lights out is not that big of a deal. Them just come out as entire housings. But getting at the wiring for your fog lights is gonna be the biggest issue. You have to pull your whole entire bumper apart and get way back up in here, and it's all in behind this part. So you pull this part here and you end up with your bumper beam and your support bracket and your plastic parts all over. It's gonna seem like a lot of stuff to take apart. But if you follow along with our instructions, you will definitely get through it. So if it seems like something you want to do yourself, stick around, watch our video, and we'll get it put on together. To start our installation of our new Aries bumper, there are gonna be a few things we have to do. First of all, we have to get off the bumper that came with our Jeep. So first thing we're gonna start doing is we do have some clips back here. These are just some standard pop-in body clips we have some along this side and it's coupled right here. We're just gonna take a screwdriver. You can either use a screwdriver or a clip tool, Today we're just gonna use a screwdriver and just start popping those clips out. Just kinda get behind 'em and wiggle 'em a little bit. And sometimes there may be a little dirt or something in behind them, so you just kind of wiggle 'em out like that and they will break loose for you. All right, now we're down to our last clip. You can see there's a little slot here. It may be in a way where you can't really get at it. What you can do is take your screwdriver and just spin it over to the side here. That's gonna allow you to get in there and get under it. And just wiggle it, get to come up, and then you can take both fingers and just pull it out of there. And once we have that out, our plastic piece should just come right out for us. Now that we have our plastic panel out of the way, we have our little clip here for our fog lights. What this little plug's gonna do, it's gonna allow us to pull the whole bumper off and just leave our lights in. And so we need to get at those with this off of the vehicle. So what we're gonna do is we're just gonna push in on this little clip here, and we're just gonna pull these two apart. And that'll get us disconnected from the Vehicle itself. All right, now that we've got that done up there, now we're gonna jump onto the vehicle here and we have our plastic skid plate we're gonna take down. What we're gonna do is we're gonna take an eight millimeter socket and we are just gonna back out these two eight millimeter bolts on the bottom. (electric ratchet whirring) (electric ratchet whirring) All right, now that those are out, we're gonna move on to our clips. We're gonna have quite a few clips across the bottom here. And they came, they can seem to be a little tricky to get at. You will be able to do it with a screwdriver, but we are gonna use a clip tool on these. And I'm just gonna get under 'em. And just under the big front top there, and we're gonna pull those out. May have to wiggle 'em again, just like you did the other ones, just to get 'em to pop loose. And we're gonna go across the whole front here and get all of those out, and that will get our little skid plate out of the way. These can be a little tricky so you might have to wiggle 'em around, maybe use your tool to kind of pull 'em part way out. Sometimes if you get up under that a little bit too with your tool, that'll help pull it out. It's just their location makes it a little difficult to get at. You probably could take the bumper off from above it and leave this part on and just pull it all off as a whole unit, but we're gonna take it off to make it easier for you guys to see. With those all out, now you can pull out your lower skid plate. All right, now that we have everything out of the way, now we're gonna start the process of taking our whole bumper off. And behind here on our bumper, we're gonna have four 18 millimeter nuts on the back of our bumper on each side. There's gonna be two on this side and two on this side, and the same on the passenger side. So what I'm gonna do is I'm just gonna break these loose first and make it easier on our tool to back 'em out. So just gonna use a ratchet and kind of break 'em loose. And I'm gonna go along and do that to all of them, and then I'll come back with my power ratchet and back 'em all out. (ratchet cranking) The nuts are gonna be kind of tight, so that's why we're gonna break 'em loose with a ratchet first. (ratchet cranking) And it'll be a lot easier once we get our power ratchet on it 'cause they are kind of longer bolts that they're attached with. So with the power latch, the ratchet, it's just gonna save us a lot of time. (electric ratchet whirring) And when you get down to your last couple, you're going to have an extra set of hands help hold the bumper up for you. You you're gonna be under here trying to get these off, and you'll want somebody to hold it in place. And then once you get the last ones out, you can hop out and then help them pull it off. (metal clacking) (electric ratchet whirring) Now that we have all the nuts taken off, we got an extra set of hands here, we're just gonna lift off our factory bumper and get that set out of the way for now. We will be reusing some parts on this one, so we're just gonna set it over here out of the way until we're ready for that. Since our bumper is modular, we do have an optional winch plate here. This is gonna allow you to mount a winch in behind your bumper and it makes it look really nice. We're gonna go ahead and see how this one fits on here and probably install it with our system just to show you guys how that is an option and it will go on with your Aries bumper. We're gonna take a 16 millimeter socket and ratchet and just break those loops. And we got two of them here. (ratchet cranking) Now we'll just come back in with our power ratchet and back those all the way out. (electric ratchet whirring) Now, if you just lift up, it will be slotted with little tabs here and you'll be able to move that outta the way. As you can see, it just sits in, kind of drops into place. Lift up and pull that off. Now with an extra set of hands here, we're just gonna lift it into place and get ready to get our top bolts installed and just kinda have somebody help you hold it there, should be fairly simple. And we're gonna run our bolt and carriage, we'll start that part over. We're gonna run our spacer plate and carriage bolt through and just get it through our winch there. All right, with this bottom one here, what we're gonna do is we're just gonna take our knee and get that lined up there, and we're gonna go through both the bottom and the side access hole here. And we're gonna run that one in. Kind of going to use both hands to get that to go into place. Can be a little tricky, but you'll get it. Once you get one in there, that's gonna help line up the other side. We got that and we'll get a washer on, our split lock washer and a nut, get it started. (metal clacking) Okay, now we'll do the same thing on the other side. Bring it up through the bottom. Can be a little tricky to get it in place, but you will get it there. Your spacer block may grab on there. You'll have to get it pointed up and down. And once you do that, it'll pop right into place. At this point, we're gonna get our winch plate fairly level here. Make sure it looks good to you and get it where you want it, and we're just gonna snug 'em down real quick. (electric ratchet whirring) And then once you get one, you want to get it kind of looking good for you, get it where you want it and get it snugged up. (electric ratchet whirring) Now that we have our winch plate on and we got everything snugged down, we're just gonna go back through and tighten up our hardware to manufacture specifications in the instructions. (torque wrench beeps) (torque wrench beeps) With our winch plate installed, now we can start with our installation of our Aries TrailChaser bumper. With this on here, if you do plan on ever getting a winch or you do have a winch, I would recommend probably getting this part on first. It's gonna save you time down the road from having to take your bumper back off and put this on and then put everything back on. This is gonna save you a lot of time if you do plan on running a winch. Now for this step in our installation, we're gonna need to get at our factory fog lights that are in our bumper here, and we're just gonna start by taking out these side panels on each side. So what we're gonna do is we're gonna remove all of these little clips around here, and we're gonna do that on both sides. So we're just gonna start with our screwdriver. And some of these may have a little dirt built up in them so you may have to wiggle 'em around, get 'em to pull out, but they will come out for you. All right, with all those removed, just lift off your panel, and that'll allow us to get to our housing for our fog lights here. Now that we have the panel out of the way, we're just gonna unclip our light here. We're gonna push in on this little clip here, and pull up on that, and we'll start to remove our fog light here. (electric ratchet whirring) Gonna take a seven mill socket and just break all these loose. (electric ratchet whirring) (electric ratchet whirring) (electric ratchet whirring) (electric ratchet whirring) Put those out, we can just pull our light housing out, and we will be reusing those. We'll just set those off to the side. (electric ratchet whirring) Now we'll need to get our wiring harness for our fog lights out from our bumper here, and we'll have to separate it, this beam right here, from our plastic bumper housing to get our wires from out behind there. To start off, we're just gonna take our clip tool and get behind these little factory retainers here and pop those out. We've got one here and we've got this one here. We're just gonna use our tool and pop those up carefully, not to damage them. We have those on both sides. Now to get our bumper beam out so we can get it at our wiring, we have eight nuts inside of our beam here that we're gonna have to take out. So we're just gonna take our 13 millimeter socket and our power ratchet and back all of those out. (electric ratchet whirring) (electric ratchet whirring) (electric ratchet whirring) Now we can lift our beam out so we can get at the harness here. So our new Aries bumper is gonna utilize our factory fog lights, and this is really kind of a cool way this goes in here. All we're gonna do, we're gonna remove this housing here that's around this. So what we're gonna do is in these little clips is we're just gonna push in, you see these little clips here, we're just gonna push those in and get our housing to kind of go past that. And then we're gonna do it on this side and we're gonna push some clips in and get that to go past it. And you'll see that's gonna slide out. Now down here on our adjuster, we're gonna do the same thing. We're just gonna push some clips in and push that out and pull off the whole housing. Now what we're gonna do is we're gonna go over to our new bumper. Hole's in here. What we're gonna do is we're just gonna pop it right in place. We're gonna line it up, get everything lined up here, just pop it right into place and it sits in there nice and tight. You still retain your adjusters on those. And it gets your fog lights tucked back in and protected back there in that new bumper. With it pushed in, you can see how these little tabs just lock it in the little plastic tabs that come on our factory housing. And it pretty much just mounts in the same way it does on our factory mount. It just click right in place and holds it in really nice and tight. Now that we have our fog lights in our new bumper that we're gonna be installing, we're gonna have to get our wiring harness out of here. So what we're gonna do is we're gonna have to undo all these little mounting bolts that run around the perimeter of our bumper, all the way around. We're gonna remove those. But first, we're gonna start by pulling out these hooks and those. Get those outta the way. Those just pull out through the bottom there. And we'll set those off to the side. Now, we can start pulling out all these screws. It's nice to have a magnetic tray or a little bowl or something to put 'em all in 'cause you're gonna end up with a whole lot of them that come out of this one. (electric ratchet whirring) (electric ratchet whirring) (electric ratchet whirring) (electric ratchet whirring) Now that we have all of our bolts out out of the back of our bumper here, we're just gonna lift out the inner panel here, and that is gonna open up to where we can get at our wiring for our factory fog lights. Now, to start doing that, all we're gonna do is we're gonna pull 'em up through the hole here and get 'em out of there. That will be our first step. Let's get our connections through. Now we'll just go along the back of our bumper panel here, and we will start popping out our little clips. We're just gonna use our clip tool and try and get up under these, and that'll help us pop 'em out. Just give it a little pressure, and they should come out for you. The harness part will probably just get your tool under there. And once you get it all the way under, just kind of give it nice pressure, and it'll pop right out. With those all popped out, now we have our wire harness free for our fog lights. Now we've got our center section here all set up, and we're gonna start on our end caps. This is the next step in our direction. So what we're gonna do with this one is we're gonna go with the one that has the pod lights that ships in the kit, and it's gonna have all of our hardware and everything we need. These are gonna go on with our three bolts here, washers, and our nuts. And these out here, the outer ones here on the outsides towards the back are gonna be really easy to do. It does get a little tricky when we get to the one up here in the front. And that one you're gonna have to get your hand up in and kind of work it around, but we'll show you how to get that done. We'll get a washer on then our split lock washer, and we'll start the nut. Just want to snug it down by hand, And that'll hold it in place for you. And then we can move on to our next one. This back here is gonna be a tight fit, so you just take your bolt and kind of get it to work through there. And you may need to hold it together. Now that you have these two here, I would just hold this together and then get your washers to go through. You're gonna be going through this slot underneath here, and that's how you're gonna get access to it. If you can get your hand in there a certain way that it seems like it works best for you, I found it easier to get down a little bit and so I can get a better angle with my hand while holding the bolt in and then just go in from underneath and just get my hand in a certain way. And it worked out really well. They give you enough room in the slot down there to get in there. It just may seem a little awkward at first when you're trying to do it, but you can definitely get it done. Now we're just gonna snug down our three bolts here. And we're just gonna get 'em snug and then we'll come back and get 'em to the correct torque specs. Now this one here, this bolt down here in the front, it is gonna be a little cramped, but you'll, you'll be able to get in there with a ratchet, but you'll get have kind of limited area to move your ratchet. But I just take a normal box-end wrench and get down here in the end, and I'll kind of alternate from turning the ratchet and also moving the wrench up here. Kind of get it to a point where it's snug with the wrench and then follow back up with doing 'em both at the same time and it'll get tight for you. If we have 'em all snugged down, now we're gonna follow up with our torque wrench. If you don't have a torque wrench, you could pick one up through each trailer or borrow one from your local auto parts store. We're just gonna bring them down to the manufacturer's specified torque settings in our manual. (torque wrench beeps) Now we'll get our LED pod installed. This is gonna be really nice to have on the ends of our bumpers, just kind of act like a ditch light a little bit, or kind of like light the sides of the woods up where you're going down a trail or whatever. We're just gonna get 'em installed here. If you could see on the bumper itself, we have a little little cutout there, a little rounded half moon area. That's gonna match up with the bottom of our light here. So this is gonna be the bottom. We're just gonna run that up in here, and you'll see how that matches up real nice there. (metal clacking) Okay, now we'll just hold it in place. And we'll insert our hardware from the bottom, hold that up into our light, and we'll get one of them started. Just hold your bolt into place and you put your washer on. And then you'll get a nylon lock nut started. Get it down finger tight, and that's gonna hold your light in place so you can continue on to your next one. Okay, now we'll get our back ones over here back in the back. These are gonna be a little more tricky. So we're just gonna start on those right now. We're gonna do one at a time here. We'll get one run through. And this one you'll kind of go by feel, just get your bolt pushed all the way through and kind of feel around to this side. Being upside down like this is gonna help keep your washer on the bolt. It just seems to be a little easier. Now, you can get your nut started on there and these we're just gonna tighten down snug. With the included Allen key, we're just gonna go ahead and do the hard ones first. Well I'm gonna go ahead and get that one popped on the one in the back. And the best way I've found to do it is just take your ratchet with a short extension and your 10 millimeter, and just put that on there, and actually just hold it with your ratchet there and actually use your Allen key to tighten down. And just get it snug and then move up to the next one here and do the same thing. Now that we have our light pods installed, our kit will come with our wiring harness that we need to get 'em all wired up. Since we're not leaving this bumper on this vehicle, we're gonna end up just doing the mock-up of it and we're gonna run these under the hood so we can show you guys to how the lights work and everything like that. But we will be showing you the installation of this wiring harness. Depending on how you order your bumper, it is a modular system, so you can change it up whichever way you want it when you order it up. For us today, we're just gonna go with a rounded brush guard and kind of go with that and see how that looks. With an extra set of hands, I'm gonna have somebody hold it in place, and I'll start getting it bolted in place. All you're gonna do is just start the nut. At least get it started on both ends of it, and then you'll follow it up with a ratchet. Inside of our brush guard up here, there will be a weld nut. So all you're gonna really run in for hardware is your washer, your lock nut, and the bolt, and it's already threaded up in the brush guard itself, so it makes it a little bit easier to install it. Now we've got 'em all started in there, now we've just gotta get in here and tighten them up. We do have the access for it here, but it's kind of a weird angle. So what I managed to do is get a swivel ratchet with a 16 millimeter socket on it and just kind of go in there at an angle like that. And once you get it on there, you should be able to tighten it up, just keep working your ratchet and you'll bring it down tight. (metal clacking) Now with an extra set of hands, we're just gonna get it set in place. It should set in place, almost really line itself up with our winch plate on there, and it's gonna fit right up against our frame rails. So it's gonna line up really nice for us. And it is gonna be a little tight fit, so we'll just kind of push back on it. (metal clacking) All right, this will be the hardware we get with our kit. You're gonna have our eight bolts here and our eight nuts, and we got our washers and our lock washers. The way we're gonna get this set up is we're gonna go on with a flat washer. And then once we put it on, we're gonna follow that up with a flat washer and then we're gonna go with a lock washer, and then our nut, and then we'll just run 'em all hand tight down on all of them before we go back through and tighten 'em all up. That's gonna let us get everything lined up the way we want it before we crank everything down tight. With our bumper in place, now we're just gonna go to the hardware. We're gonna take one of our bolts here and we're gonna take one of our washers and we're gonna start on with that and we're gonna just put one in place here. And we're just gonna go ahead and get 'em all in place, and then we'll get up under there and we'll start getting the rest of the hardware in place on them. It can be a little tricky. You may have to move your bumper around a little bit to get 'em to go in. Just minor adjustments as you go along. (metal clacking) All right, now that we're under here, we're gonna take a washer and we're gonna run it up on to the bolt we just put through, and we're gonna take our split lock washer and we're gonna follow it up with that. And take one of our nuts and just run it down hand tight. And we're just gonna do the same thing with the rest of them. There is gonna be one that's a little tricky, and I'm gonna go over that one with you here in just a second. But the three that I'm doing right now are fairly simple. You will have access to put your hand in this slot right here to get to the back of your bolts and hold 'em in place while you are threading on the nut. Now, this top one here, there is a way up top here that you can get through this hole to get your washer in and your lock nut. I noticed when I did the other side that you don't have much room to get between the frame and this inner piece of the bumper here. So I started looking around and I found out your bolt runs right through here. Here's the end of your bolt and you've got your threaded end right here. So I figured out a way to do it to where you don't have to try and squeeze through there. You're just gonna get your washer on here, and this is gonna make your life so much easier doing it this way. And if you can hold your nut on there and then turn your bolt to get it threaded, just like that, just hold it in place like that. And there you have it, it's threaded on. Now you can go back and tighten them all up. Now with them all started, we got 'em all in place. Now we're just gonna go back through and tighten them up with our 18 millimeter socket and our six inch extension and an 18 millimeter wrench, angled. And we're just gonna put the wrench up in the pocket here and follow up behind with our powered ratchet. (electric ratchet whirring) We're just gonna follow that procedure on both sides. (metal clacking) (electric ratchet whirring) All right, now that we got everything all snugged up, we'll just bring this down to the torque specified in our manual. (torque wrench cranking) Now that we have our bumper all torqued down, we're just going to go into our wiring here. This is gonna be our wiring for our lights that go on our bumper itself that came in our kit. This system here has our relay, and that's gonna be our little point where everything plugs into. And this does come all assembled. It's gonna have our switch here and it's gonna have our positive and negative. And our positive line will go to our positive battery and this will be grounded. And it does have our fused point here. And these will be our leads that run off to each of our lights over there in the bumper itself. We are gonna get this installed today. And what we're gonna do is we will show you how to get this hooked up. We will not be putting the switch into the dash because we will not be leaving this system in there, but we will get it set up, where we can show you as a demonstration on how the lights work. Now that we have all our lights installed, all we really did is just hooked up our factory fog lights and then ran 'em up and hooked them up on the passenger side of the frame here, where they both connect. And we just ran our wires for our new lights that come with our bumper. We ran them up along the frame rail there and then ran 'em up towards the battery we did mount. Up here in the engine bay, we did put our relay up in here and kind of ran our wires because this is not a permanent fix on this one. And then we did run our negative to our negative side, which is the black wire, and the positive, which is the red, over to our positive terminal. And for now, we just have our switch sitting right in here so we can kick 'em on and off so we can give 'em a look and see how they look. And those are basically gonna light up off to the side of the trail or to the side of the road for you. You can see what's going on off to the side. And that's gonna do it for our install of our Aries TrailChaser on our 2022 Jeep Gladiator.
Ratings & Reviews

Info for this part was:
At etrailer we provide the best information available about the products we sell. We take the quality of our information seriously so that you can get the right part the first time. Let us know if anything is missing or if you have any questions.


















Thank you! Your comment has been submitted successfully. You should be able to view your question/comment here within a few days.
Error submitting comment. Please try again momentarily.