bing tracking image
  1. Backup Camera
  2. Rear View Safety
  3. Backup Camera Systems
  4. Hardwired
  5. 4.3 Inch Display
  6. Rearview Mirror Monitor
Rear View Safety Backup Camera System - Mirror Monitor - License Plate Mounted Camera

Rear View Safety Backup Camera System - Mirror Monitor - License Plate Mounted Camera

Item # RVS-778718N
Retail:$317.99
Our Price: $299.99
You Save: $18.00
Backup Camera
Shipping Weight: 4 lbs
Add to cart
zoom in icon
slider vertical icon
zoom out icon
Comment field cannot be left empty.
Name field cannot be left empty.

Thank you! Your comment has been submitted successfully. You should be able to view your question/comment here within a few days.

Error submitting comment. Please try again momentarily.

Product Images

In Use/Installed

Need help with installation?
Locate installers near me
1-800-940-8924 to order Rear View Safety backup camera part number RVS-778718N or order online at etrailer.com. Free expert support on all Rear View Safety products. Great prices and Fastest Shipping for Rear View Safety Backup Camera System - Mirror Monitor - License Plate Mounted Camera. Backup Camera reviews from real customers.
  • All Info
  • Reviews (4)
  • Q & A (0)
  • Videos (3)
  • Photos

Rear View Safety Backup Camera - RVS-778718N

  • Backup Camera Systems
  • Hardwired
  • 4.3 Inch Display
  • Rearview Mirror Monitor
  • License Plate Camera System
  • Rear View Safety
  • 170 Degrees
  • Replaces Existing Mirror


  • Rear View Safety backup camera system
  • Mirror monitor
    • Replaces existing rear view mirror
    • Bright 4.3" color TFT LCD screen
    • Mirror image capability
    • Distance grid lines
    • Power harness with 2 camera inputs
  • Night vision backup camera
    • License plate mounted
    • 170-Degree viewing angle
    • Compact design makes camera virtually invisible
    • IP68 Rated - keeps out dirt and moisture
    • Shock resistant with 10G vibration rating and 100G impact rating
  • Includes all wires, connectors, and mounts
  • 1-Year warranty


RVS-778718N Rear View Safety Backup Camera System - Replacement Mirror Display - License Plate Mounted Camera


Video of Rear View Safety Backup Camera System - Mirror Monitor - License Plate Mounted Camera

Videos are provided as a guide only. Refer to manufacturer installation instructions and specs for complete information.
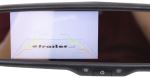
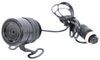
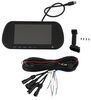
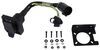
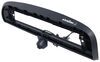
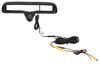
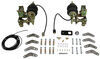


Video Transcript for Rear View Safety Backup Camera System Installation - 2012 Toyota Tundra

Hi there, Toyota owners. Today, on your 2012 Toyota Tundra, we're gonna be taking a look at RVS's backup camera system with a rear view mirror display. We just got to here to work and we decided we wanna get out of here right on time today. So we're gonna back into our parking spot, and there's cars on both sides, well, we can use our backup camera system here to guide us right into that slot with ease, we've got confidence 'cause we've got everything that's right behind us that we need to see right there. And we can even use it to kind of determine, hey, we're fully in our parking spot, because we saw that we got our hitch over the bumper that was back there. And we are now where we need to be, time to get it into work, and then when the bell rings, we're gonna get right out of here today 'cause we can shoot straight out of our spot and get on out of here.

And this is what our rear camera looks like when it's installed, it installs behind your license plate, the bracketry is actually behind the license plate there and then it comes up and over and hangs out right here in the front with a nice small little cube-sized camera here. And we can also open our tailgate here while it's in place. And it's not going to affect it at all. Clears our camera. You can also adjust the angle of the camera, you can see there's a screw that runs through here, lets you pivot it up or down however you need it.

Straight back is usually kind of the ideal position if you're using it to back up for like parking, just kind of for obstruction view. But I like that you can tilt it down 'cause if we're gonna hook up to a trailer hitch, might be really useful to be able to see your hitch ball lining up under the coupler, so you can even find a happy medium there that works best for both of those situations for you. There's also another screw here on top and that one will get very minor side-to-side adjustment. It's hardly mounted there 'cause you can see it's bent over. I don't really think it's intended for side-to-side adjustment, I think that's more just to hold it in place, but you will get just a little bit out of it if you find that it's just like ever so slightly offset to one side, you can attempt to straighten out just a little bit.

And this is also really nice for hooking up to your trailer, we can use our backup camera to help ensure that we align our ball up with the coupler and with our trailer here. Now, we're coming in a little bit crooked than we should because we have a bunch of trailers around here, but we're easily able to maneuver around all these trailers. Now, I am gonna, looks like I'm gonna stop there, we can see that we're getting pretty close, but it looks like our coupler on our trailer might be down a little bit too low. And we get this visual cue here to not only help us line up to our coupler, but let us know that, hey, we need to get out there and raise that up before we continue on. So I'm gonna go ahead and raise that up and then we're gonna continue backing on up and we don't need a spotter to do it.

And this backup camera is not only useful for getting in that parking spot you need backed into easily or getting in and out of your garage or driveway or anything like that, it's also great for hooking up to trailers 'cause we can aim the camera right at our ball, we can back up and we can see here that we're lining up with our coupler, but we can also see that it looks like our coupler needs to come up just a little bit. We get these visual cues that help us both line up without a spotter and also let us know like, hey, you're about to touch that coupler with your ball there, maybe you should get out there and lift it up. So I'm gonna go ahead and raise it up, we're gonna use this to get lined up right under the coupler. All right, so we went ahead and raised it up here. And we're gonna just back it right up, line our ball up underneath of it there. And it looks like we're pretty close right there, so we're gonna go ahead and hop out and see how we did. It might not be perfect, but it should be close enough to where I could rock this into place and get it attached all by myself without having to pull forward and backward a bunch of times and get out and run back here and look and see how I was doing along the way. So now that we've put our camera through a couple of typical uses, cover a few additional features that we have here. So you can see it as offset a little bit towards the driver here, so we do still get some of our rear view mirror there to utilize to see what's behind us in addition to our camera. And there are some settings that we can adjust here, it is a full color display that has guides on it to help guide us back. You'll get a remote with it. The remote will allow you to turn it on or off. When you're in reverse, if you don't want the camera, you can use the remote to turn it off if you're like, hey, this thing, maybe it's covered up with snow or something at the moment. You know, it's hard to say the situation where it just might not be useful to you at that particular time, we can get it out of the way. It also has a second input on it. So if we weren't in reverse, for example, if you're not in reverse, it turns off the backup camera because it's hooked into a backup source here on our vehicle that triggers it to let it know that it can come on. But the other input source on here will allow you to use it when you're not in reverse, if you did have a second camera. You can get second ones here at Etrailer. We can adjust some of the output settings on our display here to increase the visual quality if it's not to our liking. We'll use the menu button on the remote here. And that's gonna bring that up there where you can adjust your brightness, contrast, and color, the select is the top right button there so you can use that, and then the up and down are just below that, so you can increase or decrease those values as you see fit to get the best picture for you. If we hit menu again, it's gonna put us into the next setting where you can choose your language and your scale. You can also set some presets. Another thing that this has is the ability to adjust the guidelines, and that's the center button on our remote there. You can see there we've got some kind of coordinate type measurements and we can adjust those here, you can see I can move each side independently, and this is nice because your camera might not be perfectly centered when you install it there, might be a little bit offset to one side. The angle might be a little bit, and you can adjust these to kind of get it set up perfectly for your truck. Each vehicle is slightly different in its width as well, so you could make it real wide to adjust to your vehicle if necessary. On our truck here, we might wanna set it a little bit wider. We can hit the center button again and that'll allow us to adjust the other side independently. We can move it up, down, left, or right. And there are quite a few other buttons on here, there are different trim levels of this kit where you can get additional features, this is one, this one here just has our camera made into it and can accept a second input if necessary. When in the menu, this is our select button to select your settings. You can then increase or decrease the value with the up and down buttons just below that. I will say, I did just notice there that if your hand obstructs this, it doesn't work, so just keep that in mind if you're feeling frustrated at some point 'cause you, you need to make sure you're not obstructing the sensor here on the end here that sends out its signal that it accepts. So now to give us an idea of the latency of this, we're just gonna do some, kind of do some backwards movement, and as soon as I let off the gas, you should see the background here through the mirror. And this, it's pretty darn quick, it's got a fast enough latency with just the start and stop that I can't really tell, I'm sure there is some latency there, I'm sure it's not a perfect system. But it does, it tracks really well, it's not jumpy. So that's pretty good. I think it's a pretty nice system overall. We're gonna go ahead and get this back to our customer now. So my final thoughts on this product, they are a little mixed. I would say in the end, the quality of the camera, the display in the mirror here, they kind of surprised me, they're a higher quality than I had expected, our display here actually has a pretty clear display, I can see everything very nicely. Decent color on it. And we're, in a minute here, I'm gonna go ahead and do some, kind of just some reverse, just kind of do a little circles here in reverse just so we can get an idea of the refresh rate of it. As soon as I start moving, does it start moving here on our display or is there a bit of a lag to it That'd be the only other thing that I would wanna see, and the little bit that I've used it so far seems like it has low lag, and we can run one more test just to kind of see. As far as the install goes though, I will say it's kind of a pain to install. It's a universal kit, it's obvious that it's not specific to this vehicle. You are likely gonna need some additional components to complete the install, mainly just due to its wiring and wire length. Being a universal kit, they give you plenty of length of wire to be able to connect your camera up here to your display, but as far as getting the power and trigger and everything installed, you really don't get much wire length for that, you're probably gonna need some extra wire, you're gonna need some butt connectors, you're gonna need some zip ties. So just keep those things in mind, it doesn't really come with with everything that you need, but you do get the main components, it's really just some electrical stuff to help get it installed. I highly recommend a fuse tap as well to make it easy to get power on this only when the vehicle's running here so that way, when you shut your system down, shut your vehicle down here, it's not draining your battery overnight. We'll begin our installation here inside the vehicle. First thing I wanna do is just kind of assess our vehicle here and verify, you know, our mirror and its functionalities to see, if we remove this mirror, how is that gonna affect our vehicle, is that gonna negatively affect our vehicle So the first thing we can see right away when we're looking at our mirror here is that we've got some electronics on it. So let's take a look at our mirror, and the first thing that we can see when looking at it is it does have some electronics in it, we've got some buttons down here, it looks like some sensors on it. It feels like there's a sensor here potentially on the other side of the mirror, on the backside here, we'll take a look at that, it's also got a compass up there. And these here, this is typically an auto-dimming type of feature or something that detects if there's somebody behind you to adjust sometimes more than just the mirror here, sometimes it adjusts other things in your vehicles to compensate for that extra light coming in behind you. So you just wanna keep all those things in mind, if you remove your mirror and it has features like this, it could change the functionality of some things. I don't believe we're gonna lose too much with this mirror, it looks like the features that we've got on here, these are for opening like a garage door, you can program it to your garage door, so that's not gonna really affect the functionality of our vehicle by getting rid of those. The compass up here shouldn't really affect the vehicle too much, but it is possible that if you have GPS or some features on the vehicle, it's most likely that those features are built into their own units, but every now and then, sometimes modules in your vehicle borrows information from other components, and it's possible that some components could use that compass, but I kind of doubt it in this case as well. The other thing is we've got this whole power button here, so you always wanna hit it and see what it does. And that's gonna activate our auto dimming feature there, the light from our camera automatically activates it, we can probably cover up the sensor there to have it return to normal, so we verified that that's auto-dimming. So that is a feature that's pretty nice that is not gonna be on our new mirror, so just keep all those things in mind. It looks like we're not gonna have anything to here that should affect the functionality of the vehicle, it probably won't turn any lights on on our dash or anything when we remove this component. I highly doubt there's any communication that's going to it. Based on its features here, it looks like we're okay, but you should always assess this, if it seems like any of these features might affect anything else in your vehicle, like any of your blind spots systems and stuff like that, it's possible, sometimes you've got them on the backside here, that'd affect your wipers as well for your automatic rain sensing and stuff if you have features like that. So we're gonna get this out of here, I'm pretty sure none of these things are gonna affect it 'cause I don't really feel an actual, it does have like a little sensor here but that's probably not for our automatic wipers. So to remove it, we're gonna go ahead and turn the ignition off there. We'll flip up on it just a little bit to make it easier to access the bottom. And then on the bottom side there, you're gonna have a single fastener. And we're gonna remove that fastener on the bottom using a T20 Torx bit. So we're just going up in there and we're loosening this up. And you don't need to take it all the way out of there, you can if you want it, in most cases, if you just loosen it up enough, it'll slide off of there. We're just gonna go ahead and remove the whole fastener. Set that in our cup holder. And now to remove our mirror assembly, we're just gonna slide the mirror off of its mounting location. Just follow the plane of your window going towards the headliner. And you got this little plastic guy there, you might need to pull down on that a little bit in order to go far enough, we can just slide that off to the side there, it's just a cover. And you have an electrical connector that's located in here as well. So we're gonna press down the release tab there and then disconnect this connector. We can now take our mirror and just set it aside. We'll be hiding this, just poking it in the headliner. At some point here, we've got other wires that we're gonna have to hide as we're running our new mirror and camera system, so we can deal with that when we're running those wires. Go ahead and grab our new camera now. And we're just gonna slide it into place. You may or may not need to loosen the screw, so just check that there, if it's flush or something like that, you might need to unscrew it some to make sure that it's not raised here so we can slide this in. And this is just gonna slide on just like that. And then we can use the tool that comes included with our kit to secure that fastener from the bottom there. And you can use the same tool to loosen it if you need to. They are different sizes on the ends. So we're gonna use the smaller one for this fastener. And that's it, we just need to snug it up to it, we don't need to go crazy tight, it's just to keep it from kind of vibrating around and to keep it from sliding off of there, but it's unlikely to slide off because it would have to go up and then kind of back at the same time, so it's just enough to give it a little bit of pressure to hold it on there. And now we've got our mirror mounted. Next thing we'll wanna do is we're gonna head to the back of the vehicle so we can get the camera mounted. It's always best to have your major components mounted first. That way, you know where you're gonna be routing your wire to. When you're routing your wires, you know you're gonna be going from component A to component B and you know where those parts are gonna be so you can route it in a good way to get there. I do recommend, before putting the camera there on the back though, if you've got a small battery box at home, it's not a bad idea to bench test this part before you run your wires just to make sure that everything's working properly here, 'cause it's really a bummer to run your wires and find out you've got an issue with some kind of component. So here we are at the back of the vehicle. The camera that comes into your kit is designed to mount behind your license plate. We can see there that our bracket here lines up with our fasteners. So we're gonna be mapping that there. You'll notice here that our wire has a grommet as well too 'cause this is a universal kit, this is designed to work with as many vehicles as it possibly can. So we're gonna take our wiring here and we have pass it through so we can route it up. Now, luckily for us, our Tundra here already has a cutout right here in this location just above the license plate. So that's gonna make our job a little bit easier, we're gonna be able to run our wire right through that. If you don't have that, you may or may not need to drill a hole, it just depends on your vehicle. Probably all of our Tundras are gonna have that unless you have some accessories on your truck that may utilize that. But it's pretty big opening, so it looks like this is probably for passing wires through from your tailgate, so you'll probably have enough room for this little tiny wire as well. But they give you this little grommet here so that way, if you did have to drill a hole, you would be able to and fill it back up. We're gonna repurpose this grommet though 'cause we need to get this wired up to the camera at some point. And I already did a quick inspection on the truck looking for factory grommets and stuff like that, and there's just not one in a good location, so we're gonna have to drill our own hole to get our wires inside, so we can repurpose this grommet for that functionality. I'm gonna carefully cut it here just down the side so I can slide it off. And we're gonna save this for later use. Well, now that we've got, now that we know how we're gonna run our wire and where we're gonna mount it, we're gonna grab our 10 millimeter socket and remove both of those fasteners there. Our license plate will actually slide in front of the bracket like this, now we have to hide our bracket and just have our camera there. So we'll take our fasteners here, push them through the license plate and through the bracket, double check on the back side, making sure that you're going through those, run our wire around this direction first so we can get this mounted up. And there we go, we'll just run that into place. That'll hold our camera. And then our wire here, we're just gonna push it through that opening. And I'm gonna try and feed it towards the driver's side, so your spare tire's right there, so the wire's probably gonna wanna like sit on top of the tire as you're doing this, it's gonna seem like, hey, it's not really going down, but you're gonna be able to get underneath there and just reach up above that spare tire and grab it. So now that we've got our camera mounted up, we've got our mirror and monitor mounted up up here, we need the wiring that's gonna connect them together. One of the things that we need to do is figure out how we're gonna get that wire from back there up into here. And I've already given it a quick assessment here, there's not a lot of good grommets and locations to be able to pass through the large thick connectors that we've got here. So we're gonna drill our own hole, we're gonna repurpose the grommet that we'd cut off earlier, we're gonna pull up these panels right here to get to a spot where we're gonna put it. So to remove this panel, we're gonna start kind of back here by the seat on the outside, we're just gonna get our fingers under there and just start working it up, kind of running this down, hopping it up along the way. There we go, until that comes off of there. We can then set that aside. We are also gonna remove the panel here towards the front, this one also just pops off of there. Just pull straight towards the passenger side. So just kind of pull it off your weatherstripping and then just push it that direction just like that. And after you push it that direction, to pop those fasteners loose there, there is a plastic nut that's located kind of up in here, we'll need to remove that as well. So it's kind of straight back from the bottom of your parking brake pedal, your pretty much just take your hand just straight back, and here it is. And now we can pull this thing towards the rear a bit to get that off of there. Our carpet here has this plastic piece that's right here. It clips on to these pieces kind of on the other side. It's kind of a pain to get off of there, just kind of gotta get under it and pull it up there. You gotta pull pretty hard. You're gonna feel like you're gonna break it. This is the clips here, right there, so you're trying to pull like slightly outward a little bit on it to get those to release 'cause you, but you gotta pull pretty hard. And then we're gonna peel this back to reveal the floor below it. And here, we can see this is where our parking brake cable's coming up. So if we can get near this parking brake cable, that'll be a good spot to come up, and then we can kind of come over here and maybe feed up the side of our steering column to get our wires up there. So we'll probably gonna drill our hole here in about this location. So we're gonna go ahead and put our hole right in this location here. So you can actually look right on the other side of the firewall here and you can see that by looking through the wheel well on your driver front wheel there, if you just look right at the backside of the wheel and the wheel well, you'll see where these bolts are going through and stuff, so you can get a really good idea of that area so you know that you're gonna be drilling in a good spot here. So we're gonna use our razor knife first to trim out some of the insulation here so we can get a better view of what we're gonna be working with. That looks pretty good there and that's a pretty good spot there, that should be big enough for what we're planning on drilling out here, we're gonna use a three quarter inch drill bit to make our hole, which actually works out perfectly with that grommet that we are repurposing, they match up very well. Now, we're probably gonna wanna make a pilot hole there. I went ahead and just kind of hit it real fast with my bit just to make a mark on it so I know the rough area where I wanna put this hole. I'm gonna switch down to probably like an eighth inch drill bit or something to make a pilot hole to make it easier to drill with such a large bit. All right, now we've got it enlarged to our three quarter inch size, we should be able to start passing our wires through. It'll probably be easier to pass the wires through first and then to install the grommet that we had repurposed instead of installing the grommet now and then trying to push the wires through the grommet. So now that we've got our hole drilled out, we're just gonna prep that by vacuuming up all the mess. After we get all that vacuumed up, we're then gonna grab a little bit of clear coat and just spray it on there to protect it against any kind of rust or corrosion. And since we can access this on the other side, through our wheel well, it's not gonna hurt to put a little bit of clear coat on the other side as well. So now that we've got our pass-through hole prepped, we're gonna get our camera wire routed down towards that hole. We'll get this wire sheathing here, it's kind of like a cover to protect and hide your wiring while it's traveling from the mirror up to our headliner here where we're gonna tuck it in and push it across. The side here that's kind of got the more wide shape is going to insert into the mirror like right, just like that. This does slide, so you can start in like this with it fully collapsed, route your wire up under the headliner, and then you just take this apart and you can slide it like that to take up the rest of the gap. So I usually take the wire first. You can kind of do a little bit of routing with it. Trying to get it around. And it's gonna kind of follow up and then run like that towards our headliner. You can kind of just pull down a little bit on the headliner to poke it in there, kind of get your fingers under there. A plastic trim panel tool also works pretty well if you're having a difficult time 'cause is it it's pretty tight there. Something like this. And that'll wedge up in there just fine, and you can kind of give it a little twist or pry down as necessary to be able to get your components poked up in here. And we're just gonna run this all the way down as far as we can, once our connector end, we hit that, we'll stop for a minute and make our next connection. And we're just working it down with our trim tool. And we've got right here our connector, so we're gonna take a break for a moment here to grab the harness that will meet with this connector end. And this is the harness that has your three wires here, you got a green, a red, and a black, as well as two inputs. And then we'll take the small female end here and this will plug it right in here to our mirror. And then we're gonna keep on running this down, when we get to our pillar here, we're gonna push it in behind this and wrap it around to our weatherstrip. So we're just gonna keep on keeping on here. So after I tuck it around to the pillar there, we're just pushing it behind the weather stripping right here. And I'll pull this back a little bit just so you can see, there's a bit of a gap right here between our weatherstripping and our A-pillar, so the wire actually tucks in very nicely in there. Once we get down to about here, we're gonna remove this side paneling. You can use your little trim tool here to get underneath of it. Pop that out. That'll just make it easier to get our wire routed down behind it. So we're just gonna put that in there. And then we're gonna peel this out just a little bit to get this wire back in there. And then that will just poke in from there. Pop that in all the way down. And here we are behind our paneling now that we had removed earlier near our hole. So we can start making our connections down here. We're now underneath the dash, right where we had pulled off those panels here, if we look straight up from where we pulled off the kick panel here, you'll find your fuse box there. This is where we're gonna get our accessory power for our system. So we're just gonna pull down on the cover there to remove that. And there's labels here on the cover. We're gonna be removing the fuse labeled ACC for accessory, that's the first 7.5 amp fuse from the back there. So we follow it from the back, go forward, there's that first 7.5 amp, that's our accessory fuse. We're gonna go ahead and remove the fuse from its location. And then we just need to verify which is the hot side of our fuse here, so we're gonna grab our test light to do so. So I've gone ahead and grabbed a test light, I clipped one into to ground, there's a ground stud located right here so you can easily get a ground for there. And then we turned our ignition key on because this is accessory, we should only have power here when the ignition is turned on. And we can see the light lights up on that side, so we know that's the hot side, and it does not light up on the other side, so we can also verify that this is hot in accessory by turning off the ignition and rechecking it. Sometimes, you do need to close the door and reopen it to kind of turn any kind of accessory delayed that might be on, usually the door being open will disable your accessory the way so that every now and then, you gotta open and shut that door to find out. So we're gonna check again, and no power there, so our door's open, everything's turned off. That's gonna work out perfect for us. Now we can grab a fuse tap here. We sell these here at Etrailer. They look like this. And when we insert this into our location here, we're gonna insert it just like that. We need to have our fuses in the correct spots. So actually, we're not gonna insert our fuse like that. The reason why we're not gonna insert the fuse like that is because we know that the left side here is the side that we checked that had power. And this is the wire that's gonna be going out to our camera here, this is our tap outlet. We don't want the outlet here to be on the same side that has power because if it is, that means it's not gonna be going through a fuse, it's just gonna go straight out the wire, we don't actually have circuit protection then. So we actually need to insert this fuse harness in this direction so that way, the wire is coming out that way so the current will flow through our fuse to go out. So now that we know what the proper orientation, we can go ahead and insert our fuses and put it in there. You're gonna put the fuse that you had removed from its location in the bottom slot here closest to the prongs. And then we're going to use a five amp fuse for the trigger source here that's gonna, I mean, for our accessory source for our camera, two power per camera, we're gonna use that in the top slot there. And now we're just going to insert our fuse tap up just like that, and then we can tap right in here to get our power for our camera. And then we'll only get power when the ignition is on, we've already tested and verified that. Now, in order for this to work here, you're not going to be able to reinstall your fuse cover. So you just wanna keep that in mind, these fuse taps are just way too big to work, to allow the cover to re-install. You do have the option to trim it out but honestly, it's so big, you'd basically just be cutting this thing in half, and I feel like you'd be better off just keeping this in your glove box or your center console so that way, you know which fuses go in which location and you've got it there, you know, for the future just for reference. So now we're gonna go ahead and take the red wire here labeled accessory positive. We just got our accessory source from that fuse location there. So we're just gonna take this wire and slide it right into the accessory spot that we just added. And I'm gonna trim off a little bit of the wire, it comes pre-stripped, there's a little bit too much stripped there. So we're just gonna trim off just a little bit of that to get that out of the way. That'll allow us to insert this all the way into the butt connector there. And then we can crimp this down. If you need a pair of crimpers, we have some here from Performance Tools, that's what I'm using here today, this is their multi-tool. And as a multi-tool, it works pretty decently. I wouldn't necessarily recommend this if this is your only source of cutters, crimpers, and strippers, and you do this every day as a profession like we do here. It's a great multipurpose tool, but really not for a professional, but for a hobbyist at home, it's a cheap solution that gives you kind of everything you need. And I've been using stuff like these here at home for little projects, I definitely keep a pair of these in each of my vehicles 'cause it's got a lot of functionality, it's just not the easiest thing to use, like you saw the crimpers had to go around, kind of not the best design there, but again, it's a lot of features in one, so they gotta put them somewhere. So now we're gonna hook up our ground wire and we're gonna attach it to the stud located right there. Ground wire here is your black wire. So we're gonna remove this bolt first because I'm unsure exactly what size we're gonna need to slide over it, so we got a couple of different sizes here, we'll find out together. Use a 10 millimeter socket to remove the bolt. We're gonna try to use the smallest one we can. Looks like that's gonna be too small though. So you're gonna want something like this, that's, I believe that's a 5/16th diameter right there for the inner. So we're gonna take this and crimp it on to our ground wire here. There we go. And we're simply just gonna take that bolt, slide it through the ring terminal that we just added to our black wire, start our bolt back into its position and then just run it back down. All right, we've got power and ground there now, that's pretty good, at this point, we can actually start testing some things if we wanted to to see how they are. We would need our wire routed up here, but we can plug it in to test it. But let's go ahead and finish wiring up the rest of our stuff here before we test it out. But we've got our trigger wire here. We're gonna connect to this, it needs to hook to a backup source. And you're probably, the most common place you would find this is at your taillight assembly, right at your backup lights, but we've put the wire here at the very front by your camera, so that's a pretty long run to make it to there, so we're not gonna be doing that. Instead, underneath the dash here, we found the backup relay. So whenever you pull the thing into reverse, your neutral safety switch, it's gonna let it know it's in reverse, it's gonna send a signal out to trigger the relay, the relay is then gonna close, send back to our lights to power it up so we can get that right here at the front. So it is gonna be a little hard to get to. You gotta get up underneath here, you'll find your relay. It has a kind of a tannish color, maybe even orange, you'd call it brown or orange, colored connector that the blue relay plugs into. And the wire color is coming out of the back of this, they're gonna be, there's two blue, there's that green. And then there's like a white with a black stripe type color. So that'll help you identify that there. But there's no way the camera main and mirror are gonna fit right here, my hand by itself barely fits in there, so you can imagine how hard it is to see when you're down here, but you can see it if you get up under the dash there. I'm gonna get, use a quick splice to quick splice onto either of the blue wires. Either of those blue wires will work for us. We talked about how the neutral safety switch turns on the relay. Well, that's one of the blue wires, is the signal of voltage going through the neutral safety switch, the position to let it know that it's in reverse to turn the relay on there. The output from the relay is also a blue wire, so that's gonna be the voltage coming out of the relay that goes to the lights in the back. That's perfect, both of those signals are only gonna be present when we've got the vehicle pulled down into reverse, so either of those will tell our camera that we've put it in reverse to turn it on, so you can pick either of those blue wires. I'm gonna go ahead and get my quick splice crimped on there now, I am gonna use a small extension wire as well because you see how long this is, I can't have it going across the brake pedals there, that ain't gonna work out nice. So we'll get a little bit of an extension over here and then we'll let you see how we made our connection there and then get this connected to the green wire. All right, now, unfortunately, the camera's not gonna be able to make the angles required to get to the relay. But I can describe to you where it's at, you got your switch assemblies here. And when you're looking in behind those, you can kind of, I always do this, I just give it a little bit of jiggle like that. And that way, you can see on the other side, the components are jiggling. It's pretty much straight back from behind where these switch connectors are. And then down just a little bit is where you'll find that blue backup relay with the connector that's plugging into it. And again, it has two blue wires, one green wire, and a white wire with a black stripe. You can tap into either the blue wires and be fine. We used a quick splice to crimp onto that. If you're using a quick splice, make sure you're using the color red 'cause those are designed for the thinnest gauge wires and these wires that are on here are very small, I would get smaller than 22 gauge. So we went ahead and quick spliced under that. We attached some orange wire to it 'cause we had it here in the shop just kind of laying around, and we're gonna run that over towards our green wire and make our connection over there. So if you follow the orange wire up, it's gonna hit a blue spade terminal. And that blue spade terminal we inserted into the quick splice. There are different types of quick splices you can get, you can get ones where it'll accept two wires and the quick splice will quick splice both wires together, we chose one that has a single quick splice and we quick splice it on to one of the blue wires going into the relay. And this particular quick splice has a slot for a spade terminal. We then attach the spade terminal to our extension wire, which is the orange one there, and then just slid the spade terminal into here. This tight space here is a little bit easier to work with if you're using the single wire style of quick connect. We can now make our connections here between our green wire, the backup signal wire, and that relay wire, the extension we've made here, so we're just gonna strip those back. We'll attach a butt connector to one end. If you need some butt connectors, you can get some at Etrailer here 'cause you don't get any in your kit that comes with your camera. Same with the ring terminals, you can get kind of all the accessories you'll need to complete this install here. And the green wire, we're gonna take off a little bit of the excess here 'cause they stripped back quite a bit. Attach these two together. All right, so now that we've got those hooked up, we need to get our camera feed hooked up. So you've got two inputs here, we've got the AV1 and the AV2. You actually wanna use AV2 when you're connecting it, AV1 will display all the time and you can turn it on and off. This is for if you can get like a breakout connector that you could plug into here and you could plug in like a PlayStation or something like that or a old video game or maybe a VCR. So now we're gonna take the extension wire that comes in our kit and we're gonna poke it through that hole that we drilled out. So I'm just poking it in and it's extremely easy to get to this hole because it's right there at your wheel well. And then we'll take the other end here and we're just gonna plug it in to that AV2 input. After plugging them together, tighten down the nut to lock these two in place. There we go, we've got our connection there, we'll be cleaning these wires up here in a little bit. But for the meantime now, we gotta get the rest of this wire that we pushed through here routed towards the back. We're also going to take our grommet here. And we're gonna slide this over our wire, and we can get that kind of poked into place as well. Again, this was the grommet that came in our kit. We can repurpose it from that back location to here. It is pretty tight, I'm probably gonna have to use a screwdriver to finish poking it in there. There's pretty deep grooves on it, so you're really gonna have to push to get it in there, you might consider going slightly larger than a three-quarter like we did to drill it. Maybe do just one size up from that. So now we gotta get that wire routed to the back, I've already routed it and I'm gonna show you the path I took. We had chosen this location to make our grommet hole, to drill it, to pass it through because we've got our parking brake cable that comes out here and this is a great thing to just follow heading towards the back, so we actually just do that, we just zip tied along that heading towards the back. It comes out right here, kind of on the outside of the frame, but then we go right on top of the frame 'cause the parking brake cable does and we just zip tie it along the top side of the frame right onto that cable. It's just right here on top of the frame, you can kind of see, every now and then, I dip it down around the outside here because there's some components that are on top of the frame so we just kind of make a little path right around those. And then just continue on, there's that parking brake cable, again, we do stay on the top of the frame there though 'cause our fuel tank's right here as well. So we kind of stay on the inside of the frame, going above any hoses and stuff for our fuel tank, it's very hard to see, it's pretty tight. But when you're down there, you can feed your wire up and reach on top of the frame to grab it. But once we get back here to the fuel tank, we do kind of cut towards the middle. And you can see here where we we're talking about those pipes, we gotta go around those pipes there. And then we head a little bit more towards the middle here, going above these crossbeams, zip tying with any factory harnesses that we see along the way. The reason why we're following our factory parking brake cable and these factory harnesses is 'cause they're already routed in a location that's gonna be free of excess heat, like things that comes from your exhaust or any moving components like your steering and suspension. And we wanna avoid all that and, well, the factory's already done that so why have to put any more brain power into it than we need to if we can just follow them Here, we just zip tied at the back. And this is actually this little tiny piece of cable right here. This is actually the camera wire that's coming off of our camera. Here's the little connector right here. We simply just plug the two pieces together, you pull your camera into the small harness that comes in your kit, it's gonna be about this long. The other end of that harness is right here and it has the same connector as we used up front that plugged into video two, so you just plug those two pieces together and then use the nut portion to thread the two together. And all the zip ties that we had used along the way, you can get packs of zip ties here at Etrailer, so you can add that into your cart when you're getting your camera 'cause it doesn't come with any. So you just wanna keep that in mind, there's a lot of routing, you're gonna definitely want some zip ties to make this clean as well as keep all your wiring safe getting all the way from the back to the front there. So let's head inside and make sure she's working. All right, so we just hopped in our vehicle here, we've put the ignition in the run position 'cause it does have to be powered in that accessory position at least to power up the camera. We're going to pull it into reverse now. And there it is, we've got our backup camera, we can adjust the tilt on that to give us a better angle, looks like the hitch is pretty big, kind of obstructs a lot of our view, so we can tilt that up a little bit to be able to see a little more. One thing I did do before hopping in here for the test, I noticed when I was inspecting the camera there at the back, there is a protective coating. Just get the film, when get something new, you just, you wanna peel that plastic off or else you're gonna have probably a cloudy image there. So if you do see a cloudy image, you probably didn't peel the shipping cover on it, your mirror also has one, I peeled that one off as well. All right, so we went ahead and took that connector for our factory mirror, I just pulled this down and pushed it up in here into the headliner to get that out of the way so it's a little more sightful. I'm gonna take our cover here for the wiring harness, we're gonna click it into place. I have to pull us just little bit more slack here down. And I'll click in there and this will extend up into there. I don't got it clicked in all the way just yet. And now we've got our wire protector in place there to hide our wiring. At this point, our installation is complete, we're ready to enjoy our new backup camera. And that completes our installation of RVS's backup camera system with rear view mirror display..

Customer Satisfaction Score:


Customer Reviews

Rear View Safety Backup Camera System - Mirror Monitor - License Plate Mounted Camera - RVS-778718N

Average Customer Rating:  5.0 out of 5 stars   (4 Customer Reviews)


by:

My wife rode with a friend for lunch who had a new car with a back-up camera. She was really impressed and was talking about buying a new car to replace her 2011 Ford Escape that would have the backup camera. I found a video showing how to install the camera on an Escape by etrailer. I was impressed by the company and bought a unit. It arrived quickly and I was able to install it following the instructions I had watched. It took me a couple of hours to install, the hardest part being fishing the cables to the rear of the car. Once installed it worked great. My wife is very, very happy with the install. She says she is much more confident in parking her car. Thanks a lot. I would, and do recommend etrailer and the back up camera kit.

Jim G.

8/25/2020

My wife has had the backup camera for a year now and is very happy with it. She has to park in a tight parking lot for her business and it has been very helpful seeing what is behind her. She is now backing into the driveway with the unit, making it easier to load and unload her car. Thanks again


by:

im very pleased with the product (camera & rear view mirror) takes a little work to get the cables run through your vehicle (f150) and finding a good power source (my problem) had one issue with a cable mfg took care of it over all had it installed for 1 year very happy got it manly for conecting to our travel trailer but use it all the time now


by:


by:


4
4

See what our Experts say about this Rear View Safety Backup Camera

  • Does Rear View Safety Backup Camera System # RVS-778718N Fit 2006 Chevy Colorado
    Yes the Rear View Safety Backup Camera System # RVS-778718N does fit your 2006 Chevy Colorado. The mirror attachment bracket would easily fit it since it's a universal design.
    view full answer...
  • Does Rear View Safety Backup Camera Mirror Come With Part That Glues to Windshield
    The tab on a windshiled that allows for attaching a backup mirror - or in this case the replacement mirror monitor - is not included with the Rear View Safety Backup Camera System - Mirror Monitor - License Plate Mounted Camera # RVS-778718N. That is something that needs to be on your windshield already, and you'd just remove the factory mirror from that tab and slide on the replacement mirror/monitor; you can see an example of this at about the 6:30 marked of the linked video install...
    view full answer...
  • At What Point Will Backup Image Show Up On The Rear View Safety Backup Camera System
    As long as you wire the camera system into the reverse light circuit it will turn on when shifting into reverse. After installation of # RVS-778718N, you will turn your key on. There will be a green LED comes on the mirror, that indicates that you will have power. Then place the vehicle in reverse and the backup camera comes on with a grid distance warning shown on the display. You will see a very clear and large display on our backup camera to show you what's going on in our mirror. If...
    view full answer...
  • Backup Camera for 2000 F-250 Super Duty Mounts in Rear View Mirror
    Best option we have for you is the Rear View Safety Backup Camera System # RVS-778718N. This will replace the rear view mirror of your 2000 Ford F-250 and give you one with a monitor built into it. The camera hardwires to the monitor and mounts on a rear license plate frame. It has gridlines too which you said you wanted.
    view full answer...
    Image 1 for
  • Rear View Safety Backup Camera System for 2013 Dodge 1500 Tradesman
    Yes, the Rear View Safety Backup Camera System item # RVS-778718N will fit your 2013 Dodge 1500 Tradesman. This is a universal backup camera that has 33 feet of cable. You will have no problems attaching it to your Dodge Ram. I have linked a review video.
    view full answer...
  • Rear View Safety Backup Camera System Not Turning On After Installation
    For your Rear View Safety Backup Camera System # RVS-778718N you can try some of these troubleshooting steps: 1. Perform a hard reset. Unplug all the cables and power cables and leave out for one minute, then plug back in. 2. Check the physical connections to the camera, and ensure they are tight. A loose connection to the camera is fairly common and typically the source of error. 3. Verify that the camera is connected to the correct port. The camera should be connected to the port...
    view full answer...
  • Where Does Camera of Rear View Safety Wireless Backup Camera System Usually Install
    The camera of the RVS Backup Camera Kit part # RVS-091406 that you referenced was mostly intended to mount under the rear hatch release of a vehicle like what you seen in the picture I attached. That said you can mount the camera in whatever orientation on your vehicle that works the best for what you need. On a 2004 Ford F-150 there isn't a great location for a camera like this so you'd be the happiest with the version that mounts using a license plate camera like part # RVS-778718N....
    view full answer...
    Image 1 for
  • Can a Second Camera be Added to the Rear View Safety Backup Camera System - Mirror Monitor
    Yes, you can add a second camera to the Rear View Safety Backup Camera System part # RVS-778718N. There are two video inputs on the wiring harness so you'd just plug the camera you wish to use into the other open input such as the Rear View Safety Backup Camera part # RVS-659 which is what I recommend.
    view full answer...
  • Is There A Third Brake Light Camera Confirmed To Fit My 2008 Ram 2500.
    I do have a Universal camera system that would work for you, The Rear View Safety Backup Camera System # RVS-778718N. We do not have any direct fit cameras for the older ram models that are confirmed to fit so # 3460012 will not work for you. I will attach a review link below.
    view full answer...
  • Length of Camera Cable that Comes with Rear View Safety Backup Camera System # RVS-778718N
    The feed cable that comes with the Rear View Safety Backup Camera System # RVS-778718N that you referenced is 33 feet.
    view full answer...
  • Will Rear View Safety Backup Camera System for 2011 Ford Escape Work with Compass and Temp Gauge
    The Rear View Safety Backup Camera System part # RVS-778718N will fit a 2011 Ford Escape and work great on this. That said, you'll lose the features you listed as these are not built into the mirror and we don't have an option with them. However, you will gain a nice color picture for use when reversing so you can see what's behind. In my opinion, the backup camera is far more valuable than the compass and temp gauge but I also under if you want to keep this. In which case, you'd need to...
    view full answer...
  • Version of Rear View Safety Observation System that Uses License Plate Bracket for Camera Mount
    Yes, Rear View Safety does offer a backup camera system that uses the rearview mirror for a display that also has a license plate bracket that has the camera mounted to it. For that instead you'd want the part # RVS-778718N.
    view full answer...
  • Reverse Camera Recommendation for 2008 Toyota Solara Convertible
    For reverse cameras I really like the Rear View Safety Backup Camera System part # RVS-778718N which displays on the included rear view mirror and has the camera built into the license plate bracket. This gives you a monitor setup that does not add anything to the dash and a camera setup that also doesn't require any permanent mounting. My brother has this same setup in his truck and he really likes it so it would work great in your 2008 Solara convertible.
    view full answer...
  • Recommended Rear View Mirror Monitor/Camera for 2007 Toyota RAV4
    We do have a rearview mirror and monitor combo for a 2007 Toyota RAV4, the Rear View Safety Backup Camera System part # RVS-778718N. The monitor has a nice and large 4.3" picture for the camera with grid lines for ease of use. The camera has night vision for use at night and comes with an easy to install bolt-on license plate mount. The monitor does have auto-dimming but there is no compass.
    view full answer...
  • Will the Rear View Safety Backup Camera System Part # RVS-778718N Fit a 2000 Chevrolet Silverado
    I spoke to my contact at Rear View Safety (RVS) about the Rear View Safety Backup Camera System part # RVS-778718N for your 2000 Chevrolet Silverado and they stated that this system is a confirmed fit and will work well for you. The rearview mirror does indeed have grid lines to reflect distance while in reverse but an auto-dimming feature is not equipped. For a rearview camera system with both an auto-dimming and grid line feature you will want to use the Rear View Safety G-Series Backup...
    view full answer...
  • Easy to Install Backup Camera for C6 Chevy Corvette
    I'd go with a mirror style camera as that will give you the view you want without having to mount a monitor on the interior. So the Rear View Safety G-Series Backup Camera System # RVS-778718N would be what I would go with. The display is 4.3 inches in size and has adjustable gridlines as well.
    view full answer...
  • Recommended Rear View Camera System To Use While Towing Camper On The Road
    I recommend the Rear View Safety Backup Camera System with Trailer Tow Quick Connect Kit # RVS-770613-213. This is one of the few hard wired camera systems that you can add to your camper. Since it is hardwired there is not a delay like you get with some of the Bluetooth wireless camera systems. Since power to the camera is sent through the monitor it makes it easy to turn the system off when it is not needed. The kit includes a 26' cable for the vehicle, 66' cable for the camper and...
    view full answer...
  • Is Camera Only Available for Hopkins Smart Hitch Backup Camera and Hitch Aligner System
    It's possible that Hopkins would offer just the camera but we do not and the only thing we could do for you in a new kit, the Hopkins Smart Hitch Backup Camera and Hitch Aligner System part # HM50002. If you do end up needing a whole new system, I would advise on a different product as I have seen your same issue more times than I can count. Also, no one wants a bulky monitor on their dash. This is why I recommend the Rear View Safety Backup Camera System part # RVS-778718N as it uses an...
    view full answer...
  • Recommended Backup Camera for 2014 Ford Focus
    For your 2014 Ford Focus I recommend the Rear View Safety Backup Camera System # RVS-778718N. This is a hardwired system which will prevent delay on the monitor when backing up. Instead of fitting over the rear view mirror it will replace the mirror completely. The display is within the mirror itself. The camera mounts above the license plate and has a 170-degree viewing angle. It is IP68 rated and also shock resistant. This camera system comes with a 1-year warranty.
    view full answer...
  • What Causes the Blue Screen Issues On the Hopkins Smart Hitch Backup Camera
    Yes, the seal for the camera on the Hopkins Smart Hitch Backup Camera and Hitch Aligner System part # HM50002 is not that great so moisture can get inside and ruin the circuit board. If you take the back cover off and try to clean the board that may fix this but otherwise your only option is to replace the unit. For this, a much better investment would be the Rear View Safety Backup Camera System part # RVS-778718N which also eliminates the need for a separate monitor on your dash. Historically...
    view full answer...
  • Will the Hopkins Smart Hitch Backup Camera Work with a Pioneer Radio
    The Hopkins Smart Hitch Backup Camera and Hitch Aligner System part # HM50002 will not plug into the back of a Pioneer Radio nor do we have a system that would. They like the Hopkins Smart Hitch Backup Camera are all designed to work with a specific monitor which is generally included with the kit. If you do not want to have another bulky monitor on your dash then we do have the Rear View Safety Backup Camera System part # RVS-778718N which display the reverse image on the rear view camera. I...
    view full answer...
  • Backup Mirror and Camera System for a 2014 Ford Fusion
    The backup camera system that I recommend going with is the Rear View Safety Backup Camera System # RVS-778718N. This camera system will replace the current rearview mirror on your 2014 Ford Fusion and the camera will install on the license plate. Rear View Safety is one of the leading brand names in camera backup systems and this kit allows you to connect up to 2 cameras. I am also attaching a video of this system being installed on a 2005 Ford Escape for you to use as a reference during...
    view full answer...
  • What Is the Field of View of the Hopkins Smart Hitch Backup Camera and Hitch Aligner System
    The Hopkins Smart Hitch Backup Camera and Hitch Aligner System part # HM50002 has a limited field of view as the viewing angle is only 110°. Therefore, it is primarily used for hitch alignment and coupling but it can also be used as just a standard reverse/backup camera. I know it's not as cost effective but if you're looking for a better option with more field of view, I recommend the Rear View Safety Backup Camera System part # RVS-778718N which has a 170° field of view and it uses an...
    view full answer...
  • Rearview Camera With Mirror Monitor for 2022 Coachmen Beyond 22C
    The Rear View Safety Backup Camera System # RVS-778718N you looked at would be my first choice for a camera with a mirror monitor. This includes a bracket that sits behind your license plate to mount the camera and has a built in 4.3" screen. If you don't plan on mounting this above your license plate you could also use the G-Series # RVS-776718 or # RVS-776718-DCT. These are surface mounted and have the same 4.3" display. The DCT model also has an auto-dimming feature, built-in compass,...
    view full answer...


< Previous
12


Do you have a question about this Backup Camera?


Info for this part was:

Employee Tyler C
Edited by:
Tyler C
Employee Jameson C
Expert Research:
Jameson C
Employee Joshua S
Video Edited:
Joshua S
Employee Jacob T
Video Edited:
Jacob T
Employee Cole B
Installed by:
Cole B
Employee Wilson B
Updated by:
Wilson B
Employee Daron K
Written by:
Daron K
Employee Zach D
Video by:
Zach D
Employee Jonathan Y
Video by:
Jonathan Y
Employee Brent H
Test Fit:
Brent H
Employee David F
Test Fit:
David F

At etrailer.com we provide the best information available about the products we sell. We take the quality of our information seriously so that you can get the right part the first time. Let us know if anything is missing or if you have any questions.