
Blue Ox Base Plate Kit - Removable Arms


To see if this custom-fit item will work for you please tell us what vehicle you'll use it with.
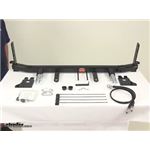
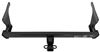
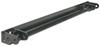
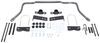
Custom designed to fit your vehicle so it can be safely towed behind your RV, this base plate has easily removable arms that offer a seamless look when you're not flat towing. Base plate bolts directly to your chassis, so no welding is required.
Features:
Specs:
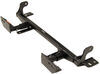
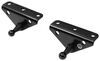
This base plate's hidden design creates a clean and seamless look. The bracket arms are easily removable, creating a slick appearance when you're not flat towing. Because the arms can be removed, you also won't have to worry about banging your leg into any protruding arms when you walk by.
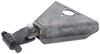
Attaching and removing the bracket arms is a breeze. To attach the arms to the base plate, simply insert them into the receivers and rotate them until they lock into place. Once you're finished towing and want to remove the arms, pull the pin to disengage the lock, rotate the arms, and remove them from the receivers. Finally, plug up the now empty receivers with the included receiver covers to help keep dirt and debris out of the base plate and provide a finished look.
Flat towing your vehicle is much more convenient than using a trailer or a tow dolly. These other options take up much more storage space, leaving you less room both at home and at the campsite. In addition, securing your vehicle to a trailer or tow dolly can be a hassle and more time consuming than hooking up with a tow bar.
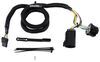
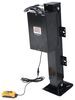
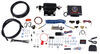
There are 5 basic components needed when flat towing a vehicle: a tow bar, a base plate kit, a safety cable set, tow bar wiring, and a supplemental braking system.
The tow bar links your towed car to your motorhome. It attaches to the custom-fit base plates that install on the frame of your towed car. Safety cables ensure that your towed car does not separate from your motorhome in the event that your tow bar becomes detached. Tow bar wiring allows your towed vehicle's signal lights to sync up with your motorhome's tail lights, which is required by law in most states. Finally, the supplemental braking system - also required in most states - brakes your towed car when the brakes in your motorhome are activated, preventing wear on the motorhome and decreasing braking distance for your entire setup.

California residents: click here
Videos are provided as a guide only. Refer to manufacturer installation instructions and specs for complete information.
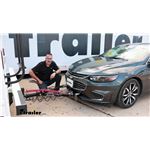
Hi John with etrailer. Today we're gonna be taking a look at Blue Ox Direct Connect Base Plate Kit with Removable Arms that we've installed on our 2018 Chevrolet Malibu LT. Now when it comes to flat towing, you're gonna need more than just a base plate. There's actually a number of components, especially if you're gonna be flat towing the Chevy Malibu. I mean you're going to need a tow bar, you're going to need diode wiring, some sort of supplemental braking system, some safety cables, and of course the base plate. And namely, this is what we're gonna be looking at specifically today, in this video, is the Blue Ox base plate.
Now if you've already got a Blue Ox tow bar, this is a great matchup for it. Blue Ox is, in my opinion, it's one of the top brands when it comes to base plates. This kit in particular has the removable arms, and I'll show you how they work right now. If you get into your location, and you want to disconnect this, simply gonna pull a pin, remove your safety cables, your diode wiring, your supplemental braking system, breakaway switch, and you're ready to roll. Now if you want even a more streamlined look, then you can take the removable arms off.
I do like the way that this kit fits the Malibu, and they have everything that you need as far as studs for your diode wiring already included. They also included a bracket for your breakaway switch for your supplemental braking systems as well. And this kit is going to include some plastic plugs that you could put inside of the base plate to keep dirt and moisture out. And it's just gonna make your life a little bit easier when it comes time to replace the removable arms in and when you're ready to hit the road. Now as far as installation of the Blue Ox base plate or any base plate on the Malibu, this is a very large and involved project.
The entire front fascia has to be removed. There's gonna be cutting and drilling, but the end result is nice. Blue Ox did a nice job integrating this base plate kit into the front. You don't have to trim the actual front of your fascia. There's just some minor trimming on the backside.
Now if you wanna see what it takes to get this base plate installed or if you're gonna bring it to a shop and see what they have to go through, stick around and we'll show you what we went through installing this base plate. Now to begin our installation, we're gonna need to remove the front fascia. In order to do that, we're gonna begin by removing eight T15 Torx screws from the front. (tool buzzes) Now there'll be a series (tool buzzes) of these running across the front. We're mainly interested in the ones that are holding down the fascia. You'll notice this one on both sides isn't holding the fascia down, so we'll leave leave that one alone and move on. (tool buzzes) Now once you have the Torx screws out, you can come to where the fascia meets the quarter panel here. You're going to have a 10 millimeter bolt that's holding these two together. Probably a ratchet wrench is gonna be your best option to get this out. You are gonna have one of these on both sides. (tool buzzes) Now we're basically working our way from the top down. Once we get the 10 millimeter bolts removed, come to the wheel wells, the instructions will tell you it's a T15. In our case today, it's gonna be a seven millimeter socket. There's three fasteners that we need to remove out of both sides. (tool buzzes) Now you can take the inner fender well liner, and we're gonna peel this back. Just push it off to the side a little bit as best you can, right here, holding these two pieces together is gonna be another bolt facing down, so we need to get that removed, same deal on both sides. Next, we can go underneath the Malibu all the way around the edge of the front fascia here, we're gonna have 15 seven millimeter fasteners that we need to remove. Now you're gonna see a lot more fasteners under here. They're all the same size. The ones with the clips, we can leave alone. We're just getting the ones that don't have clips on them. (tool buzzes) Okay, now we're ready to pull our fascia off. You may have noticed that I've already got blue painters tape down on some of these edges and that's just gonna keep us from accidentally scratching the paint. Up here at the top, when we first took these off, this little plastic trim can pop off and this might be a little bit easier to see what's going on when we remove the fascia. So these will just pop off with little clips. One thing we can do is come in the middle and the one screw that we didn't take out earlier, we're gonna lift the fascia up and over that on both sides here. Now over in the corners where we took that 10 millimeter bolt out, this gonna have a plastic plate here. It's kind of held in with a clip, and if you don't hang onto it, it'll slide back there but it's not that big of a deal. But we're gonna pop this out on both sides, and what that's gonna do is allow us to pull this front part of the fascia out. I've already pulled the tab on this side. Okay, so now the top part of the fascia is free. Now we can work our way to the wheel wells. I've got my hands underneath. I'm gonna slowly pop out and that'll release these clips here. I'm gonna go do that on the other side. While we're doing this, we're gonna be taking a look and seeing if there's any electrical connectors that we need to disconnect at the corners. (plastic pops) Now at this point, it's gonna be a good idea to have some help. I've got Joe here with etrailer and we're gonna pull this out and we're gonna be checking for electrical connectors. Now over here on the driver's side, we do have an electrical connector that needs to be disconnected. Now this is gonna have a red locking tab on it. Sometimes these things can be pretty tough to slide back. Once you get the red tab slid back, just push down on the black tab and it should disconnect. Now over here on the passenger side, we're gonna have a similar connector, but this one has, it's upside down and then it has a cable holder that we also need to disconnect (plastic pops) like right there. Now we can set the fascia off to the side. Now with the fascia removed, we need to remove the passenger side headlight assembly. It's gonna be 4 seven millimeter screws, (tool buzzes) one on the side, (tool buzzes) and the last one will be up in the front underneath it. (tool buzzes) Now with the screws removed, the headlight will be loose and we can get it out of its position here. We gotta find the electrical connector so we can disconnect it. It'll be on the backside and again, it'll have a red locking tab. Slide that to the back, disconnect it, set the headlight off to the side. Now with the headlight removed, we can access the 10 millimeter bolt that's holding the air baffle for the air intake. (tool buzzes) Now if we come to the front of the baffle, it's gonna be held on by one push pin connector. You can use a trim panel removal tool or a flathead screwdriver to get this removed, and just work the baffle out and set it off to the side. Now you still have your trim panel removal tool. You're gonna see the wire loom that's coming across over here on the frame. We're gonna be working here, so we need to get this removed and just kind of set off to the side. So pry these off. We will get this loom set off to the side and out of our way. Next we can remove the styrofoam off of the front bumper here, set this off to the side. We're gonna have two screws here on the air dams. We need to pull these off, (tool buzzes) seven millimeter on the front. We'll just stick with the passenger side here for right now. And on the other side of this, down on the inside is another push pin that we need to remove. This can be pretty tricky. Pull out the center, then you can pull the edge out here. Then we can take it. We're gonna feed it, kind of bend the front down here, and we're gonna lay it flat. And right here on the seam, we're just gonna cut it. This isn't gonna get reused, and we could use snips or if you got some aviation shears, whatever you need to cut this, this stuff cuts pretty easy, so just like that, just cut the whole thing off and do this on both sides. Now on the driver's side, we have a electrical connector that is tied in with this, with this shield here and we just need to disconnect it for right now away from the shield so that we can trim it. This is about the only difference from the passenger side. Now we need to remove the washer reservoirs. There's a few things going on here. Number one, we're gonna have 3 10 millimeter nuts that are holding it on. We're also going to need to disconnect this wiring harness, disconnect the switch, and disconnect the pump, and then we're gonna have to plug this pump. In our case today, it's worst case scenario, our reservoir is completely full. So we're just gonna take this a little bit at a time. First thing we're gonna do is we'll remove the wiring harness. You wanna be careful with this plastic. It's flexible, but it could be brittle if your car's a few years old. Just be careful about that. We can come to the coolant reservoir sensor here. This has got a red tab around it. Slide that back and then push the tab on the inside and that'll disconnect. Now for the washer pump itself, you take a small flat head screwdriver and just insert it right here and kind of just gently push up. It's gonna slide that tab and allow us to disconnect it like that. Okay, now we can remove our 10 millimeter nuts. (tool buzzes) Now the neck of our reservoir is hooked at the top so we're gonna have to lift it to pull it out. But before I do that, I'm going to pull the tubing out here, slide the reservoir, at the top, I've grabbed the neck of it. The neck will come out. So you can set that off to the side. Now with the neck back on, we set our washer reservoir kind of off to the side and zip tied it to the fender panel here. The only other thing we have to do is get this wiring harness off of the frame. The directions would have you disconnect a pump on your washer fluid reservoir and it's just not necessary. This is gonna give us more than enough room to work on the frame right here. Now we can take a straight edge and I'm gonna run this even with the frame. What we're gonna be doing, if you can see, the edge of the bumper extends past the edge of the frame here. So we're gonna be trimming the bumper on both sides. So the straight edge will keep us flush with the frame. We're gonna get this mocked up on both sides, and we can use the reciprocating saw to trim the edge of the bumper. (tool buzzes) Now with the sides cut flush with the frame, if you look straight down, you're gonna see a frame extension on both sides. You're gonna need to take a half inch drill bit, and we need to ream out this lower hole to a half inch. In order to do that, we can kind of bend this plastic panel out of the way (tool buzzes) and just get it from the bottom. (tool buzzes) There we go, so get this done on both sides. Now when it comes to installing the side plates, what we need is an 18 millimeter socket, and we're gonna remove the front two bolts here. (tool buzzes) Also, if you scratched up the frame at all when you we're cutting this flush, I hit mine with just a little black spray paint to eliminate any corrosion. You don't have to worry about the front up here, this is aluminum. Now these plates are not side specific, but we do need this front hook going down like this. So these are gonna set over like this and something that doesn't come in your kit that is recommended is gonna be Red Loctite. We sell this here at etrailer or you can pick it up at just about any auto parts store or home store. So this is recommended for all the fasteners when we go to reinstall everything. When we set this back up here, we are gonna have a little bit of, we're gonna need to level it and it's basically just gonna be eyeballing it with the top of the frame here. I'll get these snugged up while we're eyeballing. (tool buzzes) And once these are snug and we're happy with the orientation of it, we can torque this down to the specs that we can find in our installation manual. (tool buzzes and beeps) And you wanna do this same process on both sides. Next we need 1-1/4" hole saw, and using our side plate as the template, we're gonna drill 1-1/4" access hole into the frame. (tool buzzes) Now with our access hole cut, we can take a 3/8" drill bit and we're gonna ream out these two holes for our new hardware. (tool buzzes) Now we're just going through the one side of the frame here, we're not going all the way through. (tool buzzes) Now the hardware we need for this step is gonna be the 3/8" by 1-1/4" hex head bolts, lock washers, and then we need two of the handle nuts. We can come to our new holes that we've drilled here, and we can set the lock washers on our bolts. Then we're can apply the Red Loctite, we will slide that in. And then if you need to bend these, which we're gonna need to do for access, do whatever it takes to make it easy. Sometimes these things are pretty challenging to get on. It really comes down to making sure you have enough room in here to make the turn. So I'm looking down through, and I can kind of see that I've got it lined up. Okay, we've got this one on so we can torque these down. I like to do these one at a time and then clip this wire and then we'll start the other one. So we'll get these snugged up and torque down to the specs in our installation manual. Now these are 14 millimeter, (tool buzzes) gonna trim these. You can either bend them a lot and they'll snap that off or you can cut 'em. I'd like to snap those off, that way, we have a clean surface and work down for the next one. Now we can take our windshield washer reservoir and reinstall it. Okay, so I have the base plate pinned up on the passenger side with just one set of hardware here. Lemme show you what we have. You need total of six. These is gonna be the 3/8" - 16 by 1-1/4" hex head bolts, flat washer, lock washer, nyloc nut. So put the lock washer on and then the flat. And then, we're just pinning this base plate for right now. Just gonna set this stuff loosely in here. So we'll do this on both sides of the vehicle where we do all three on the sides, but leave them loose. Now we've got the sides pinned on both sides. What we wanna start with tightening is gonna be this 1/2 hardware that's on the bottom. So you're gonna have the flat washer, lock washer, your half inch hardware, and then a spacer block. The spacer block is gonna go in this frame extension right here. With ours, yep, we're gonna have to get a pry bar in here and open this up. But as far as this goes, got the lock washer and a flat washer. This is gonna come in from the bottom and I'll get a pry bar on the bottom of this and open this up for our spacer block. I will run this up. Now this block that's welded to our base plate is threaded and honestly this is gonna be the tough part is lining these up. So I've got a dead blow hammer, I've got a pry bar. So we're gonna use all of these probably to get these to line up. Once we do get 'em lined up and threaded in, then we'll tighten these, this one bolt here, and the one on the other side to the torque specs in our installation manual, and then we can torque the smaller 3/8" hardware on the sides. (tool buzzes) Now in getting the other side of the base plate lined up over here, I wanted to let you know that we did have some troubles getting these bottom bolts to line up. Whether it's manufacturing variances or if your vehicle may have been involved in a collision of some sorts, we're dealing with tight tolerances here, and ultimately, what I did was to pull these side bolts out first and then I was able to line up the bottom here just a little bit easier for me anyway, it was easier to have the bottom tight, and then align the three pins up here on top with a pry bar. So no matter what you do, if you're having issues with this, you can try loosening up the bottoms or pulling the pins out. The only thing that you really need to know would be that you want to torque the bottom, the two bottom bolts first, and then come in and torque the sides afterwards. And that's really what we did here. So we've got the base plate tight, and we've got everything torqued down, so our next step is gonna be to put the safety cables on. Now in your kit, you're gonna get two safety cables and two quick links. And so it's easier to show you over here on the passenger side. We're gonna hook these up the same way on both sides. But on the other side, the windshield washer reservoir blocks what we're doing. So I'm gonna show you on this side how we run this around. The only rule really is that we wanna keep this away from rubbing on things like charge cooler or getting caught up in the belts on the motor side. So we wanna come around, there's core support here because these really are just in the event something catastrophic happens and we have a disconnect up here. This is gonna hang onto it and still have this frame back here to hold everything together. So the quick link can come through, and just run this through and tighten up the quick link. Okay, and then you can take zip ties, that's what we're gonna use, and I'm gonna zip tie these quick links together so they don't rattle when you're going down the road. And I'm gonna zip tie here just to keep this cable nice and tight and down and away from the belts and the hoses. Now once you're done on the driver's side, if you still have your zip ties out, the connector that we had with the wind dam that we cut off down here, I'm just going to take this and secure it to our cable. If it ever needs to come off again, that's fine, but that way, this is secured. Now another nice feature of this base plate it does come with an optional breakaway switch bracket which we will be installing today. We'll need a 1/4" drill bit and on the front of this bumper here, there's a lip, about an inch or so. And for us, we'd like our breakaway switch right here. We can take our 1/4" drill bit (tool buzzes) and drill through the lip and the kit will have hardware included with it to bolt this up. (tool buzzes) Then we can just use the supplied hardware and this is a nyloc locking nut on the backside. Lemme get this bolted up. It's gonna be 11 millimeter. (tool buzzes) Now as far as trimming the fascia, in the directions, they're actually talking about the styrofoam bumper here. And in particular they're talking about the two lower tabs on either side. And when we fit this up to the bumper, we're gonna see what they're talking about is that the tab right here is hitting where the base plate is now bolted up, so I've marked it down here. What we need to do is just cut this flush, and you can cut this with a razor knife, but cut this on both sides. Now once we had the styrofoam trimmed, we reinstalled it back on our fascia. It's really just a matter of two clips on either side and then a center pin. Yours may have stayed on the whole time. Ours just came off when we pulled the fascia off. So from this point forward, the actual physical installation of our base plate is complete. We would only then just reinstall the headlight and all the other stuff and put the fascia back on. But if you're doing a full flat tow setup like we are, now is a great time to do the diode wiring, to do your supplemental braking system, because the entire front end's open here, you're gonna be, it's gonna make it easier for you to run the wires and get everything hooked up. So that's what we're gonna do right now. We're gonna run both the braking system and diode wiring, and then we'll come back and we'll reinstall the fascia. Okay, so we have our supplemental braking system installed and our tow bar wiring, I'm going to tidy up these wires along the front of the Malibu, I'm gonna install the air box and then the passenger side headlight, and then we're gonna get the fascia installed. If we run into any fitment issues or any problems along the way, we'll be sure to point those out. Okay, so the fascia for the Malibu went on relatively without a hitch. As long as you keep everything in order, like putting on the air box and then the headlight and then the fascia, you wouldn't, you're not gonna run into any problems. I will say that if you're doing diode wiring and a braking system, you wanna keep all of these components off until the very end. We did have to bend down our breakaway switch just to clear it, but otherwise there is no trimming on the front of the fascia to get this thing to fit. So that's gonna do it for today's look at Blue Ox's Direct Connect Base Plate Kit with Removable Arms on our 2018 Chevrolet Malibu LT.


Prompt service!
Great service
Fast shipping, good price, good product, easy install.
Do you have a question about this Tow Bar Base Plate?
Info for this part was:
At etrailer we provide the best information available about the products we sell. We take the quality of our information seriously so that you can get the right part the first time. Let us know if anything is missing or if you have any questions.


Thank you! Your comment has been submitted successfully. You should be able to view your question/comment here within a few days.
Error submitting comment. Please try again momentarily.