
Thank you! Your comment has been submitted successfully. You should be able to view your question/comment here within a few days.
Error submitting comment. Please try again momentarily.


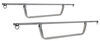
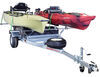
Stores two kayaks flat, stacked with space between - off the floor and easy to reach. The padded arms prevent hull damage, and there's no awkward shuffle to pull out the one you actually want to use. Great for a garage, dock, or by the shed.
This rack keeps your kayaks off the floor and out of the way, without forcing it overhead. No need to wrangle pulley straps or dangle 60 pounds of boat from drywall anchors. Just lift from the ground and slide it into place. Simple, stable, and far less stressful on your shoulders and garage ceiling.
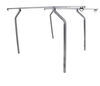
Freestanding design holds your kayaks without locking you into a wall. If you rearrange the garage or move gear to the dock, the whole rack comes with you. Yaks stay level, separated, and ready to grab - no digging through a pile to get moving.
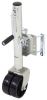
Each arm is wrapped in padding that cushions the hull and spreads out weight. Boats rest flat and secure without pressure points, dents, or hull warping. Keeps gear in shape for the next trip, not flattened from a season in storage.
This rack was built for kayaks, giving each boat its own padded cradle with room to breathe. You could hang a wetsuit or lifejacket on it, but it's better served keeping your watercraft supported, spaced, and ready for the next launch.
Flat, rounded, V-shaped, and pontoon this rack fits a variety without the need for add-ons or adjustments. The welded frame keeps everything stable, so nothing shifts or sags in storage. Take the fishing rig out on Saturday, and a touring kayak on Sunday - no time lost digging gear out of a pile.
The frame uses heavy-gauge steel with a weather-resistant powder coating that stands up to damp basements, salt air, or seasonal exposure on a back deck. The foam padding is UV-treated so it won't flake apart after a summer in the sun.

California residents: click here
Videos are provided as a guide only. Refer to manufacturer installation instructions and specs for complete information.
Hi, everyone. I'm Evangeline right here at etrailer. Today, we are taking a look at the Malone kayak and stand-up paddleboard rack. This can be used indoors or outdoors, can carry your kayaks or your paddleboards, or your surfboards, whatever you need for all of those fun adventures. This is available in different configurations depending on if you have kayaks or paddleboards. You can mix and a match, whatever your needs may be.
So let's talk about real quick how this carries those things. Whether you have a light paddleboard or an extra heavy canoe, this has an up to 125 pound weight capacity per item. And the way this accomplishes that is definitely gonna be the construction of the rack. You're gonna have these arms that stick out, durable arms with a rubber padding around them. So as you're hoisting things up and onto this rack, it's nice to know that this will stay steady.
This is not connected, by the way. You have two separate components here so you can move them as far apart or as close together as needed. In our case here, I've got a 10-foot kayak. So this fits perfectly where the cradles that's holding up our kayak are curved to support our hull. And then I just bring the kayak in, tilt that on over, and this keeps everything nice and secure.
And this is what the back of the rack looks like. So as you load up your kayaks and your paddleboards, you also wanna make sure that you're not scratching things up more than they need to. And what helps with that are these foam pads. So the kayak is resting up against it. The paddleboard, I can always just adjust this foam pad over onto the cradle, and that way we don't have fiberglass against metal.
And speaking of adjustability, these arms are adjustable too. In the back of this mast here, you can see how there are different holes. And as you assemble the whole thing, if you find that the paddleboard or the kayak needs to sit a little higher up because you have a large kayak on the bottom, things like that, you can very easily make those adjustments. Now there is a little bit of assembly required the first time. If you're curious about that, later in this video, I will go over that real quick. So what is your setup like How are you storing your kayaks Because I've tried them all. When I've tried to cram them indoors in a garage, they're taking up all the valuable floor space and getting tripped over or scratched up as they're sitting there. When you store them outside, they start to kill grass or you can start getting critters growing their little homes inside the kayak. So looking for a solution that makes it easier to store up or off the ground, and then when you can stack them up, it looks a lot better and it is a lot easier to maintain, clean, as well as bring to the water when you're ready for your adventures, that's where this comes in handy. Since this is designed as both an indoor and an outdoor rack, wherever you need it to be, it can go. I've noticed that this rack works best when it is loaded up with cargo. And that's because it's designed to be able to hold heavy things, but also handle whatever you throw at it. 'Cause imagine kids might be running around in the yard, running up against the rack, pushing at it, leaning at it. The feet underneath the rack are not only very stable, but they are also adjustable for uneven terrain. And if you are storing this indoors or on a deck or a dock, you can even add anchors to really bolt it down to the ground. So as you have your heavy, heavy kayaks on there, it's nice to know that they aren't gonna topple over anytime soon. Without the kayak and the board on, this is what it looks like. You can see the two separate parts, and it's actually really easy to lift around and put wherever you need it to go. Now, the assembly process I mentioned earlier does take a little bit of time, but once you do have it all put together, if you don't need this rack at the current moment, you can always stow it away in a corner of your garage since it doesn't take up much room. And before we get to the assembly process, let's first talk about how do you know which is the right rack for your different situations Because everyone has kayaks in different shapes and sizes and different storage needs. This is something that's helpful if you have up to two things. Now, this is available in different configurations, depending on what those things are, but there are other options too. You can get wall-mounted kayak carriers. You can get kayak carriers that go on the floor, but have wheels so that you can wheel them around or even work on your kayak on them. So if you're curious about those different options or maybe you need a little bit of advice of which one is gonna be the best fit for you, feel free to reach out to us right here at etrailer. We love getting people the best fit for their journeys. Now, if you're curious about that assembly process, I'll run you through that real quick. The good news is that everything is gonna be included with your kit from the parts to the hardware to even the tools. You're gonna get two 13 millimeter wrenches, and a lot of carriage bolts, which makes it a lot easier. So what you're gonna do is you're going to start at the bottom. You're gonna have this base piece here. You'll recognize it from its end caps and how it only has two holes along the center as well as the holes for the feet. So go ahead and attach the middle mast. This consists of the top mast with these struts. And then notice how these struts aim out towards the base of that middle piece. So this all gets fit together like a collar around your base piece. And when they are all fitting together, they're then secured with your two carriage bolts. So those bolts will go through all layers of metal and then they're tightened down at the end with the included hardware and your 13 millimeter wrench. There'll be three feet per set. If you we inchesre to use the anchor, that anchor would be placed between the two nuts on the feet. And then if you needed to adjust the level of the feet, this can also be done here by adjusting those nuts. Then you have this support bracket, and this is gonna be the regular bolts with the flat washers and the nuts. And then I secure them with the two 13 millimeter wrenches. Make sure as you tighten this down, you just take turns tightening so it's not pulling one way to the other. Next, you're gonna attach your top pieces. So the first piece you installed earlier into this video. The second piece is gonna look very similar, but then it will have a little bracket inside that fits nicely together. So this will be secured in the back with these two bolts. There's already gonna be a thread on the inside, so don't worry about that part. Once that is secured, you can then line up the cradles. This will be secured using two carriage bolts. And this is when you can decide where you wanna put your kayak or put your paddleboard. The kayak carrier will have this curve to it and a paddleboard carrier will be straight across. You can adjust them up and down, and tighten them down with your 13 millimeter wrenches. Finish off the job by putting the foam pads wherever on the rack they may make contact with your watercraft. I don't often do assembly overviews, but a lot of our neighbors here at etrailer have asked about them for Malone-related products simply because there are a lot of nuts and bolts involved and it can get a little confusing sometimes. So hopefully this quick overview helped you out. Again, if you have any questions, feel free to reach out. My name is Evangeline. I hope you have a good one.

Easy to assemble and holds my Oldtown Sportsman 120 and a another 12 ft kayak perfectly. 100% recommend if you are trying to free up some space
Seems pretty darn sturdy, this is good! Fairly easy to put together, which is also good. Using it outside next to our stucco house. The End.
Info for this part was:
At etrailer we provide the best information available about the products we sell. We take the quality of our information seriously so that you can get the right part the first time. Let us know if anything is missing or if you have any questions.


Brooke M.
5/16/2025
Oh yeah - I can really see how that would save a TON of space! How long have you been kayaking?