
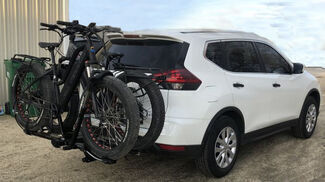
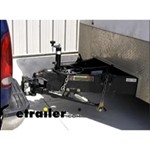
Trailer Hitch Installation Tips
- Select your vehicle to confirm the Trailer Hitch fit

Before Installation:
- Make sure you have the correct hitch for your vehicle and the trailer being towed.
- Review the instruction sheet provided with the hitch.
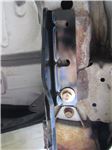
- Check the hitch attachment area of the vehicle. Do not attach a hitch to a vehicle which shows excessive corrosion or damage in the hitch attachment areas.
- Take the appropriate safety precautions. When elevating the vehicle on a hoist or ramps, ensure that the vehicle is properly secured and blocked such that it will not fall or roll off its supports.
- Use the appropriate tools and wear safety glasses when drilling holes.
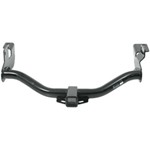
- Prior to installation, it is a good practice to loosely assemble the hitch, install the drawbar, pin and clip, and hold the hitch up into position. This will allow identification of any obstructions to the installation and verification of drawbar position on the vehicle and give an idea of how the hitch is to be installed.
Installation Steps:
- In some cases, it may be necessary to temporarily loosen the exhaust system and/or slightly reposition it to clear the hitch during installation, particularly on exhaust systems that have been replaced prior to installing the hitch, as all hitches are designed using vehicle original equipment.
- In a few cases, it may be necessary to adjust the bumper on a vehicle, or the brackets which mount to the bumper, in order to install the hitch.
- Hitches are designed to use existing holes. In cases where appropriate holes are not available, holes must be drilled in the frame. Holes can be drilled in the appropriate places using the holes in the hitch as a guide.
- When drilling, always center punch the hole positions and drill a pilot hole. This can then be followed with the appropriate drill size for the hole required.
- When installing the hitch, be sure to use the reinforcing plates supplied with the hitch where appropriate in order to reinforce the frame and spread the load to the frame edges.
- All hardware, with the exception of handle or tab nuts and U-bolts is grade 5 or 8.8 (metric). Tighten all bolts to the torque levels specified in the instructions.
- Before torqueing all of the bolts in place, make sure the trailer hitch is mounted symetrically to the vehicle.
Installation Tips:
- A scissors jack or floor jack can be very useful in holding the hitch up in place. In many cases C-clamps can be used to clamp the hitch to the frame during installation.
- Clean out bolt holes. We recommend soaking the bolt holes on your frame with WD-40. Then take a wire brush, and scrub out the holes to free the opening of road debris and grime. This should allow the bolts to fit more easily. Because the manufacturer of the hitch will use the diameter required for your vehicle, the correct bolts should be included in the hardware kit.
- Drill holes that are either the same size as the bolt or at the most 1/16" larger.
- When drilling, be extremely careful to avoid drilling into vehicle components which are located behind where the hole is being drilled.
- The hitch must have solid metal-to-metal contact with the vehicle attachment points. Excessive undercoating or weld on the vehicle should be removed.
Helpful Videos
Watch how to clean out weld nuts
Watch weld nut removal and replacement
Safety Tip:
Never modify the hitch in any way. Do not drill holes into the hitch to mount accessories, etc. Never cut holes or modify the assembly using a torch. This weakens the metal, produces a ragged hole, and presents an unnecessary fire hazard. Never weld a hitch to the vehicle frame. Welding on the frame of the vehicle can weaken the frame.
Helpful Hints
Lowering the Exhaust:

- If WD-40 is applied to the rubber exhaust mounts prior to lowering the exhaust, the mounts will slide off the bracket more easily.
- A flat screwdriver or pliers can also be used to pry the rubber mount off of bracket.
- It is only necessary to remove the rubber mount from the vehicle frame. There is no need to remove it from both brackets.
- Lower the exhaust when the vehicle is cold; otherwise the exhaust will be hot and can cause burning when lowering.
- Do not apply too much pressure to the exhaust once it has been lowered.
- If the vehicle has a custom exhaust system, the instructions to lower the exhaust might not apply to the vehicle.
Watch a typical exhaust being lowered
Drilling into the Frame:

- Do not drill extra holes into the frame. This could weaken the frame of the vehicle.
- Lift the hitch into place before drilling to ensure that the holes will be drilled in the appropriate place. The hitch can often be used as a template.
- Use a drill bit that is the correct size for the hole. A drill bit that is too big will create a loose mounting point.
- Do not drill into the hitch.
- Make sure the drill bit is designed to drill into metal.
- Avoid hidden vehicle components when drilling into the frame.
Watch the typical way to drill into a vehicle frame
Using Fish Wire as Bolt Leaders:

You can also use a drill to enlarge the access hole. This will allow for easier access for the bolt leader, spacer block, and bolt.
- It is a good idea to fish the bolt leader through once before installation. This will let you know how much clearance is available inside the frame rail.
- Check the instructions to make sure the correct parts go on each specific lead.
- Do not countinually pull on the wire if it gets stuck. If the wire is pulled too much the bolt will strip out of the bolt leader and can get lost in the frame.
- If the wire gets stuck in the frame, lightly tap the frame with a hammer. This will help loosen the wire lead and bolt if it gets into a tight spot.
- Once the bolts are in place, leave the bolt leader attached until the hitch is in place. Once you are ready to place the washer and nut in place, remove the
bolt leader.
- This will prevent you from pushing the bolt back into the hole; or, if you do push the bolt into the frame, you can easily pull it back down.
Watch the typical way to fish a bolt leader through a vehicle frame


Cutting the Fascia:
- Before cutting fascia, mark where you plan to cut prior to actually cutting.
- Use a new sharp pair of tin snips or a utility knife to cut the fascia
- If you use a utility knife, do a series of light cuts first.
- Make long cuts to lessen the amount of jagged edges from the cut.
- Use 220-grit sand paper to smooth the edges.
Trailer Hitch Maintenance
Trailer hitches are powder coated; the way the manufacturer ships the products on pallets, the hitches can get scratched because they are stacked on top of each other. Also, due to the nature of a trailer hitch, being exposed to the elements and constant road travel, the hitch will have a tendency to rust. It is a good idea to periodically check a trailer hitch after it has been installed for any signs of rust. If the paint seems discolored or looks like it has begun to rust, it is a good idea to repaint the rust spots on the hitch to help protect it. Any black spray paint will help to protect your hitch.
Hitch Hardware


Carriage Bolts and Wrench Washers (Reinforcing Plates):
Many hitches use carriage bolts and special washer blocks or plates, which act as a wrench inside a boxed-in section of the frame to hold the bolt during tightening. The plates also help reinforce the frame by spreading the load to the frame edges.

U-Bolts for Boxed in Sections:
Another method used for boxed-in or enclosed sections of the frame is to use U-bolts. Make sure that the two nuts are drawn up evenly on the U-bolt during installation. If one nut is installed at a time, the U-bolt may bend and break.


Handle Nuts:
Some attachments to boxed-in areas are made with "handle nuts." Inserted through an access hole, the handle locates the nut over the hitch attachment hole and prevents the nut from turning when the bolt is tightened. Do not forget to trim off the excess handle or to bend it away from other wiring or other components.
Watch the typical way to use a handle nut


Lock Nuts and Toothed Washers:
Prevailing-torque locknuts are used for certain critical attachments. These will not spin on freely, but will resist turning all the way on. Do not substitute a free-spinning nut where a locknut has been provided. Hardened washers with peripheral teeth are used on certain slotted attachments. The toothed side should go against the slotted member as shown below.

Galvanic Isolators:
Prevent corrosive action between steel hitch components and aluminum attachment areas. Remove the paper backing and adhere the isolator to the hitch where indicated in the instructions. Pierce the isolator with a screwdriver to allow a bolt to slide through.

Sonja
12/18/2024
I have a NX300 Lexus and I want to add a tow hitch. Do I absolutely have to drill a hole? Is there another solution. And if not, will that make my car considered frame damaged. Because of the drilling of the hole.


Dan C.
1/13/2023
I watched all the hitch videos. I have a 2023 equinox. In some pictures of the hitch (online not etrailer), it is mounted in the bumper space with a bezel. I do not see any videos installing it in the bumper space. Must it be installed under the bumper as all the videos show?

Dwayne H.
12/18/2021
I got the etrailer trailer hitch Class 3 with 2" reciever. Item #e98849. If I get the bolts lined up under the bumper, the ones on the chassis is just off. If I get the ones on the chassis lined up, the others are off. I don't know how to adjust the bumper, tried but couldn't get it to move. The only thing I can see is to notch the holes on the hitch itself to make it fit. Any guidance would be appreciated.

Suzette G.
6/1/2021
What are GM or Chevrolet torque specs for a tow hitch on a 2003 Silverado LS, 4.3 L, 6 cyl, 6 ' bed, extended cab? Thanks


Explore Expert Info
![Our Expert]()
on Trailer Hitch

on Trailer Hitch


Departments
Towing
- Trailer Hitch
- Fifth Wheel
- Gooseneck
- Towing a Vehicle
- Front Hitch
- RV Hitch
- ATV Hitch
- HD Truck Hitch
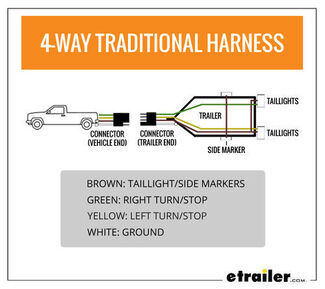
- Vehicle Wiring
- Brake Controller
- Ball Mounts
- Weight Distribution
Sports and Recreation
Trailer Parts
- Utility Trailer
- Boat Trailer
- Landscape Trailer
- Enclosed Trailer
- 5th/Camper Trailer
- Car Hauler
- Horse Trailer
Vehicle
Contact & Help

Terri
5/2/2025
I added a tow package onto the rear of a minibus conversion, can you recommend which parts?