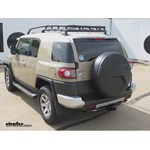
Customers compare etbc7 to these similar products
Products Featured in this Video
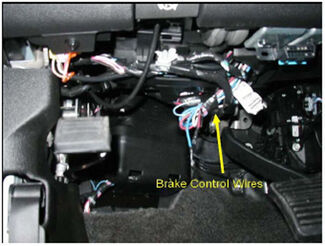
All right next what we need to do is run this wire up to the front side of the vehicle up by our fire wall. Basically we just have to keep this as close to the frame as possible away from the exhaust and also as far to the left as possible to keep it away from the steering arm too. We have got our wire pulled through on the top here but we need to get to the left side as far as possible so push it back down and pull it on this side so it will come back close to our battery and our access point through the fire wall right here. And you will notice we ran the wire from here all the way up to the positive terminal here. :35
What is going to happen is that black wire is going to get directly connected to this via circuit breaker and then the rest of this wire we are going to cut off and we will actually use to go in between the brake controller and the battery itself. Now we double check our length just to make sure a couple of times and get our excess here. We have to figure our where we have to locate our circuit breakers. Our circuit breakers are probably best located probably in this area right here. Just make sure you have enough room for the hinge mechanism to clear. 01:04
All right what we will do is we will go ahead and mount our circuit breakers in this general vicinity right here. One here and one here is all we need. Just two. Make note this will be a 40 amp circuit breaker we are starting with first. The other will be is for a hot lead. Go ahead and cut our wire and leave a little bit extra just in case. What we need to do next is take this gray sheath and peel it most of the way back because like I said the black wire is going to be our 12 volt and that is going to go through our circuit breaker to the battery. This white wire is going to be going to the blue wire on the brake controller so we are going to put that white wire back through to the fire wall. Once you get this sheath stripped back go ahead and zip tie this off. When you get to your first junction this lead will go to the battery and this one will go out back. Go ahead and make your cut and put your connectors on. You have got a little excess so we will take care of that and then we will put our connector on. We will do this part absolutely last. Now we will move on to the white wire. This will be hooked up to the blue wire on the brake controller. What we do is we poke a hole through the grommet here and there is plenty of room so we keep off to the side as best as possible and then we will just make our run through the body that way. This extra length of wire we cut off will be our lead to go the battery and to the brake controller. We will go ahead and poke that on through and then we will shove as much as we can through and we will use the rest that we can to go back to the battery through the circuit breaker. 3:49
Now we are just measuring to make sure we have enough lead to go out with enough slack and I think that will do it. So we will go ahead and strip our wire back so we can have our leads going to the negative and the positive and then we can have connection to our circuit breaker. So strip it all the way back to about right here. So we have got our sheath stripped off so we will go ahead and make our connection to get it ready for the circuit breaker and we will leave our battery connections for last. Our power going out to the brake controller will be on the silver post here will be marked auxiliary the same way as this one will be. We will just leave these alone and we will make these battery connections at the last point and we will go ahead and move to the brake controllers to get installed and attached and hooked up there. Next we will find a place to install our brake controller. The plate gets mounted in the area right about here. You can go up or down. You can not do anything like this on these. Just go up or down so we will put it at about this position and then get it where you like it. Take out the brake controller and leave the bracket in place and we will mark our holes out. Just make a simple little scratch. We will use that for our pilot hole. Quick check to make sure nothing is back there. Go ahead and take a screw and just run it a little bit just to get a hole started. Go ahead and put your bracket back in. Once you have got that one set you can go ahead and check it to get it straight like you want it. Next we will go ahead and install our brake controller and a couple wires to the back and make our connections to the wires that ran through the fire wall. These are the wires that ran through. We have got one, two, three. The fourth one will be a spread wire over here. 7:14
This will get connected to the wire that goes to the top light switch so we will leave that one out for now. All right once you get your wires set up, take a moment to figure out how you want to route them. I am probably going to go along the back edge here. Basically at this point we will go ahead and cut off our excess and we will just make our wire connections. We are going to go over one more time. If you remember this wire is the one we used for our brake lead because it is separate by itself out of the sheath so we will run that to our blue wire. Our battery wires will still be color to color. We will go ahead and tape these wires up and then leave some excess to go to our brake pedal switch. I will show you a trick here. You will notice that the wire is getting a little bit longer here because it is getting a kink. Simply just wrap it around itself. We will go ahead now and find a spot to zip tie it up and make it nice and neat. We have actually taken the liberty to test the wire for what we need. We found that the brake wire switch wire that we need is a green with a yellow stripe. We tested it and it comes on only when you hit the brake pedal. We will go ahead and make our connection to that. We will make our last two connections. We will start with a negative battery terminal and go ahead and take that off first. Now we can do this side. That is our ground. All that remains is to test our install.
Info for this part was:
At etrailer.com we provide the best information available about the products we sell. We take the quality of our information seriously so that you can get the right part the first time. Let us know if anything is missing or if you have any questions.