
To see if this custom-fit item will work for you please tell us what vehicle you'll use it with.


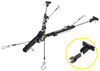
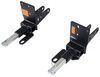
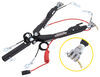
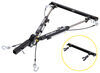
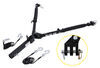
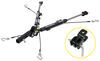
Get a clean, factory look for your car when it's not being towed by using these invisible base plates. Tabs remain on tow bar arms and easily secure to base plate receivers with a quick turn. Simple, bolt-on installation with included hardware.
Features:
Specs:
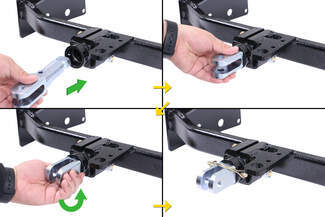
Setting up these invisible base plates for use with your etrailer tow bar is fast and easy. They easily bolt onto the ends of your tow bar. And because the tabs remain on your tow bar at all times instead of protruding from your vehicle , your car maintains a clean look when it's not being towed.
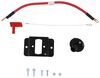
Using the etrailer invisible base plates to attach and remove your tow bar couldn't be easier. With the base plate tabs attached to your tow bar arms, simply insert the tabs into the receivers on your vehicle and twist to lock them in place. Insert the included pull pins to add an extra layer of security, ensuring the tabs stay put. To remove each arm, simply tug the pull pin to disengage the lock, twist the tow bar arm, and pull the tab out of the bracket.
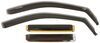
Keep dirt and debris out of the base plate receivers with the included covers. These high-density polyethylene covers easily snap into place over each pull point when your tow bar is not attached. Limiting internal corrosion makes it easier to slide the tabs in and out and helps to prevent seizing so that the tabs don't get stuck.
If you have a tow bar from a different manufacturer, an adapter may be available. etrailer offers adapters for use with other tow bars so that you don't have to go through the added hassle and expense of replacing your tow bar when outfitting your new towed car with base plates.
| Type of Tow Bar | Adapter |
|---|---|
| Roadmaster Tracker, Falcon 2, Falcon All Terrain, Blackhawk, Blackhawk All Terrain, Sterling tow bars with serial numbers up to 14,500 | e98983 |
| Roadmaster Nighthawk, Sterling All Terrain, Sterling tow bars with serial numbers 14,501 | e98984 |
| Roadmaster Eagle, Eagle 8000 | e98979 |
| Roadmaster Falcon 5250 | e98981 |
| Blue Ox | No adapter needed |
| Demco Kwik-Tow | No adapter needed |
| Curt Rambler | No adapter needed |
At etrailer, we're committed to the products we sell, and to our customers. Our experienced and knowledgeable staff are available via both phone and email to address your questions and concerns for the lifetime of your base plates. The technicians at etrailer perform flat tow installations on a daily basis, making them a valuable resource for do-it-yourselfers. The one-on-one, personal service you'll receive comes straight from an expert in the towing and automotive field. We've installed it, we've wired it and we've towed with it, so whatever your question, we can answer it.

Videos are provided as a guide only. Refer to manufacturer installation instructions and specs for complete information.
Hi, this is Scott with etrailer. Today we're taking a look at and installing our etrailer base plate kit for 2024 GMC Canyon. Our base plate kit is gonna allow you to get all set up for flat towing. What it's gonna do is allow your mounts here to mount up in the pockets of where your tow hooks actually go. So you'll actually remove your tow hooks and you'll put these in its place. Now it's pretty cool.
What these do is you can get your pins undone, and you can pop this part out and this part here, you can pull out this section here, get that out of the way. And with those out of the way, that's gonna allow you to pretty much hide this behind your bumper. You're not gonna have anything sticking way out or anything like that, so you're walking by, you're not gonna hit your shins on it or anything. So that's a really nice feature of these that they're hidden. And another nice part about this is you don't have to cut your fascia up to get these installed.
All you do is pull your hooks off and put these in place. So that's a really nice feature. Another nice thing is, this is gonna incorporate your safety cable loops as well. So those go on there nice and easy. To get your flat tow set up, there are quite a few components that you're gonna need.
You're gonna need your tow bar set up. You're gonna need your base plate kit. You're gonna need a battery disconnect, a charge line, and you're also gonna need a diode kit. That's gonna be your wiring that's gonna be set up so you can have your rear lights on your towed vehicle. You're going to also need some type of braking system, which we have installed here.
And we have the air set up to where it runs out of our coach, and runs air. And that will be our braking system set up on our vehicle. Installation for this setup is pretty involved. You are gonna have to remove your fascia. You're gonna have to remove your tow hooks and get them installed, and it's pretty tight spaces where you're getting put up in there. So it took me about three days to get everything completely set up, and that was working at least eight hours a day to get this one done, so it is pretty involved. If it's something you wanna tackle yourself, you can always watch our video, and we'll help you get it installed. If it's something you really don't have time to do yourself, you can always take a look at our dealer locator, and we'll get a place local set up for you to get it done. To start our installation, we have four T15 screws in the top of our fascia. We're gonna need to get those removed. (tool whirs) On the inside of our fender well, we're gonna have nine T15 screws we're gonna remove. (tool whirs) That, we'll need to pull off our fender trim. It's gonna get behind it. I'm gonna apply a little pressure. It's gonna have plastic pop clips behind it. Let's kind of move along, get it to break loose. Once you get the lower area of pops, you can move along, get your hands behind it, and pull back with a little bit of pressure. Okay, now we got it back that far. Now I like to pop a piece of rag right in behind our trim that's gonna hold it out of the way. On each side we're gonna have another T15 right here that goes into our front part of our fascia, and attaches it to the front fender. I just wanna remove that. You may have to pull your fender well down just a little bit to get it on there, (tool whirs) and we'll do that on both sides. On the passenger's side, we're gonna have two wiring harnesses we need to disconnect, so these can be a little tight. So I like to just pop 'em out and pull this back. Now we'll pull up on the little black clip in this one. Just pull up on it and pull her out and it's good to go. Now we can move on. We have two 15 millimeters on this little bracket down here. I'm gonna go ahead and get those out while we're here. (tool whirs) Now right up in the top of our fascia, right in here, it's hard to see, but you're gonna feel a little seven millimeter. We need to get up in there. It can be a little tricky to get to. We'll just back it out. And that's what that one's gonna look like. Underneath of our fascia, we have six T15 screws. We're gonna get them removed. (tool whirs) Now we can start on the corner of our fascia, and just nice and gently pull out on our edges. Work our way up. This can be a little tight. Once we get this popped loose, we're gonna work our way across, and it will pop out of the way. There is little tabs on the top. Now we can pull away our fascia. Now with an 18 millimeter socket and an 18 millimeter wrench, we'll back off our bolts for our tow loops. (tool whirs) Now we can pull those out of the way. On our driver's side, we're gonna have this wire that connects into the side of our frame piece here. Let me just get that out of the way for now. Just move that off to the side and out of the way. Now we'll get our pull pod put into place. Each one is labeled driver's side, and you wanna make sure your chain loops are facing the inside of the vehicle. That will be reusing the hardware that we used, took out for our hooks. Now we can loosely get our nuts in place on both sides. To get room to slide our plates in place on the sides of our pull pods, we're gonna have to get this lower panel out of the way. So we're gonna take a 13 millimeter socket, (tool whirs) remove all our bolts, and get our panel. Now we have our plates we're gonna sandwich between our frame. So we want these facing this direction, the slope going forward. And we're gonna take our hardware in the kit, line up our bolts, and usually easier to do this one that's in the front of our vehicle first in case we'll have more room. One thing you can do as well is just get your bolt in part way. So that's gonna hold it in place so it's not swinging down. Then you can get behind here and get your nut put in place. And then we'll go ahead and get our other one on finger tight as well. Now we'll take another plate facing the same direction, and we'll get it in place just like we did the other one. Now from the outside in, we're gonna take our long bolts and run them through both of our plates. We're just gonna get a knot on those loosely, and we will have those two that are side by side. They can be a little tricky to line up, but you will get it. Now, as you can see, this is gonna be a tight space, so just hold it with two fingers like this, and just spin your bolt itself, and that's gonna help you get it started. Now for our top hole, we will run our bolt through as well, just like we did our two down here. And this can be a little bit of a tight space. So what I'm gonna try to do is hold the nut on a wrench. Now that we have lock tight on every bolt, what we're gonna do is just make sure we have this looking good and level. I like to go with the frame and just make sure I look good there. Everything looks to be on point. Now we'll come back through and we'll just snug down all of our hardware. (tool whirs) Now we'll go back through and torque our hardware down to the specifications listed in our instruction manual. For our safety cables, we wanna put it on above our frame of our vehicle up and over and down. And it's gonna connect right down here to where we have these holes. For our plateau mounts, we're just gonna run our loop through, put our cables in, and snug that down. Now that we have everything torqued down, normally at this point you would go ahead and put your fascia back on, but we're gonna go ahead and finish up some more of our flat tow components, and then we'll move on to the next step. Now we have 'em all set up, and as you can see here, everything went really well through these openings, and they hide really nicely. So this is really a good plus with these that they hide so well, and they're behind your bumper line. Other than that, it was a little bit tricky to get our setups for where to figure out where our air comes in and for our plugs. So we had to take two long brackets and fabricate those in order to get them to mount up to our bumper brace on both sides. So we had to trim out a piece of our panel here where it comes straight across. We cut both of those out, and we ended up getting them marked in there and screwing these onto the bumper panel itself and coming down and then bending a 90 in both of our brackets. And we got 'em to drop out through here. So we're able to make our connections right here in the front. And that was a look at our etrailer base plate kit for our 2024 GMC Canyon. I'm Scott with etrailer, and thanks for watching.

Info for this part was:
At etrailer.com we provide the best information available about the products we sell. We take the quality of our information seriously so that you can get the right part the first time. Let us know if anything is missing or if you have any questions.


Thank you! Your comment has been submitted successfully. You should be able to view your question/comment here within a few days.
Error submitting comment. Please try again momentarily.