


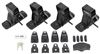
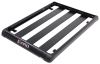
These custom-fit clamps and pads let you mount 4 Inno XS200, XS250, or INSU-K5 feet to your vehicle's naked roof to help create an aftermarket roof rack system. Clamps mount to feet with bolts. Kit includes 4 clamps and 4 pads.
Features:
Specs:

Videos are provided as a guide only. Refer to manufacturer installation instructions and specs for complete information.
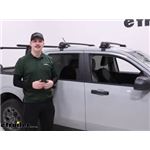
Hi everyone, Aidan here with etrailer. Today we're gonna be taking a look at and showing you how to install this Inno flush feet roof rack system on top of our 2022 Ford Maverick. So a roof rack can be good for a number of things. Things like lumber or kayaks that are maybe a bit longer that aren't gonna fit very well in the bed of our Maverick or just having some extra space. Let's say we don't have a tonneau cover and we've got some luggage for a trip that we don't have room for inside the vehicle and we don't want it out in the bed. We could put a roof box up on top of the crossbars here so we have some covered and locked up storage on the roof rather than having it in the bed.
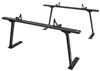
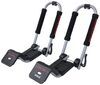
So this uses Inno's flush feet, which means that there's gonna be no overhang on the crossbars. Everything's contained in the feet right here locked up. So it gives us more sleek and finished look for some people. Personally, I like a little bit of overhang. You can see for my ladder rack we've got some overhang on the crossbars there which can be a good utility for certain things like load assist kayak carriers that need some overhang.
But really it just comes down to preference and style because functionally there's not too much difference besides that load assist kayak carrier application. The crossbars themselves are gonna be an aero bar which means they're a little bit thicker in the front and taper off towards the back. That's going to help with wind resistance and just help them be a little bit quieter overall, they work really well for most clamp around accessories, but you also have this rubber strip in the top that it can be used for T track accessories that's accessible by unlocking and taking off the end cap of the feet. And you can see that's where we've got the opening for our track where our accessories can just slide down in and through. The weather stripping's gonna really help with wind noise because without that, it's going to make a lot of noise and be pretty annoying going down the road.
And the fact that you can just slide it along means you don't have to cut anything or make any modifications to the weather strip. Leaving this all undone, you can see the fit kit. That's gonna be the rubber pad that sits on the base of the roof that makes contact with this lip and the clamps that will go around and into the openings of the door and hook underneath there to give us a good secure fit. All that gets locked up whenever we put the cap back on so no one can get to it when these are on and locked up. And you can see it gives us a pretty sturdy and secure fit on the roof as well.
I'm not able to move the crossbars at all but it is moving the entire truck by shaking it from there. This is a pretty low profile system, but I do wanna check out the space we have underneath the crossbars which is gonna be about 1 1/2" of space from the bottom of the bar to the top of the roof. So that's the room we have for our clamp around accessories. As far as the distance that adds to the top that's gonna be 2 3/4". Now with it, I will say that it's not going to clear the antenna here, so if we did have something like a roof box that came into contact with this we would have to unscrew and remove this in order to fit some of those longer accessories over that. As far as the weight capacity goes, that is going to be a limiting factor here, it's only 100 pounds. So for the whole system that's pretty below average. I'd say most of the time these roof rack systems tend to hover around that 165 range. And granted, you're not gonna be putting a ton of weight on your roof, but I would just like a little bit more head room to mount both the accessory and whatever is loaded in the accessory whether it be luggage in a box or a kayak on a kayak carrier because you do have to factor in the weight of the accessory itself in addition to what's loaded in it. So for me, 100 pounds is just a little bit low, for me I'd maybe look into the Rhino-Rack system that does have a higher capacity. That one also has the feet that don't contain the whole crossbar and will have a little bit of overhang. So if you're into that style and you want a bit more capacity, that's the way I'd go. As far as the installation process goes, it's fairly straightforward. Most of the measurements and the instructions are very easy to follow but we did have a bit of trouble getting the positioning of these right because the instructions are for the through feet rather than the flush feet that we're using today. So follow along, we'll walk you through what we did to make sure that this fit properly on the Maverick and it shouldn't be too bad beyond that. First thing we're gonna do is get our crossbars installed. There's a bit of pre-assembly we want to do on the ground first. You can see you've got a rear crossbar installed already, but we'll be going through the front crossbar. I'm gonna flip it upside down first and we're gonna turn our attention to the edge. These crossbars from Inno have this track system and we want to pull it out all the way like this to reveal this open block where we can install our metal block with some threads. There's gonna be a slot and a little bit of a ridge shape. We want that ridge shape for the inside of the crossbar and just slide it back in like that. From there, we're gonna bring it all the way to the middle and push this button down to have it all the way in like that. This slot will line up with our tower. It's got this sort of T shape right there. We've got some threads that will line up with the threaded hole on our block as well as a tab that will line up with our extra slot right there. So I'm just going to kind of lean it down like that at an angle and pull it out to the side set it down flat once it's out there and use the provided tool to tighten down this bolt in the center where this slotted hole is. At this point, I've got it threaded down so I can still move the tower back and forth but it's not going to come loose if I try to bump into it, it's at least started. But what we're gonna do is actually take a measurement from the center of our crossbar there's a marking, we want to go to where our tower starts. Now they give you a measurement in your instructions but that's for the through feet. We have the flush mounted feet right now. So our measurement didn't line up with what the instructions that we had gave. So we found that for the flush feet a measurement of 20 7/8" was giving us pretty good fitment. You could probably play around with it a little bit more and do some more fine tuning and maybe get something that's even more accurate. But for us, that worked pretty well on the rear crossbar. So for the front crossbar that's what I'm gonna start off with. When you've got that measurement all set, you can come back through and tighten down that bolt fully until you hear some clicks from your tool letting us know it's torqued down properly. In the end of the tower here, there's a bolt that can control the pivot of the tower. Again, just use the provided tool to loosen that up and that will, as you can see unlock some side to side movement. We're gonna leave this loose for now and we'll adjust it when we have it on the roof. And the last thing we need before we take it to the roof is our fit kit. These pads are gonna go and make contact with the actual roof, and these ones are gonna be the same for the front left, right, all the different positions so we don't have to keep track of which one is which. We do wanna make sure we align it properly. You can see we've got five indentations, four on one side and then one in the middle. Those will line up with some screws on the tower. So just get those lined up and push these tabs into the holes right there. We want the thick side of the bar facing towards the front. And one thing to note about those towers that we didn't mention before is that they are side specific. There's a small diagram on the top that'll match up. You can see the thicker part of the aero bar is on the front matching up with our crossbar and the tapered end is matching up there as well with an L for left hand side or driver's side. And the other side has an R for right hand or passenger side. So we can get this set up in place now I'll probably need to go to the other side and get it all adjusted properly. But essentially you want that fit kit to line up with this ridge on the roof like that and we'll get our positioning all fixed up. Your instructions are gonna give you two measurements, one from the center of the door jam to the back crossbar centered up and then one from there to the front. So for us, we've already got our back one in position. We're gonna go from the center to the center of the crossbar. We want that to be 11 3/4". So for ours on both sides we want it lined up right about there. Again, take that measurement on both sides to make sure that your bar is running parallel to each other and perpendicular to where the vehicle is going. Once you have this on the roof, you do wanna make sure that you adjust that side to side pivot to match the contour of your roof the best you can and tighten it back down the same way we loosened it up whenever you're happy with it. Once that's been set, get your hook in place. These are the same for all four door positions. And follow that up with your bolt and washers that will go through the clamp and into the threaded block in the tower. I'm just gonna thread this on by hand on both sides and then evenly tighten knit going back and forth between each side because we don't wanna pull the crossbar all the way to one side when they torque this one down. We wanna do it evenly. And as we're tightening down those clamps we're gonna listen for that same click as before to let us know that we're all torqued down properly. You can shut your door and add in the covers. These are side specific, and then lock it up, repeating that process on both sides. And that's really all there is to it for the roof rack on our 2022 Ford Maverick. Thanks for watching.

This rack fit my 2024 Ford Maverick perfectly, although etrailer said it wouldn’t fit. I checked the fit guide on the Inno website, this was confirmed as an option for my truck. Installation went well, fit is perfect, really like the Inno products. Highly recommended.
Very well made. Strong material.
Video very helpful
Info for this part was:
At etrailer we provide the best information available about the products we sell. We take the quality of our information seriously so that you can get the right part the first time.


Thank you! Your comment has been submitted successfully. You should be able to view your question/comment here within a few days.
Error submitting comment. Please try again momentarily.