


To see if this custom-fit item will work for you please tell us what vehicle you'll use it with.
Thank you! Your comment has been submitted successfully. You should be able to view your question/comment here within a few days.
Error submitting comment. Please try again momentarily.


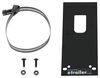
Fully welded vehicle trailer hitch is strong and durable. Draw-Tite's Tested Tough guarantee ensures that this hitch exceeds industry standards. The combination of an e-coat base and a powder coat finish provides excellent rust protection.
Features:
Specs:
Draw-Tite's Tested Tough program provides testing standards far superior to those outlined by the Society of Automotive Engineers (SAE), the go-to source for engineering professionals.
Each Draw-Tite trailer hitch receiver undergoes extensive fatigue testing and static testing with the ball mount that is either supplied or recommended for use with that particular hitch, thus ensuring results that are applicable to real life use. Fatigue testing is also conducted on hitches rated for use with weight-distribution systems.
In addition, Draw-Tite performs static testing on a simulated automobile, as opposed to the rigid fixture used for SAE testing, resulting in a more true-to-life scenario.
At etrailer.com we're committed to the products we sell, and to our customers. Our experienced and knowledgeable staff are available via both phone and email to address your questions and concerns for the lifetime of your hitch. The technicians at etrailer perform hitch installations on a daily basis, making them a valuable resource for do-it-yourselfers. The one-on-one, personal service you'll receive comes straight from an expert in the towing and automotive field. We've installed it, we've wired it and we've towed with it, so whatever your question, we can answer it.

California residents: click here
Videos are provided as a guide only. Refer to manufacturer installation instructions and specs for complete information.
Ryan: Hey everybody, my name's Ryan and here at etrailer we install, test, fit, and review a lot of different parts. That way we can try to answer any questions those of you might have. And that's exactly what we're doing here today on our 2020 Cadillac XT4, we're going to be taking a look at and showing you how to install the Draw-Tite Max-Frame trailer hitch receiver. So if it we're me and I was looking for a hitch to put on my XT4, I think the first question that would come to my mind would be, how's it going to look These XT4s have a really sharp look to them and I personally wouldn't want to do anything to jeopardize the appearance of my Cadillac. And this hitch, you're not even going to know it's there when you're not using it.So believe it or not, there is a hitch behind here. This panel, though, covers it up and gives it a super factory appearance.
So you're not even going to know that hitch is behind there until you're ready to use it. Whenever you are ready to use it, it's not a big deal to remove the panel itself. Underneath on each corner, there's just going to be little quarter turn fasteners. You can pop this off, out of the way, and then we're going to have full access to our hitch. So I see people using their Cadillacs to do a little bit of everything.
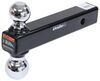
So whether you're wanting to pull a trailer or primarily use accessories, the hitch is going to be able to handle just about anything you want to throw it.That's partly due to it being a class three hitch, so it's going to have that two inch by two inch receiver tube opening. That's a very common size and a ton of different accessories will work out with it. It's going to have a reinforced collar for extra strength, and it's going to utilize that standard five-eighths pin hole. Now keep in mind, a pin and clip does not come included, but if you need one, you can pick it up here at etrailer. We're going to have a loop style safety chain openings, which do sit back a little bit, and they gave us more than enough room to use just about any size hook that we might have.Now the hitch is going to have some pretty high weight capacities.
As far as the maximum gross tongue weight rating goes, it's going to be 675 pounds, that's going to be the amount of weight that's pushing down on the hitch. It's a pretty high number and you should be able to use pretty much any size bike rack or cargo carrier that you'd want to, for example. As far as the maximum gross trailer weight rating goes, it's going to be 4,500 pounds. That's going to be the amount of weight that's pulling on the hitch. So that is the weight of the trailer plus anything you might have on it.
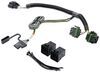
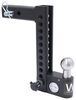
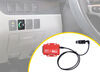
Now I do always like to suggest, never a bad idea just to grab your XT4s owner's manual, that way you can make sure your Cadillac can pull that much weight safely.One thing I do like is the fact that Draw-Tite actually gives you a bracket that's pre-attached to the head. So it makes it super easy to mount up another small bracket like this one here. That way, if you have trailer wiring, you can push it through there and give you a real clean appearance. And that being said, if you do plan on doing some towing, I would suggest picking up some trailer wiring, that way the lights on your trailer will sync up with the lights on your Cadillac and you'll be safe and legal. Now let's go ahead and take a couple of measurements, that way we can figure out which hitch mounted accessories will work best. If you go from the ground to the top inside edge of the receiver tube opening, that's going to be right at 18 inches.So if you do plan on doing some towing, chances are pretty good you're going to need to get a ball mount with a straight shank or a very slight drop. We go from the center of the hitch pin hole to the very edge of our bumper, it's going to be right at five inches. And you can use that measurement to figure out that if any folding accessories you might have can be stored in that upright position without contacting the bumper. So at the end of the day, probably my favorite hitch available for the XT4, not only is it going to allow you to do anything you want to with it, but you're also going to not even be able to notice it whenever you're not using the hitch.So really helps keep that clean, factory appearance. As far as the installation goes, I'm not going to lie, it is a little time consuming. You do have to remove the fascia, there's a couple parts that are a little bit tricky, but as long as you stay focused and patient, you should have no problem getting it done at home. Speaking of which, let's go ahead and do that together. To begin our installation, we're going to be here at the back of our Cadillac, and we're going to need to remove the fascia that way we can put the hitch behind it.So, first thing we're going to do is open up our hatch. That way we can gain access to this small panel here, that's next to our tail light, and we need to pop that out of the way. So what you can do is grab a trim tool and work underneath it and carefully pop it off. And if you look on the backside, you can see those are the clips that we're holding it in place. But with this released we can set it off to the side, and if you move down a little ways, you're going to see we have a Torx bit fastener right here. I'll grab a T-20 and pull it out. Now, anything we do to this side of our Cadillac from this point on, we're also going to do to the other side, because it's set up the same exact way.Now we can move to our wheel-well, and what I've done is just put some painter's tape all around the seams here, that way when you start to remove everything, we're not going to have to worry about or paint getting scratched. With that being said, we have this plastic wheel well trim piece and we need to pop that off, maybe about up to here, about halfway. That's because there's a fastener underneath it. So what you can do is grab the corner of it and start to work it. And sometimes you may have to take a trim tool or something like that, and pry under it and behind it to release some of those fasteners. Sometimes these can be pretty tight, so just take your time and work it off. And usually when they start to come off, they all pop out at the same time. So we'll feel it release. The bottom here you may have to pry up.So if you look right there, that's what you might have to pry up on to release a small portion of plastic. And we'll just work our way up to about here. Now you can see that we have that screw, we need to pull that out, so I'll use a seven millimeter socket to get that removed. Now, if you look just inside of our wheel well, right here along the edge, we're going to have three fasteners we need to pull out and I'm going to do that using a T-15 Torx bit. Now, if you look in the center of our bumper, we're going to have our access panel, we can pull that down out of the way. These are quarter turn fasteners on each corner there. So you can release those and you can work your panel down and we'll set it off to the side for now.With that panel out of the way, it exposes a couple more fasteners we need to take out. We're going to have one here and one there on the other side. So using a T-15 Torx bit, we'll get both of those removed. Now with an extra set of hands, you can actually remove our fascia. So the way this is going to work, if you start here at the corner by our wheel well, you can carefully just pop it out. It's releasing those clips. Up here by the taillight it does get pretty tight, so be careful when you're doing that. And there's actually a clip behind here, so what you can do is pull out on the bottom, lift up at the same time and it should free.So continue to work this out. So once we have it removed, you don't want to pull all the way back too fast. We're probably going to have a connector, which we do right here, and what you're going to do is push that red tab out, push down on the east center, pull that connector apart, it looks like it's just going to be connected with the little plastic tab there. Pop that off. And there's also an identical connector over there on the driver's side. So use that same technique to get that removed. And with the fascia off, we can set it off to the side somewhere safe. So whenever we remove our bumper beam to make room for our hitch, it is going to allow our exhaust to drop down a little bit. And so what we want to make sure and do is support it.So I'm just going to take a strap, just run it from side to side, give it that little extra support it needs. And if you don't have a strap laying around the house, you can always pick one up right here at etrailer. So to get our exhaust lower down, if you look on the bottom side of our bumper beam on each side of our vehicle, we're going to have two, 15 millimeter bolts. So go ahead, grab our socket and extension, and pull those out. Now we can remove our bumper beam itself, and so that's going to be held in place by two, 15 millimeter nuts on each side of it. We'll pull those off. Once you have both sides are moved, you can work the bumper beam, eventually it'll break loose and we'll be able to pull it towards us and off of our vehicle.Just a little trick, if it's not going to come off, you can take a trim tool or a Flathead screwdriver, and pry behind it and off of those studs. Now we can set this aside and we'll be reinstalling it later. Now we can grab our hitch and slide that over the bumper beam studs. And while it's resting there, we're going to take our bumper beam and re-install it. So it will sit back over the studs there. Then we're going to take the nuts that we just removed and get all these started hand tight. At this point we can lift our exhaust back up, get everyone lined up, and we're going to take the factory hardware and re-install it. Now that we have all of our hardware in place and hand tight, you can go ahead and snug it all back down.Now we can come back with a torque wrench and tighten down all of the hardware not specified in our instructions. So something I do want to mention, if you are installing or planning on using trailer wiring, now would be a great time to do that. And that's because with the fascia removed, we can easily access our trailer connector plug. So it'd be much easier since we have all this space. So at this point, if you're wanting to do wiring, go ahead and get that done now. That's exactly what I'm going to do, and once I have this finished up, we can work on getting our fascia re-installed.Now with an extra set of hands we can re-install our fascia. The opposite way that we removed it, so don't forget to plug your electrical connectors back in, carefully line everything up, and work it back into position. Just a quick tech tip, a lot of times what can happen when you go to re-install your fascia, you get it really close and this top portion here just does not want to line up. And what you can do to usually fix it is, if you take your fascia and rotate it towards the back. So grab the bottom side of it and pull it towards you, and while pulling it towards you a little bit, you can push us up and get it started.Push it in, and once you have it like that, at that point you can slowly start to rotate it back into place and work your way down. And that makes it a lot more manageable. Just take your time and focus on what you're doing and you'll get everything to line up just fine. Now that we have our fascia back in position and all lined up, we can simply just re-secure everything the opposite way that we removed it. Now that we have everything secured, we can go ahead and remove our support strap. And if you plan on using your hitch right away, you can leave this panel off. If not, you simply put that back into place and re-secure it as well. And that'll finish up our look at, and our installation of, the Draw-Tite Max-Frame trailer hitch receiver on our 2020 Cadillac XT4.

Installation instructions made the install a snap! Was extremely pleased with the fitment and reinstallation of the rear fascia. This is the second hitch I have purchased from etrailer and both have exceeded my expectations!

We have been extremely happy with the trailer hitch we purchased from etrailer! First, we used their selector guide to find the hitch for our vehicle. Second, their pricing was very competitive. Third, ordering online was easy. Fourth, we received the product as advertised in a timely manner. Finally, the product has been great! We have used the hitch to pull our boat and also attach our bike rack.
Great product and perfect solution for my hauling needs!!
Make sure you secure the proper, non-marring tools for separating exterior body panels prior to attempting to install this hitch. It really does require removal of the entire rear fascia to install. Additionally, be sure to fully torque the attachment bolts and install any wiring harness PRIOR to reattaching the fascia. Once installed it looks good and does the job.
One BIG THING to keep in mind is do not exceed the towing capacity and tongue weight of your vehicle. Just because this hitch is rated at 4,500 lbs GTW and 675 lbs tongue weight doesn't mean you can safely load it to those specs. For example Cadillac's XT4 owner's manual says the factory installed hitch is rated at 2,500 lbs GTW and 250 lbs tongue weight. More importantly if using a cargo hauler "make sure the total weight, including the carrier, is no more than half of the maximum allowable tongue weight."
Great Service and Delivery!
Fast shipping, All parts fit as advertised. Instructional videos were a plus.
Trailer hitch was an easy install about 80 minutes, trailer wiring was plug and play no splicing of wires which was great.
Kind of a simple product so not sure what could go wrong. That said, it is more important to comment on the order process and general observations. Ordered before and this time and will order again. I found working with your site easy and quite informational on the products I am looking to buy. That was especially true with the video. Without them, I would not know what to do with the install and how hard or easy things would be. You should also know that when I went to the person who is going to install, they told me to go to "etrailer" as you are the best for getting products like this. So all in all, I am happy and will be back and recommend etrailer.com.
fits perfect.
Fits perfectly follow the video for installation you'll have no problems.
Everthing came as ordered I don't plan on installing right away.
I have to watch video a couple more times, which is great, other wise i would have to farm it out.
Thanks
Hitch installed easily, fit perfect ! Works great !
Very nice hitch and pretty easy install!
Great product, very easy install. Great service from a great company.
Thanks
This hitch is solid and well built. Awesome product!
Great product and it was si ple to install and looks great
GREAT
Excellent Service
Fast
Recommend Them Highly
good


Do you have a question about this Trailer Hitch?
Info for this part was:
At etrailer.com we provide the best information available about the products we sell. We take the quality of our information seriously so that you can get the right part the first time. Let us know if anything is missing or if you have any questions.


Kenneth
2/13/2025
Perfect