


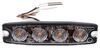
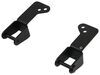
4-1/2" x 5" Low-profile LED utility light produces a bright light. Spot beam offers focused illumination for seeing at a distance. Black powder coated aluminum housing is durable and rustproof. Pedestal mount - includes hardware. 9 Diodes.
Features:
Specs:
Lumens are used to measure the amount of usable light that is put out by a light source. Raw lumens represent the number of lumens that the manufacturer claims the LEDs are capable of producing. It does not include the light's drive method or the amount of light lost from the lens or reflector. Effective lumens take these factors into account and represent the number of lumens that are actually produced by the complete light assembly, not just the amount of light that the diodes are capable of producing. This light has a 1,800 raw lumen capacity and produces 707 effective lumens.
California residents: click here
Videos are provided as a guide only. Refer to manufacturer installation instructions and specs for complete information.
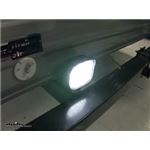
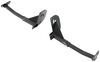
Today, we're going to review part number TLL46TB. This is the Optronics Opti-Brite LED spotlight. This is the 9-diode design with a square shape. This LED utility light is perfect for agricultural, industrial or recreational use. The spotlight design of this light will concentrate the light beam in a trapezoid shape so it is a trapezoidal light design. It has long lasting LEDs which are great replacements for your incandescent lights.
They're more efficient and they provide a brighter light with less power draw and there's no bulbs to replace and no brittle filaments to break. The rectangular face on this adjust forward and back just like this. Pretty easy aiming. It is a low profile design for tight spaces. The housing itself is a rust proof aluminum housing which is also black powdered coat finish.
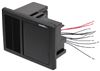
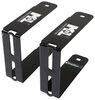
If you notice the way it's designed, it is like in fins so the air flowing through there help cool the light. The front has a tough polycarbonate lens which is impact resistant and it is made of the same material used to make bulletproof glass. The stainless steel pedestal mount bracket here and the nuts and bolts and the hardware are all included for you and helps resist corrosion. The slide is a dual powered light so it will work with 12 volt and 24 volt DC systems. You notice coming out the back is a single wire sheet which will contain two wires, the white wire for the ground, the black wire which is the lead wire for the 12 volt power. When this comes on, it gives of a trapezoidal design.
The trapezoidal lights has a medium range visibilities so they are ideal work lights because of its narrow pattern is more focused than a flood light. The flood light will actually spread the light out but is less focused than the spotlights. The flood lights will provide a short range wide visibility. They're a good option for general work but normally this type of trapezoidal or spotlight, it gives you the narrow light which is good to use with a spotlight. I do want to give you a few dimensions on this. The overall width on this is 5 inches wide.
The height on this is 4 1/2 inches tall and the depth at the widest point is 2 3/8 inches. Now the length of this wire sheet coming out the back is 10 inches. The wires that are used are 19 gauge wire and again it's the 9-diode design. It comes with a three year warrant. The effective lumen output on this light is 1,350 lumens. What I'm going to do here is I'm going to hook up. I have a alternate 12 volt power source. I'm going to hook up a 12 volt power to it just to give you an idea of the design of the slide and the power of it. We'll hook up the power. We'll hook up the ground. What we'll do is go ahead and turn off the overhead lights. With the overhead lights off, I'm going to turn on the 12 volt power and you'll be able to see the trapezoid design of this light. This is a spotlight. I'm going to go ahead and turn off the power. We'll go ahead and turn the headlights back on. Remove the clips. That should do it for the review on part number TLL46TB. This is the Optronics Opti-Brite LED spotlight, the 9-diode design in a square shape. .


Works great.
Super service. Arrived early.
It installed but seems like great quali ty.
Info for this part was:
At etrailer we provide the best information available about the products we sell. We take the quality of our information seriously so that you can get the right part the first time. Let us know if anything is missing or if you have any questions.


Thank you! Your comment has been submitted successfully. You should be able to view your question/comment here within a few days.
Error submitting comment. Please try again momentarily.