

 Arrives before Christmas
 To see if this custom-fit item will work for you please tell us what vehicle you'll use it with.


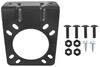
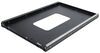
This fully welded trailer hitch receiver bolts onto your Kia Telluride's frame with no welding required. Receiver sits beneath your bumper so it's out of the way when accessing cargo. Powder coated steel is sturdy and corrosion resistant.
Features:
Specs:

California residents: click here
Videos are provided as a guide only. Refer to manufacturer installation instructions and specs for complete information.
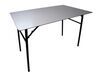
Hi everyone, Jesse here with etrailer. Today we'll be taking a look at and I'll show you how to install the TowSmart custom fit trailer hitch receiver on our 2023 Kia Telluride. The Telluride is a very spacious SUV, but it's always nice to be able to add some extra storage space onto the back of the vehicle and adding a hitch allows you to do that. With this hitch, you can use accessories such as a bike rack or a cargo carrier, and you can even do some light duty towing. Here's a closer look at our hitch installed on our neighbor's vehicle. As you can see, the cross tubes are completely hidden behind the fascia, so all you'll be able to see is the receiver opening, and that receiver opening is a standard two inch by two inch opening.
Behind that, we have another standard 5/8 inch pinhole. The pin and clip are not included with the hitch. However, we have many, many options available here at etrailer. Also, any accessory that you add on will most likely come with one included. Then we have a wire type safety cable loop that's super easy to access regardless of what style safety cable you have.
For example, this S or even a large beefy pelvis like this. For some measurements, we'll start with our ground clearance. From the ground to the top of the inside of the collar is right at 14 inches, and from the center of our pinhole to the edge of the bumper is about four and a half inches. You wanna keep that in mind for any folding accessory that you might add on to ensure they don't make contact with the vehicle. And for the weight capacities with this hitch, we have a gross trailer weight of 5,000 pounds.
That's the amount of weight that you can pull behind the vehicle and a maximum tongue weight of 500 pounds. That's the amount of weight pushing down on the hitch. You do have the option to use weight distribution with this hitch. It'll bump those numbers up to a gross trailer weight of 6,000 pounds and your tongue weight to 750. Always be sure to double check your Kia's owner's manual to ensure that your vehicle can handle that weight seat.
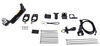
If you're looking to add a hitch to your Telluride, I think you'll be very happy with the TowSmart option. When it comes to installation, it's really a pretty easy process. It does involve some removing of panels below and some trimming. So if it's not something that you're looking to do yourself, maybe you don't have the time, the space or the tools to do so, feel free to check out our dealer locator. If you have experience getting this installed yourself, you wanna share some tips or tricks with us, please feel free to leave a review or a comment. But otherwise, if you're looking to get this installed yourself or you just wanna see how it looks to get it installed, follow along and I'll walk you through the process. We'll start off our installation by lowering down our exhaust. Before you start with that, make sure you have something supporting the exhaust. We have a lift, so we're high up in the air, so I'm using a cam strap. If you're working on the ground, you can use something like a floor jack, but we'll start on our rearmost hanger. I did spray some soapy water on it just to make it a little bit easier. We'll just use a pry bar, get that popped all the way off. And then there's another one that's kind of tucked up here on the passenger side on the front of your muffler here. Get that one pried off. It does help to have a pair of exhaust hanger removal pliers, but you should be able to get it with just the pry bar. Get that dropped down. Then we have one more, a little farther up here in the center. We'll get that popped off. Now we need to remove this plastic panel. There will be three push pins along the bottom and then two plastic nuts that we'll remove with a 14 millimeter socket. These push pins, you just pop out that centerpiece and you should be able to slide the entire piece out. And then with these nuts, you may be able to remove them by hand, but to make it easier, I'll use a socket and usually you'll have to kind of pull down against it to get it to actually come out. (socket wrench whirring) And we'll set that aside. Now we'll have the center section here of our rear fascia that we're actually able to pop out. So we'll just start on the push pins. They work the same way as the other ones, so one there, one here, and then we have some Phillips screws to remove. (socket wrench whirring) Now with those screws and push pins removed, we'll come on the outside and just kind of pull against it. It should pop out pretty easily. We'll set that aside. Now we have these two pieces that come down and I'm just gonna get them out of our way. So two Phillips screws on these. (socket wrench whirring) I'll just show you where we'll be installing all of our hardware. So we'll have these bottom two. These are already threaded, so I just recommend cleaning them out with a wire brush or anything like that. And then threading your hardware in and out a few times. We'll be using those two and then you'll have some longer bolts. They're gonna slide through these holes in the frame here and you'll have two on the driver's side on the top and only one on the passenger side. Now's the time when you'll want to recruit the strongest person in your neighborhood. That's why I have Brad here to help me out. We're gonna lift this up, starting with kind of focusing on going over the exhaust. Get your holes lined up and we'll throw on one of the bottom bolts on both sides. Now we'll tighten down our bottom bolts. That way it'll be easier to line up our side holes. (socket wrench whirring) I'm just snugging down with an 11/16 socket. Now on this side as I said, we'll use two bolts. So you'll see you have two silver bolts and one bronze bolt. Just make sure that you have conical teeth washers on each bolt and then also on the other side before we install the nut. And you want those teeth facing the hitch, you will have two different size conical teeth washers. Make sure that you're using these smaller diameter ones for these bottom bolts, but I'll get these slid through now. Top that off with that washer and our nut. Along with the different size diameter conical teeth washers, you will have two different thread pitches because one of them will thread onto this passenger side bolt. So just before you lift everything up in place, make sure you have the nuts threaded on the correct bolts. If you're having issues on the passenger side getting past this heat shield, I'd recommend just to get the bolts started by sliding the washer all the way up past that heat shield. That way you don't have to worry about that at all. And then what I've been doing is I'm pushing up against that heat shield while also pushing the bolt forward and I'll just get it worked into position. We can tighten our side bolts down with a three quarter inch wrench and socket. (socket wrench whirring) Now we're ready to torque everything down. Just please note that you will have three separate torque specs for the different size bolts, but we're using the same socket and wrench and a torque wrench. Before we can get our centerpiece reinstalled, we will have to do a little bit of trimming on it. The instructions will kind of have it laid out how you should cut it, but I like to just mock it up, get it as centered as possible. Then what I'll do is mark the edge of where I'm cutting. So we'll cut it there and then I'll just cut it in a straight line following this edge right here. I'll make this cut using a multi-tool. You could also use a Dremel or whatever you have that will cut through plastic. (multi tool whirring) Now we'll mock it up, make sure it fits and come back and clean up all of our mess. All that's left is to get this panel installed and the panel over here and then hang back up your exhaust. Other than that, that's gonna do it for our look at and installation of the TowSmart custom fit trailer hitch receiver on our 2023 Kia Telluride.

Info for this part was:
At etrailer.com we provide the best information available about the products we sell. We take the quality of our information seriously so that you can get the right part the first time. Let us know if anything is missing or if you have any questions.


Thank you! Your comment has been submitted successfully. You should be able to view your question/comment here within a few days.
Error submitting comment. Please try again momentarily.