
235/80-16
235/80-16
235/80-16
235/80-16
235/80-16
235/80-16
235/80-16
235/80-16
235/80-16
To see if this custom-fit item will work for you please tell us what vehicle you'll use it with.
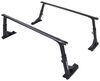
The V-bar studs on each cross chain of these heavy-duty, twist-link snow chains bite into frozen roads to give you excellent traction in deep snow and ice. Also ideal for mud. Built-in cam tighteners make fitting and tightening the chains a snap.
Features:
Specs:
Note: To determine whether you can use snow chains on your vehicle, or if chains might affect your ABS/ESP functionality, consult your owner's manual.
These chains are outstanding in serious winter conditions because the V-bar studs can bust through intense ice and packed snow. So, you'll be able to get to work and back home again even in the toughest weather. You can also use them if you ever go off-roading and end up in a mud-digging situation. These chains are going to help give your vehicle purchase to pull out and keep moving.
If you know your tire size, you may think you won't need to test fit your new snow chains. But there are a lot of variables that can affect whether chains will fit your specific tires, including your tire type, the amount of air pressure in the tire, the amount of tread wear, and the tire manufacturer.
We recommend that you order chains as early in the season as possible to give yourself plenty of time to test fit the chains and reorder if needed. This way, you won't be stuck out in the cold later with snow chains that don't fit.
You can test fit these chains in your garage or driveway, but you'll want to wait until there's snow on the ground to actually drive with them. These will cause damage to your garage floor and paved driveway. If you're out in the snow and come across bare pavement, you'll want to pull over and remove the chains. These can cause damage to your vehicle if they break from the wear of riding on a harsh surface.
Installing tire chains is easy.
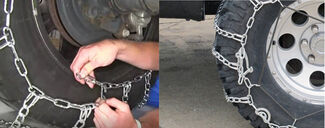
1. Lay out the chains on the ground to make sure there are no twists or kinks.
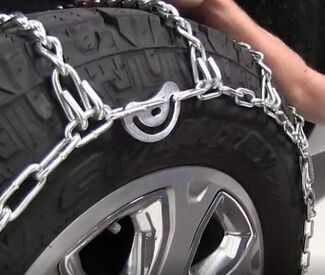
2. Drape the chains over your tire, ensuring that the v-bar studs face away from the tire.
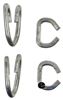
3. On the back of the tire, pull the chain tight and hook the ends together. Repeat this on the front of the tire, then clamp the lever to fasten extra chain links and keep them from flapping as you drive.
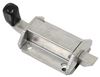
4. Insert the included tool into the cam and twist to tighten the sidewall chain. Twist as many cams as it takes to get a tight fit.
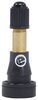
5. Drive forward 2-3 vehicle lengths and recheck the chain tension. Tighten any loose cams. If needed, rubber adjusters (sold separately) can be used to get a tight fit. Make sure the hooks on the adjusters face away from your tire so your wheels don't get scratched.
Quick Tips:
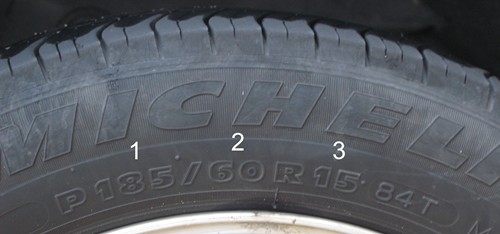
To choose the right snow chain, you must match your tire size. Those measurements can be found on the side of your tire.
185/60-15
These chains fit the following tire sizes:
Videos are provided as a guide only. Refer to manufacturer installation instructions and specs for complete information.
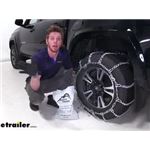
Adam: Hi, everyone. Adam, with etrailer.com. Today, we're going to be talking about the Glacier Chains V-Bar Snow Tire Chains. So this is going to be a ladder patterns chain. So we are going to have little gaps in between each of these here, but what really stands these out from most is the fact that they have a V-Bar right here. This is going to be one of your more aggressive if not the most aggressive type chain that you can have.This is going to be something for extremely deep snow, something with ice, or something like that.
It is not only just a twist link, they actually integrate these V-Bars on top of that. So just imagine what a twist link would do. If you ever use those before. Just add two spikes per link, this thing will literally tear up any of that ice you may hit whenever you're going down the road. All of it is made of a steel construction, and it will resist against rust and corrosion over time.One negative thing about these V-Bars is just the fact that we have these two really sharp edges on all of these.
That's what's going to be hitting the ground first. So you might see a little bit more wear compared to some of your just square link or twist link style chains. So, one thing that I noticed when I put these chains on is we have four different cam tensioners. Some of the other ones that I've messed with in the past only have about three. So, that's just going to give you that extra amount of adjustability.If you have two vehicles that have this similar size tire, we might be able to use them on both with all that adjustability.
So first thing you guys really need to do before buying your chains is just figure out what size tire that you have. If you don't know it off the top of your head, I know I don't. It's actually right here right next to your rim. So it's going to be a series of numbers, they're going to be about three, then a group of two numbers, and then an R, and then the size of your rim.So when you go on our website and you have your vehicle and the fit guide, you go on there and you can actually have options for different tire sizes. So just click that and you'll be ready to go for the specific tire that you're needing to chain up.
They do come in a pair of two. So if you plan on putting this on an all-wheel drive vehicle or a four-wheel drive vehicle, something like that, just be sure to check your owner's manual and make sure that you're able to do that on both of the tires.Usually it's going to be the same size for front and back, but just obviously check, but it is going to be the same exact installation process on both sides. But one thing that we do get a lot of questions about is sometimes when you're in a really aggressive situation, a lot of snow, a lot of ice, but then the road starts clearing up. What we really need to do when that road starts clearing up, because these V-Bars are extremely aggressive. You probably should take those off after a while, because they will wear down relatively quickly in light conditions.So whether the roads are clearing up and you need to take them off, or the roads are getting bad and you need to put them on, it is really easy to just put them on and off. So let's just go ahead and show you guys how. So the first thing we want to do is lay out our chains and just take a couple of things into account. One, we want to make sure there's no kinks in our links or anything like that. And two, we just want to make sure that these cams are going to be on the outside of our tire. So once we get all that squared away, just kind of grab it in the middle and we can go ahead, and drape it over our tire.We want to make sure it's nice and even, and also I want to make sure there's an even amount of slack on the right and left. Once that's good, we can go around back and make a connection. So we are going to have a hook over here and some spare links on my end. What we're going to do since this is the first time, I don't know exactly which link is going to be best, but once you guys put these on, you'll pretty much know.I'm just going to go with not the last one, but the second to last. And I do honestly suggest putting these on before you get into this situation where you're actually going to need them, just so you don't run into any roadblocks. So now we can go around front and make another connection. So we're going to have our spare links here and our tensioner. I'm going to try to find the best one for it. That one works, but we'll see if we can get it to the next one up. Probably not. So I'm just going to pick this one and loop it into itself here.We've got a spare link, just hanging there. And that's what that's for. We don't have a whole. We have a decent amount of slack, but now we're going to go ahead and actually tighten our cams. So luckily we do have a tool that comes with our kit. We don't have to grab that separately, which is a plus. And we can go ahead and start with the cam. I want to start with this one here. Pretty simple, a little better. We can do more.Getting there. All right, we are pretty close, but I'm just going to go ahead to see if I can get this one tightened down too. All right. So I tightened down all of them and we really do have a decent fit here, but we do suggest grabbing a rubber tensioner and hooking that up as well. So this is what your rubber tensioner is going to look like. We do carry these at etrailer, but they don't come with the kit. So be sure when you buy your chains, grab some of these.All we really need to pay attention is just the hook. Just make sure it just faces out away from our rim. And then of course just be as symmetrical as we can. Once we get that on there, I'll move that. We do suggest that you guys roll over them a couple of times, let them settle into your tire and then come back out, check them. And if you got the right amount of tightness, you're ready to hit the road. Well everyone, that's just about it for a look at the Glacier Chains V-Bar Snow Tire Chains.

Seems to be very good quality and easy to install.
Do you have a question about this Tire Chain?
Info for this part was:
At etrailer.com we provide the best information available about the products we sell. We take the quality of our information seriously so that you can get the right part the first time. Let us know if anything is missing or if you have any questions.


Thank you! Your comment has been submitted successfully. You should be able to view your question/comment here within a few days.
Error submitting comment. Please try again momentarily.