
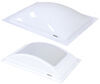
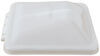
Leaking skylight or unfinished interior? This kit replaces both the roof skylight and interior garnish in one step. It seals out water, softens incoming light, and covers rough edges for a tidy, finished look inside your RV.
Features:
Specs:
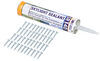
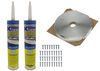
Get a waterproof install using the included sealant approved for use with polycarbonate plastic. Remove the old skylight, then clean and prep the roof surface so it's dry and debris-free. For added sealing, apply butyl tape (sold separately) along the skylight flange before setting it in place. Secure it with 1" zinc or stainless steel screws (not included), then seal over the flange edges and fasteners with the included sealant. Install the garnish from the inside using 1" screws (not included) to complete the setup. If you need hardware or additional sealant, an install kit and extra sealant are sold separately (SR76RR or SR86RR). If you'd like help installing your skylight, check out our Installer Locator to find an installer near you.
Videos are provided as a guide only. Refer to manufacturer installation instructions and specs for complete information.
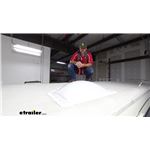
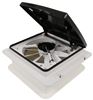
Hello, neighbors. Steve here with etrailer.com. Let's take a look at our Specialty Recreation RV Skylight with the included Inner Garnish and Sealant, and it fits a 14 by 14 inch opening. So, folks, this is approximately 18 1/2 by 18 1/2 square. This flange will fit over a 14 by 14 inch long cutout and requires a minimum roof thickness of 1 1/2 inches thick. Now these are made of a durable polycarbonate construction.
They're UV resistant and impact resistant. It's a translucent white material that's gonna diffuse light and reduce glare. You're gonna get one tube of their SR140 sealant. Please note you only use this with the polycarbonate as it's designed specifically for the chemical compound makeup of both. So don't use any self-leveling adhesives or sealants that you may have laying around as the chemical makeup of those could hinder and break down the polycarbonate.
It is made here in the US. There is no hardware included. You would need to use approximately some 1 inch screws to go through. The nice thing is they've pre-drilled all the holes for you, so you don't have to worry about that part. And, again, the two pieces will mate up; one inner, one outer for the install.
Well, folks, that's gonna wrap it up for our quick look at this Specialty Recreation RV Skylight with the included Inner Garnish. I'm Steven. Thanks for watching.

Do you have a question about this RV Skylight?
Info for this part was:
At etrailer we provide the best information available about the products we sell. We take the quality of our information seriously so that you can get the right part the first time. Let us know if anything is missing or if you have any questions.


Thank you! Your comment has been submitted successfully. You should be able to view your question/comment here within a few days.
Error submitting comment. Please try again momentarily.