


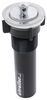
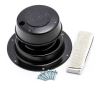
Sleek RV bathroom faucet has 1/4-turn stems that prevent leaks so you won't have to worry about wasted water. Washerless design reduces daily wear and tear to help extend the life of your faucet. Includes mounting hardware.
Features:
Specs:
To install, use the inlet shanks to drop the new faucet in place of your existing faucet. Then tighten the included mounting nuts against the underside of the counter, and connect the hot and cold water lines. You'll need to keep some tub and tile caulk (not included) on hand to help prevent any leaking.
California residents: click here
Videos are provided as a guide only. Refer to manufacturer installation instructions and specs for complete information.
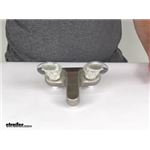
Today we're gonna take a look at the Phoenix Faucets brushed nickel finish 4 inch dual handle RV bathroom faucet. You can see this has a nice brushed nickel non-metallic one piece body to it. They do use a silicon under body. If you notice the levers, they're a dual clear acrylic lever handles for the hot and cold water. They do use a quarter turn washer-less valve. The flow rate on this faucet is 2.2 gallons per minute.
It is made in the USA. Does use the 2 hole mount. Basically, these 2 water connections would fit into the holes in your sink or your counter. The distance between the connections, center to center, is 4 inches. So to install this, you just align the faucet with the holes in the sink or the counter, drop it into place, and then secure it using these included plastic lock nuts. Take those off first, then drop it in, then just it to attach those and secure it into place. I do want to give you a few measurements on this.
We'll start with the width of the faucet, and the width we'll measure from this end to this end. If we put a ruler on that, it's going to be right at 6 and a quarter inches. The height, which we'll measure after this is installed, so from the bottom of the base to the highest point, is gonna be right at 3 inches tall. The shank length, that'll be the length of this threaded connection for your water, from the bottom to the very end of it. It's gonna be right at 2 inches.
Then the depth would be, when it's installed, from the front of the spout to the very back of the base. If we put a ruler on that, it's gonna be right at 5 and a quarter inches for the depth. This faucet does come with a nice set of detailed instructions. Tells you how to install it, and on the very back it'll give you a list of the parts that are included with this part number. That should do it for the review on the Phoenix Faucets brushed nickel finish 4 inch dual handle RV bathroom faucet.
Ratings & Reviews


great service
Info for this part was:
At etrailer we provide the best information available about the products we sell. We take the quality of our information seriously so that you can get the right part the first time. Let us know if anything is missing or if you have any questions.


Thank you! Your comment has been submitted successfully. You should be able to view your question/comment here within a few days.
Error submitting comment. Please try again momentarily.