


To see if this custom-fit item will work for you please tell us what vehicle you'll use it with.
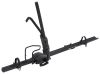
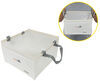
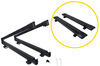
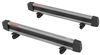
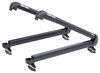
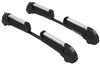
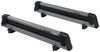
These custom-fit clamps and pads let you mount 4 Inno XS200, XS250, or INSU-K5 feet to your vehicle's naked roof to help create an aftermarket roof rack system. Clamps mount to feet with bolts. Kit includes 4 clamps and 4 pads.
Features:
Specs:

Videos are provided as a guide only. Refer to manufacturer installation instructions and specs for complete information.
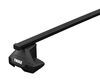
Hi, everyone. It's Evangeline here at etrailer. And today we'll be taking a look at our INNO roof rack system. This has the 48 inch long crossbars, the 51 inch long Aero crossbars, the INNO through feet and the custom fit kit for your 2011 Ford Fusion. So we have a bunch of different options right here at etrailer when it comes to roof racks. And why would you want a roof rack Well, if you wanna carry cargo, let's say in a roof basket or a roof box, or if you wanna carry bikes on your roof or even a kayak, the first thing you need is an aftermarket roof rack like this.
So from all the other roof racks that I've tried out, this is gonna be my favorite just because we don't want too much overhang. This is a nice fit. And we have a very aesthetically pleasing design for the INNO roof rack system. So we're gonna go through the different specs, the different measurements of this roof rack system so that you can decide if it's the right fit for you and your Ford Fusion. So these are the 48 and the 51 inch long crossbars.
So we have different options from INNO. You have a wider length, and then you have the shorter length, which is this. I usually recommend getting the longer crossbars, but for this specific situation this is actually my favorite because we have a sedan. If you have longer crossbars, what may happen is that as you enter your vehicle, you could possibly hit your head against longer crossbars. So just for that reason alone, I think this is gonna be the best fit.
Let's take some measurements. Measuring for overhang, I'm gonna measure from the end of the towers to before the crossbar end cap, and we have an inch and a quarter overhang on the front crossbar, and less than an inch overhang on the back crossbar. So that's gonna be helpful when you have items that need overhang. This will not work for that. You're gon have to mount everything on the inside unless you use the T-track channels.
So those T-track channels can be accessed once you open that end cap. So you just press the tab in, pop that that end cap off. You can now put T-track mounted accessories through. I really like the design from INNO for this, because you don't have to cut the rubber strip inside to fit. You just pop it on above the wind strip and then place it wherever you need to go. And then the rubber strip adjusts for you. These are the modern Aero crossbars from INNO, and upgrade from your traditional round or square crossbars. If you had those old crossbars, you remember going down the highway, lots of wind drag, lots of window noise. These don't have that. They have that aerodynamic design, which means you have a larger bar, so more support for some of your items and less wind drag and wind noise. That T-track system though is my favorite part. I highly recommend if you can get an accessory that is channel mounted, do so so that you can maximize your limited bar space. Since they do have a custom fit kit, your crossbar spread will be limited to 27 inches from the center of one crossbar to the center of the other. Some roof rack accessories require a certain crossbar spread. So that's gonna be the measurement you're gonna have to make sure. Make sure it's within 27 inches and then you should be fine. Roof clearances is gonna be measured from the top of your roof to the bottom of your crossbar. Over here at the center, it looks like it's gonna be 3 1/2. That's gonna change depending on where you're gonna measure it. But since you have this glass roof here, it's nice to know that you have plenty of clearance. If you have accessories that have clamps that go around, you wanna make sure you have enough clearance for that, especially with tightening down those clamps. The height now added to our roof is gonna be about 4 3/4 inches. That's gonna be where your cargo is sitting. So what if you're carrying on skis with extra high or extra tall bindings That's gonna help out. If you have more clearance on your roof rack, you have more clearance for skis. So here you have your INNO through feet towers. I like the through feet because they're super duper easy to install, especially compared to some of our other brands. The other brands have more adjustment, but then it takes more time to adjust those towers. These just rely on the fit kit to get the best fit. Now you have integrated lock core. So all four towers have the same lock, so they could be accessed with one of these two keys. So that just loosens that. You can take the end cap off, and now you can access your fit kit. So that fit kit involves the special pad, as well as this special clamp. So that cramp is designed to contour around your vehicle. It's very important to get the correct fit kit for the correct vehicle. So make sure to check out are etrailer product pages and use our fit guide to get the best fit for you. But once everything is tightened down, you get the two tools included with this kit to use it. So you don't need anything else from you other than tape measure. And then you tighten this down, and it's so contoured that you can even slam your door on it, no problem at all. So let's take a look at that install process. So the install process is gonna be a little bit involved. That's because we have a bare roof. So you're gonna have to have these different clamps. You're gonna have a special fit kit, but that's what this video is for. I'm gonna guide you through the process of figuring out which clamps go where, which pads go where, what do we do with these silver plates That way you can get your roof rack on your Ford Fusion in no time. First thing you need to do is prep the crossbar. I actually installed the rear crossbar already. So we're gonna install the front crossbar together. You're gonna want a shorter crossbar in the rear, the longer crossbar in the front. So we're gonna have the silver plate. And that's what we're gonna use to prep the bar. Push this track through on the inside of your crossbar all the way out. So see how it's open there. You're gonna put the plate in from the bottom, bring that up and then push that back in. So this goes all the way through, and then you're gonna get your tower. So notice how we have those tabs on the tower. That tab is gonna fit onto your silver plate. So make sure, just bring that upside down, just like that. Then you're gonna press in on where your hook is gonna go, and that will allow you to slide your tower through. Once you've passed that opening, you're secure. Now, where do you put your towers That's what this tape measure is gonna be. So follow your instructions. It has different measurements for whether you have the front or the back. So we're gonna measure from the center, and we want our front crossbar to be 20.1 inches from the center. So once you have that center line on your tower lined up to right where you need it to be, we have it at 20.1 inches, you're then going to tighten it down with our larger hex tool. Once your towers are in place, you can also just double check them because there is a measurement for the full length apart. So it should be 40.3 inches apart. Once that's double checked, everything's tightened down, you're then gonna use your fit kit. So good news is that both towers use the same fit kit when it comes to the pads. You're gonna have the 401 right over there. So do that on both towers. The next step is just to make sure you have it facing the right way. Remember the tapered portion should be facing the back of the vehicle, and the taller portion should be facing the front of the vehicle. Just gently place this on your roof. You're gonna want it sitting right on top of your door. And to help you out once you do have it marked, you do get a sticker to mark your place, or if your car's dusty, I just make a mark right there. Now you're gonna secure it with the hook. So that hook just sits in your tower. Then you are gonna have this bolt. Then you have a washer and then a plastic washer. And then those just fit between the hook and the tower. And then use the smaller hex tool to tighten it down. What I actually do is I leave the doors open and then I tighten this down like 75%, go to the other side, tighten that down fully. That way it's evenly tightened. Once it's fully tightened down on both sides, you're then gonna have this tower. This fits from the bottom into those little tabs. Then you're gonna have your keys, and then that will secure it. The final step is to put these nice, shiny end caps into your crossbars. Remember there's gonna be a right and a left end cap, so just make sure you get the correct one for each side. Once all four end caps are placed, all four towers are placed, you double check that everything looks nice, tight, and secure. That's it for the install process. And that was a look right here at our INNO roof rack system with the 48 and 51 inch long Aero crossbars, the INNO through feet and the custom fit kit for your 2011 Ford Fusion. My name is Evangeline, and I hope you enjoyed the journey..


Fit perfectly. Held the kayaks firmly in place from St Louis to Hotsprings AR.
Do you have a question about this Accessories and Part?
Info for this part was:
At etrailer.com we provide the best information available about the products we sell. We take the quality of our information seriously so that you can get the right part the first time. Let us know if anything is missing or if you have any questions.


Thank you! Your comment has been submitted successfully. You should be able to view your question/comment here within a few days.
Error submitting comment. Please try again momentarily.