
Thank you! Your comment has been submitted successfully. You should be able to view your question/comment here within a few days.
Error submitting comment. Please try again momentarily.


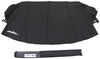
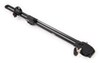
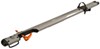
Replaces the windshield bracket assemblies needed for your Yakima WindShield roof rack fairing (Y05016, Y05017, Y05018, or Y05019).
Features:
California residents: click here
Videos are provided as a guide only. Refer to manufacturer installation instructions and specs for complete information.
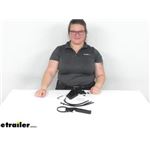
Hey everybody, I'm Ellen here at etrailer.com and we're taking a quick look at the replacement brackets and hardware for your Yakima windshield fairing. So if something happened to that original hardware, maybe one of these guys snapped or broke or just got lost somewhere along the way. This is gonna be a complete kit to replace that hardware. So I have one assembled, how it would be on your vehicle minus the actual fairing itself. So you're gonna get the brackets, the straps, the push pins and then also a tightening tool for the strap to go around the bracket, around your bar on your roof rack. And you do also get some little clear protectors for your vehicle as well.
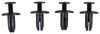
So this would go underneath the kind of the foot where that bracket makes contact with your roof to make sure that there's no damage or rubbing that happens there. So, let's take a little closer look. So you're probably gonna be already familiar with how these go together, but just as a refresher, you'll have that push pin that goes into the bracket and pulls in the fairing itself. So to get these on and off you usually can just push the pin in place. So it'll come with this popped up.
So if you just push on it it should expand out along the lines here. I'll bring this little closer so you can see what I mean. So when I push this in it's gonna expand and hold in place like that. So that's what's gonna keep that fairing tight against the bracket. Now, if you ever need to take it out you can loosen this by just putting in a Phillips head screwdriver and threading that back out.
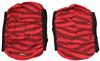
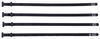
As far as the strap, again, this should all be familiar to you, but just to review, the strap can easily be taken on and off by just putting the little T-end into the bracket, but to actually get it snug, you do need to tighten down this plastic nut on the inside. It does come with a hex key to tighten that up. So just turn that and it turns the little nut inside there to tighten that around. And once that's as tight as you want it to be you can take the excess and then put it into this little keeper on the back of the strap. Mine isn't quite long enough to really do that right now.
You might kind of go, I mean, you're probably gonna have this much tighter. There we go. Actually, we'll lock in. That's pretty much all there is to it. Again, it's gonna come with each of those parts and you're gonna get four of each of those parts. So you'll get four of the brackets, four of the straps, four of the push pins, and also four of those protectors. You only get one tightening tool. That's all you really need. That's pretty much all there is to it for our quick look at the replacement hardware for your Yakima windshield roof rack fairing. I hope that this has been helpful in deciding if this is the right replacement part for you. We do have a lot of other replacement parts for Yakima gear here etrailer.com and all kinds of accessories for your roof racks, bike racks and more so be sure to check those out. And thanks for watching..

To confirm several other reviews that mentioned similar information, I used these brackets to convert an older Yakima fairing that was designed for round bars to the newer style that can now be installed on aero bars. I had to drill an extra hole for the 2 inner brackets, but they work.
these work great but I must have an older fairing. The two inner clips that are smaller required a little bit of fabrication. I needed to drill a couple new holes in those for the screw clip. Also - I was able to figure it out after a bit of looking at them but some basic directions on how to tighten them would definitely benefit someone else. My fairing is also kind of tapered if you will so when it's all fastened down my fairing has a little bit of a warped shape as it sits on it's feet. I am just assuming new yakima fairings are the same rectangular shape now and not tapered. Would of got 5 stars if it would of said what generation of fairing these went to. I made it work so pretty happy :)

Worked perfectly for attaching my old fairing to the new factory rack. Have had these on for a year now and they haven’t loosened or even moved.
Perfect for attaching clips to the wind screen.

Pierre

6/2/2022
im install on old yakima deflectoron new top rack very weel
Great
Do you have a question about this Accessories and Part?
Info for this part was:
At etrailer we provide the best information available about the products we sell. We take the quality of our information seriously so that you can get the right part the first time. Let us know if anything is missing or if you have any questions.


Brooke M.
6/11/2025
That's awesome! Thanks for sharing how you did it along with the photo :)