


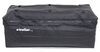
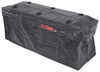
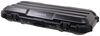
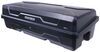
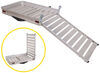
The Rightline Gear Duffel rooftop cargo bag holds 2 cu ft of gear. Great for your SUV or minivan. The unique design allows you to buckle multiple Duffel bags together.
Features:
Specs:
California residents: click here
Videos are provided as a guide only. Refer to manufacturer installation instructions and specs for complete information.
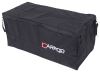
Hi everyone. I'm Evangeline right here at etrailer. Today we're gonna be talking about the Rightline Gear Car Top Duffle Bag. This is going to be a weatherproof duffle bag. We can put all types of cargo inside of it, but most importantly, put this bag in pretty much all types of situations, whether you want it on your roof, on a basket, or even inside your vehicle, the options are pretty much endless. This is a small bag, but it's actually available in two different sizes, but what we have today is the 60-liter bag.
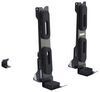
You can also get this in the 120-liter, so double its size, and what a lot of people actually do is they get the smaller bags and then they connect them all together. So the design of this is you can actually daisy chain multiple Rightline gear bags. So if you have cargo, you can put it all on your roof, but not all stuffing it together. They accomplish this with the design of their straps. So each of your car top bags are going to have this handle strap, which makes it easier to carry around, but also to secure to each other or to your vehicle.
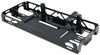
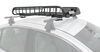
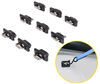
At the end of each strap, you're gonna have this buckle, and you have different attachment options. But long story short, it all buckles together, whether it's buckling to another bag or buckling to a raised rail or basket, whatever you wanna attach it to. For securing your bag, while it is preferred to loop a strap around your crossbars or your roof rack or your raised rails when possible, if you don't have any of those, that's totally fine. You can use the extension straps or the weather strip hooks to still secure this around your roof. Also, if you have this secured to a basket or a platform or your hitch cargo tray, doing the loop method is always the way to go.
These weather strip hooks are going to be metal hooks with rubber around them. So the way they work is that they hook into where your weather strip is on your door. See how it hooks into that corner, just like that. What does most of the work though is gonna be your door closing in on these hooks. Now, every car is different.
This fits some cars better than others. If you find that, let's say there's too much of this hook than you feel comfortable with between the weather strip and the door, then try to find another spot on your vehicle that you can tie this around to get you that better leverage. And that's where the extension shafts may come in handy. This can also be helpful for if you have a wider roof or your cargo basket is pretty far apart and really wide. You can always use these straps to extend the distance from your bag to your connection point. This is not usually how I personally carry around my cargo. I have a roof rack, I might as well grab a roof box. But not everyone has a roof box or a roof rack. They're in different types of situations with different vehicles, and I actually, after using this, understand the appeal of the car top back, because, unlike my roof box, this is actually really easy to remove and haul around, especially if I have multiple bags, then I just grab the bag I need, I unhook it, and just like that, I can take it off of my car and I'm ready to go to the campsite. And the fact that you can connect multiple bags together so each bag has its own type of cargo in there is really helpful. So what type of cargo can you even put in here Well, the specs are right here on our site for all of our different bags. Since it's a bag, you have a little bit more flexibility compared to if this was a rigid roof box. So this is commonly used by people that like to just push things into the bag and just really stuff it. For example, I've got a backpack in here, I have my rain jacket in here, I even have a helmet inside. So all of this can be pushed and shoved, and if things tend to be a little bit taller than the bag dimensions but shorter on the other side, that's totally fine. As long as you can zip everything up, then everything will be protected. And that's because of the material of the bag. The bag is made of a PVC material. So compared to the thin canvas of supposedly waterproof tents, this is gonna be a lot more serious. The material is similar to what you'll find on outdoor signs in front of stores. And adding to that waterproofness, you also have your sealed zippers. So our inside compartment is a great example of that. Notice as I open up the zipper, that PVC layer comes apart. There's gonna be a hidden compartment where you can put in documents or your wallets, your phones, things like that. Now, when you close it, everything seals itself, preventing water from coming in and just getting things wet. While it does look like it's about to rain here at etrailer, to really mimic a storm, we're gonna bring this to a water hose. So I have my personal stuff here that I'd rather not get wet, but to add to it, we're gonna add some paper towels, and that way, if water does get into the bag, we'll be able to more visibly see it. So, paper towels wrapped around, close this on over, and we'll get the onto to the roof. (Evangeline speaking quickly) On the way to the garden hose, we're gonna drive this around our test course real quick, and let's just talk about how this sits on the roof once you have it fully tightened down and secured. So we're gonna go over some speed bumps and see some up-and-down movement, and everything looks super secure. You don't want too much up-and-down, because that's how you scratch a roof. And this sits very flush, very flat on there that we actually have less movement in the bag compared to something that may flex, like a roof box in extreme situations. Now, driving around, it all looks really good. Usually when I get to highway speeds, I would be concerned about the straps, but since our bag is really filled up and we don't have much excess fabric, then that's less fabric to flap around. A trick if you notice that there is extra wind noise and flapping as you are driving around is to make sure you fully fill up your bag. If you can't fill up your bag, then you may wanna consider getting the smaller version and just getting multiples of the smaller bags so that you know for sure that they are filled. Here we have our garden hose and we have our bag loaded up. So let's just go at it. (hose spraying) We'll try some different spray options. We're gonna do our little mist here, and we can do a more direct shower as well, really hitting that bag. Well, my car definitely has a lot of water on it and so does the bag. So let's take this down and see how well it held up to our impromptu shower. Unzipping. Well, it actually looks like it got a little wet. All right, paper towels definitely look a little damp over here along the sides, and so is my bag. You can see that color difference here on the bag from the dry to the damp, and paper towels definitely got wet too. So I think what happened here is that definitely came in through where the zipper seams are. So if you're going through a car wash where water is shooting up towards the zippers, probably not ideal, but if you are going through, let's say, water coming from above, coming down, that overlap on that should be good enough to keep the water up and outta the way. Like, I'm not upset, there's not a puddle inside the bag, just some damp paper towels, and not even all the paper towel is wet, but just enough where, like, if I had electronics, I wouldn't be loading them up along these sides of the zipper. So for the final review of our Rightline Gear Car Top Duffle Bag, while it wasn't 100% waterproof, and yes, I did put it through a more extreme situation than you might go through just going through a regular old storm, would I still use it Yeah, depending on the situation. I can totally see this being helpful for if you're maybe only going on an adventure once or twice a year, it doesn't quite make sense to spend a lot of money on a more extreme, permanent setup when you could just grab a couple of these duffle bags and pair them together. Where I also see this being super helpful is, as someone who really likes organization, I would put different items in different bags. This could be my gear bag and the next bag could be my clothes bag and things like that. Being able to carry this around, whether it's throwing it into the car, onto a hitch carrier, or onto the roof, makes it really portable and really versatile. So hopefully this video just explained all that, how you might use it, how it works, and if you have any questions, feel free to reach out to us right here at etrailer. I love seeing cool setups for cool adventures. So if you have any pictures of that, well, feel free to send them my way. But today, this was a look at our Rightline Gear Car Top Duffle Bag here at etrailer.com. My name's Evangeline, I hope you enjoyed the journey.
Info for this part was:
At etrailer we provide the best information available about the products we sell. We take the quality of our information seriously so that you can get the right part the first time. Let us know if anything is missing or if you have any questions.


Thank you! Your comment has been submitted successfully. You should be able to view your question/comment here within a few days.
Error submitting comment. Please try again momentarily.