
To see if this custom-fit item will work for you please tell us what vehicle you'll use it with.
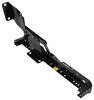
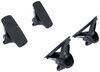
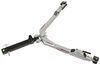
The curved ends on these rust-resistant black powder coated steel steps give your Jeep Wrangler a streamlined look. Fully enclosed ends prevent internal corrosion. Top-mounted, non-slip pads provide sure footing and rugged style.
Features:
Specs:
The PRO TRAXX oval step bars from Westin offer the best in both durability and rugged style. Sturdy, black powder coated steel construction and sealed, domed ends work together to prevent internal corrosion. Top-mounted, saddle-pad-style step pads have raised tread for excellent grip and deep grooves that allow water to quickly and easily drain away.

California residents: click here
Videos are provided as a guide only. Refer to manufacturer installation instructions and specs for complete information.
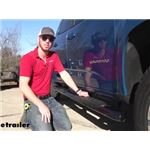
Shane: Hi, I'm Shane with etrailer.com. Today, you're going to be taking a look at . I'm going to walk you through the installation, on the Westin Pro Traxx 4 Nerf Bars for your 2014 Jeep Wrangler. What are some of the reasons people want to put nerf bars on their vehicles Maybe they want to dress it up. Maybe they want to use it to get in and out of the vehicle a little bit easier. Maybe they have older parents, or older grandparents, or maybe they have young children that have a hard time getting up and in and out of the vehicle.
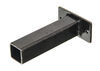
These are going to give them an extra step to make it easier for entering and exiting the vehicle.These are going to be four-inch wide steps, or four-inch wide bars. They're going to be fully enclosed on the ends, so we don't have to worry about corrosion on the inside, unlike some of the other ones that may just have a cap that goes over them. They're going to be a black powder coated steel. You can see, they kind of have a textured finish to them. So, they fit really nicely with this vehicle, unlike some of the chrome ones.
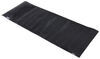
And I'm not saying chrome is bad. Chrome, you just have to keep clean. When you touch them, they get fingerprints on them. With these, you don't have to worry about that. It's going to be easy to clean, easy to wash off.Our step pad.
Our step pad's going to also be four inches wide. It's going to be basically, the full length of our door, so we know we have plenty of step pad to get in and out of the vehicle. It's also going to have raised tread on it, so that's going to make sure that we have sure footing during those wet conditions. Our bars run from the back fender all the way to the front one. So, they're running basically, the full cab length of the vehicle.
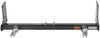
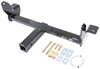
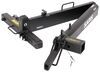
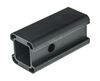
These are going to mount right up underneath the vehicle to existing holes or existing weld nuts in. So, we're not going to have to do any drilling.The only drilling that we might have to do is, this one hole right here may not, it may just need to be enlarged. You don't actually have to drill a hole, just enlarge it just enough to get that bolt to fit in there. So, other than that, there really is no drilling or anything like that we have to do. It's going to come with all the necessary hardware. All of our brackets are going to be black powder coated finish. So, they're really going to hold up well against any rust or corrosion. Another nice thing about having rails or tube steps on the side of your vehicle is, it makes it easier to . maybe you have a roof rack or cargo rack up on top of the vehicle. It's going to make it a lot easier to use that step to get any of your stuff up there or to get it down. Or maybe, you're strapping stuff down. Rather than having to pull out a ladder every time, you can see it gives us plenty of height to get up here and do whatever we need to do.To start your installation, you want to lay out all your parts. You want to make sure you have the pieces for each side. Check your bars, make sure they're not damaged or anything like that. Next thing we are going to do is, if you have anything on the sides like this, it's going to have to be removed. We are going to have two nuts here, two nuts here, and then a nut that runs, or a bolt that runs up here and here. With a 10 mm socket, remove this nut and this nut. And we'll take a 1/2 inch socket and we'll remove this bolt. And we are going to slide it off, and we are going to set it aside. These will not be reinstalled.Next, we need to put on our front and rear brackets. You'll notice, one's got a little notch in it like this, one of them is a rounded notch. This is going to be the rear, this one's going to be the front. If your vehicle . This one has a weld nut. If it doesn't have a weld nut, your kit's going to come with a nut plate like this. This will actually slide up inside, and then sit right there. Since we have a weld nut, we won't be using these. You're going to take your M 10 bolt. You're going to put on a lock washer and a flat washer. You're going to take your bracket, and we're just going to loosely install it, and we are going to thread it right up inside of that weld nut, just like that.Then we are going to do the same thing for the back one. This hole right here is not quite big enough to fit our bolt through it, so take a 5/16 drill bit, and we're just going to open that hole a little bit. We are going to go on the inside, and we are going to push our bolt through. I would suggest . Because this hole's a little bit larger, I'd suggest putting a flat washer on. You're going to have some extra ones in your kit. And then, we're going to put on a flat washer on the inside, a lock washer, and a nut. Then we are going to line up our holes between our support bracket and our body bracket. Bolt, and then lock washer . I'm sorry, flat washer, lock washer, and then nut. Then you're going to repeat that process for the back one.We're going to take our rail. We are going to set it in place. And how you know which side's which, if you notice these holes, they're farther away from the end than this end. This is going to be the front, so you'll know which side is driver and passenger. Also, the packaging should have a driver's side and passenger side sticker on it. We'll line up the holes. Then we're going to put a large Allen bolt, tooth lock washer, and flat washer. You're going to have two for the back, two for the front.These steps are going to come with an Allen wrench. You're going to go ahead and tighten these down, or your rails down to your brackets. 1/2 inch socket. We are going to tighten our bracket to our frame rail, or the body. And we'll tighten this one down. There's really not an order. I've just found it easier to do it this way. And then we'll tighten these down. And you're going to repeat the tightening process for the back, and then repeat the whole process for the other side of the vehicle. Again, I'm Shane with etrailer.com. I hope this video has helped you, whether you're still deciding or installing the Westin Pro Traxx 4 Nerf Bars on your 2014 Jeep Wrangler.

Info for this part was:
At etrailer.com we provide the best information available about the products we sell. We take the quality of our information seriously so that you can get the right part the first time. Let us know if anything is missing or if you have any questions.


Thank you! Your comment has been submitted successfully. You should be able to view your question/comment here within a few days.
Error submitting comment. Please try again momentarily.