
To see if this custom-fit item will work for you please tell us what vehicle you'll use it with.
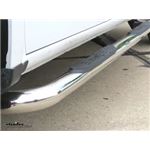
The curved ends on these cab-length step bars give your GMC Canyon a streamlined look. The non-slip step pads on the powder coated steel, 3" diameter bars sit in recessed areas instead of cutouts to inhibit internal corrosion.
Features:
Specs:
The step pad areas in Westin's E-Series round nerf bars are indented instead of cut out, maintaining the structural integrity of the steel tubing and preventing internal corrosion.
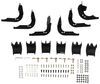
As shown in the image above, these step bars have a U-style tubing, which ensures that each bar conforms perfectly to your vehicle. Installation is quick and simple - just bolt the mounting brackets to existing holes in your truck's frame. No drilling is required.

California residents: click here
Videos are provided as a guide only. Refer to manufacturer installation instructions and specs for complete information.
Hi there, GMC owners. Today in your 2021 GMC Canyon, we're gonna be taking a look at and showing you how to install Westin's Nerf Bars. It's a three-inch, round tube step from Westin that has a plastic pad on top that gives you a good surface to step on. It's nice and flat on top with some raised surfaces to keep mud, debris, and snow and other things like that from preventing you from getting good traction. That dirt can go down inside the grooves and your foot can rest on top to get good traction in any inclement weather. Tube steps are great for a lot of different reasons.
Whether it's for a lifted truck, you just have to get in and out. Or for other reasons such as potentially roof-mounted accessories. So if we get out here, if you're trying to load something on top, it could be quite difficult here. But with the tube step, we've got another step and it's gonna make it so much easier, especially if you're, maybe ladder racks, we got the overhead ladder racks or anything like that or if it happens to be a cargo basket, it makes it a whole lot easier to access all those things. This tube step runs from front to back, so it'll work with both you and your passenger, and it comes with no-drill brackets that are custom fit for your vehicle.
So that way, all of our hardware's just gonna pop into place and then we screw it all together. So that way, there's no modifications made to our vehicle. Now that we've covered some of the features of our tube steps, why don't you follow along with me in the shop and we'll show you how to get them installed. We'll begin our installation at the front of the vehicle. You can start on either the driver or passenger side, doesn't really matter.
We're gonna need to get this trim panel here, pulled back just a little bit, 'cause there's some bolts behind it we need to take out. To remove the panel, we're gonna loosen up both of these Torx bits that are in here. There's one located here and then the one a little bit further in. We're using the T15 Torx to remove those. Once we get both of those bolts removed, you can then pull out on your panel here.
And there is one pin there. We wanna try to be careful you get that popped out. There we go. And we don't need to take it all the way out. You really just need to get it so you can pull it back like this. And then the two bolts are gonna be here and we'll use a 10-millimeter wrench to remove those. If you get our wrench in there and there is gonna be a lot of paint on it. So it is gonna difficult to take your wrench on it, but it is a 10 millimeter in size. You want it to just constantly keep pressure on it because of all that paint, it's gonna make your wrench going slip off of there really easily. After we get the first one removed, then we can remove the second one. We can then take the small button head screws, place a flat washer on it. We can then just take these and thread them into the weld nuts, where we removed our factory hardware. You will get an Allen wrench with them so you can use that to tighten them down. Now, once we get those snugged up, we can reinstall this panel. In most cases, you're gonna need a trim panel tool. You can get trim panel tools like this, here at etrailer. Because typically when you pull this back, the pin up in here, it doesn't end up staying. So you gotta take your trim panel tool and just pop that pin out of there. Let's get behind it there and then we can release it. And this'll just snuck right back in the little slot there and then we can reinstall it. At this point, now we can put our pins back in and tighten those down. And we can also get our Torx screws we installed as well. We're now just on the inside of the frame right where we're working, you can see the studs poking out here on the left. And if we go just to the rear of those, you're gonna have a hole here. This is where we're gonna need to insert our clip nut here to then go in the big hole. It's gonna slide over and then the nut portion there is gonna line up with that hole. There's also one up here. So we'll slide this one in place as well. We can now take our front bracket. This is what it's gonna look like here and it is labeled, so you can't really get it wrong. If you look right here, it says PF for passenger front, we're working on the passenger front. So that means that that's our bracket. The little holes here will line up with the bolts that we had threaded through. So we'll just slide that on and then the other holes are gonna line up with those nuts that we had just slid into place. Each one of these is then gonna get a flat washer, a lock washer, and a nut. We can then take the smaller hex bolts that come in our kit, we're gonna put a lock washer on it followed by a flat washer. One's gonna thread into the bottom hole here into the nut that we put into place. And then another one is gonna thread into the other nuts in the side hole. Sometimes you got to kinda move the nut around a little bit to get it to line up 'cause they're kind of a loose fit and we want these to just be loose for now. So we can move it around to get our bracket in place. We're now gonna install our rear bracket. So we're still on the passenger side over here at the back. You may have rubber plugs in this location, if you do, just pull those out. We're gonna take the fish wire that comes in our kit. We're gonna go through the small hole and then we're gonna take it right out to the large hole that's right next to that small hole. We can then take the handle bolts that we have here, that'll handle weld onto them. This is gonna thread right onto our coiled wire here. And then we can take it. We'll just push that into the frame. And then you've got coiled wire here to pull it back through. Once we get it pulled back through, you can unthread our coiled wire from it. It can be pretty stiff sometimes. You may need it to get it yank. And then for the vertical ones here, we're gonna put the plastic nuts on them that come included. These are just gonna prevent hardware from falling down into the frame and it'll be fine if they get smashed in between the bracket and the frame since it's so thin. It's really there just to help you out and make the installation easier. We'll then feed in our other bolts in the bottom hole, but this time, we're not gonna use one of those. We're actually gonna leave our coiled wire on it. So we're gonna take that through, threaded on to this one. I wanna make sure I get a couple of, couple of good threads on it there. And then now we're just gonna push that up, slide into there, and it can hang down, it's okay. Now we can take our bracket. And again, it's labeled passenger rear, PR there. This one's gonna have to push into the frame a little bit and then we'll take the coiled wire and we're gonna drop it down through the vertical hole here. Or this is more of a horizontal plane, but we wanna go straight down vertically. This is gonna line up just like this. So you'll push that up in there, slide the bracket over the top bolt, and then we can pull our bolt right back down through it like that. And then we can put our hardware and secure this. They're gonna get a flat washer, lock washer and a nut each. The only difference is our top bolt there. We're gonna use the larger flat washer and on our bottom bolt here due to it being so close to that inner lip. The larger flat washer will kinda put some pressure on it so you're gonna use this smaller one. And be careful, we don't wanna push this back up into the frame. There's no plastic thing on this one. So I usually like to do is after I get both of those on there, I'll just push on it. And that sideways pressure will keep it from pushing up while I'm trying to get the nuts started. And we wanna go ahead and just leave these loose now as well. So I'm just gonna run it up by hand there. So we need to have a little bit of place, so we can get everything lined up. We'll now need to remove our body bolts so we can install some brackets. There's one body bolt towards the front, we'll need to remove, and one towards the middle. We'll focus on the front one first. We're removing that with a 21 millimeter socket. So now that we've got our bolt out, you'll wanna take the washer off of it because the way we want this to work is we're going to have our washer back where it was supposed to go. But if you look, there's a cup, kind of a groove inside of there, and we wanna take up the space. So we're gonna put a spacer in there. And then our bolt is gonna slide through the bracket through the spacers, through the washer, and then we can put it right back up into place. We'll now move to our middle bolt. We're gonna remove this one. This one doesn't have a cup or anything on it like that. So we don't have to worry about any of those things. We can then just take our middle bracket here. There's no way to get this one wrong 'cause the bolt is only gonna fit through one opening. And then this bolt is gonna go through our bracket and then right back up into the body mount. We can now take the large bolts that come in our kit. We're gonna put on a lock washer, followed by a flat washer. These are gonna thread right into the opening here on our running board. So you can kind of hold that up there, kinda line it up, push your bolt through all of your brackets and then thread it into your tube step. And there we go. Now we've got this one caught, we'll take the same hardware, and we're gonna towards the rear. And just hold up the other end of our tube steps and use the same type of hardware to thread it here into the back. And now we can take our button head bolt. This is the larger one that comes in the kit. We're gonna put a lock washer and a flat washer on this. This is gonna go through the hole in our center bracket, and it's gonna thread right into our tube steps. Now that we've got all of our hardware loosely installed, we can go back and start tightening it down. I like to tighten down the brackets to the vehicle first, and then we'll move to tightening it to the running board. We can then take the other included Allen wrench that comes into your kit. This is a larger one for the larger button head bolt and snug this down. Well, then go back and torque the hardware to the specifications outlined in the instructions. If you need a torque wrench, you can get one here at etrailer. Next, we'll torque our body bolts. This spec is not provided. So you wanna contact your dealership to make sure you get the appropriate spec. You most likely can find those online as well. Now we have our passenger side down. We can repeat the same procedure over here on the driver's side. You do wanna keep in mind that the tube step here is side-specific. The packaging that it comes on here, that's kind of like a wrapper will have a sticker on it that'll tell you whether it's the passenger or driver's side. And that completes our installation of Westin's Nerf Bars on our 2021 GMC Canyon..

no specific length on info
GOOD FIT, EASY INSTALL

very satisfied
Info for this part was:
At etrailer.com we provide the best information available about the products we sell. We take the quality of our information seriously so that you can get the right part the first time. Let us know if anything is missing or if you have any questions.


Thank you! Your comment has been submitted successfully. You should be able to view your question/comment here within a few days.
Error submitting comment. Please try again momentarily.