

 Arrives before Christmas
 To see if this custom-fit item will work for you please tell us what vehicle you'll use it with.
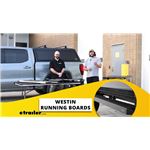
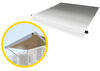
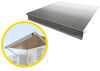
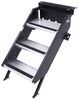
These 6" wide, brite anodized aluminum running boards sit close to your Ford Explorer's frame for a streamlined look. The 1-piece, non-slip step pad on each board is made of soft, durable rubber, providing better grip than a molded step surface.
Features:
Specs:

California residents: click here
Videos are provided as a guide only. Refer to manufacturer installation instructions and specs for complete information.
Hi, I'm Danny with etrailer. And today, we're gonna take a look at, and I'm gonna show you how to install, the Westin Sure-Grip running boards on our 2020 Ford Explorer. Now, with the Ford Explorer, today, it is a little bit low to the ground, but as you can see, this door jamb here is pretty high up. So getting in, I have to lift my leg pretty high. So adding these running boards are gonna add that little bit of extra step, just to make it more comfortable getting in and out of your vehicle. Now, another good thing too is, if you're storing things on the top of your vehicle, like a cargo carrier, this is gonna allow you to have that little bit of extra height to get what you need up here.
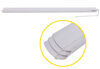
These running boards are six inches wide. But do keep in mind that the doors have this slope here, so it does kind of cut into 'em. And it's not gonna be a problem when you open the door, but if you're getting something from the top of the vehicle, it will decrease the amount of space you have for your foot. They're nice because they have a rubber pad that runs the full length and grooves in 'em that help with irrigation, so the water runs off, as well as grip as well. Now, if you happen to go offroading in your Explorer or on uneven terrain, then I'll go ahead and give you the measurement from the ground to the underneath of the running board.
And that's gonna be about seven inches. (tape measure swishing) If you decide to get these running boards for your Explorer, please send in a photo of how they look on your vehicle and/or review or comment. Now, getting onto the installation, it is very easy. It's just three brackets along either side. It's a no-drill application, just a bolt-on.
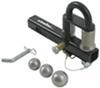
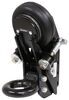
So if you're ready to put these on, follow along and I'll show you how to do it. So to start off the installation, I'm on the passenger side here. You're gonna wanna grab your black bracket that comes in the kit. And I'm at the cab side and I'm just gonna slide this in that square hole so it aligns with this round one here. (bracket clinking) Now, these brackets will go on the same on every single attachment point, except the rear will just be flipped.
Now, we can put our brackets into place. I'm gonna grab a nut that comes in the kit. And it's pretty tight here, so I'm actually just gonna use this to pinch that nut where I need it. I'm gonna slide it up so I can get threads. Now, align our bracket and get our bigger bolt, (bolt clinking) our M10 bolt, thread it on. Now, all these hardware are gonna have a locking washer and a flat washer. Now, I'm gonna get the top bolt in. (bolt clinking) And that's gonna go into our black clamp we put on. (bolt clinking) And I'm gonna get these all on and just hand tight, for now. Now, if you are planning on adding this weather strip to your running boards, you will have to take off the plastic cover. It's just gonna be three screws securing it into place. I just removed those with a Phillips-head screwdriver. Pop this off. And now, you can slide this in that channel. (strip swishing) So you can slide this all the way down, pop that cover back on, and then we can put this on the vehicle. Now, you're gonna wanna take your square-headed bolts and you're gonna slide 'em in these two channels. Now, I'm gonna slide 'em roughly where our brackets are. So I'm gonna go ahead and put this on here. Now, with it resting on our brackets, you can slide your hardware to where they need to go, (bolt clinking) and get 'em dropped into place. Now, I'm gonna grab a washer and an eye lock nut here. (bolt clinking) And I'm gonna do this for all our bolts. Once we do that, we can tighten and torque everything down. Now, I'm gonna go ahead and get all these tightened down. I'm gonna start with the brackets, get those tightened down. They are a 13 and a 16-millimeter socket, as well as these bottom ones, they are 13 as well. I already tightened in all our brackets. And now, I'll tighten these down. (impact wrench whirring) Now, I'll go and tighten the big M10 bolts first, (torque wrench ratcheting and beeping) to the specs in the instructions. And if you don't have a torque wrench at home, you can rent one at your local auto parts store or you can buy one from us at etrailer. (torque wrench ratcheting and beeping) And that was a look at the Westin Sure-Grip running boards on our 2020 Ford Explorer. I'm Daniel, thanks for watching.

Info for this part was:
At etrailer.com we provide the best information available about the products we sell. We take the quality of our information seriously so that you can get the right part the first time. Let us know if anything is missing or if you have any questions.


Thank you! Your comment has been submitted successfully. You should be able to view your question/comment here within a few days.
Error submitting comment. Please try again momentarily.