

 Arrives before Christmas
 To see if this custom-fit item will work for you please tell us what vehicle you'll use it with.
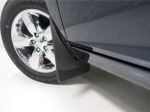
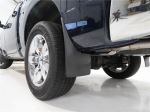
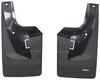
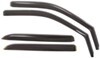
These premium mud flaps are easy to install and digitally designed to fit your car or truck. Protect your Ram 3500 and your trailer from road debris. Flaps are constructed of durable thermoplastic resin with stainless steel fasteners.
Features:
Precision fit, durable components and ease of installation make WeatherTech NoDrills your first choice in mud flaps. Installing mud flaps has never been this painless. Patent-pending QuickTurn stainless steel fasteners makes installation quick and easy - no drilling required.
Videos are provided as a guide only. Refer to manufacturer installation instructions and specs for complete information.
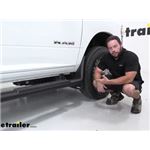
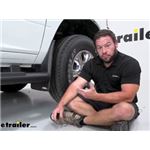
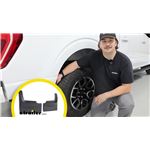
AJ What's up everybody It's AJ with etrailer.com. Today we're gonna be checking out these weather tech mud flaps. Now we're gonna be putting 'em on a 2022 Ram 2,500. Let's check 'em out. Takin' a closer look at the mud flap here, it's gonna be great for keeping that gravel or dirt or whatever your tires are kicking up from hitting the bottom of your truck and ruining that. It goes on here really easy, you see it's custom fit to fit your vehicle.
It goes on over the trim here, so it really looks good. It looks factory, like it's supposed to be there. It's also sturdy molded plastic, you see, it's not just a flimsy flap, that goes back and forth in the wind, so it can hold up, to bigger rocks and dirt. Now we talked about what they are and what they do, they're not too bad to install, it's just a couple screws. Follow and see how I did it.
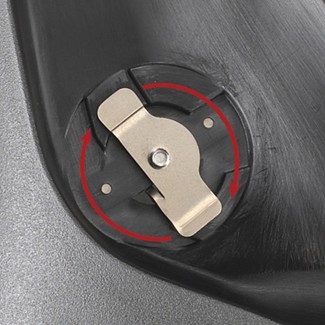
We're gonna start up with the front mud flap on the driver's side. Now they're all marked, so you just look here. It's gonna have LH for left hand, that's gonna be the driver's side. All we have to do is remove these two hex head bolts, so I got my ratchet here, gonna loosen those up and we're just pulling the bolts out. So don't remove the plastic piece behind.
We got one here at the bottom, and there'll be one a little further up top. We'll take both of those out. With those outta the way, we can put our new mud flap in place. You see it already has a section that's a cutout, that's gonna go around this plastic piece, and clip in. We're gonna set a place right there, if you come along to the backside you can see how it fits the groove perfectly, right there.
There's also a clip on the underside, they wanna clip on the fascia. So I'm gonna push from the inside out, to get this tab to go up, and around this portion, as we slide it up. So, I guess you could use a screwdriver if you want, to pry out a little bit more, but you don't wanna pry it too much, so it doesn't grab on there. There you go, slid up into place. Then we'll replace our hex head screws. Now once we got both of these tightened down, you do the same thing on the passenger side. Overall, like I said, not too bad to get installed, you just had to remove the hex head screws, replace this. It fit right over the existing trim here, so that's pretty easy. Well, I think that does it. Thanks for hanging out..

Great
Do you have a question about this Mud Flap?
Info for this part was:
At etrailer.com we provide the best information available about the products we sell. We take the quality of our information seriously so that you can get the right part the first time. Let us know if anything is missing or if you have any questions.


Thank you! Your comment has been submitted successfully. You should be able to view your question/comment here within a few days.
Error submitting comment. Please try again momentarily.