
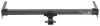
etrailer Trailer Hitch Receiver - Custom Fit - Matte Black Finish - Class III - 2"


To see if this custom-fit item will work for you please tell us what vehicle you'll use it with.
Thank you! Your comment has been submitted successfully. You should be able to view your question/comment here within a few days.
Error submitting comment. Please try again momentarily.


Hit the road with confidence! Whether towing a camper, hauling gear, or getting the job done, this hitch is built for adventure. A fourth layer of matte black powder coating resists corrosion, ensuring strength and durability for every journey.
Rated for 5,000 lbs of gross trailer weight (GTW) and 750 lbs of tongue weight (TW), this hitch is built to handle mid-size trailers, campers, multi-bike racks, and cargo carriers. Whether you're heading out for a weekend getaway or hauling extra cargo, this hitch provides the durability and security needed for worry-free towing.
Unlike standard glossy hitches, etrailers hitch features a matte black carbide finish, making it more resistant to scratches and better at hiding dirt and scuffs. The added fourth layer of powder coating ensures superior corrosion resistance, making it ideal for long-term use in various weather conditions.
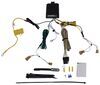
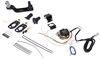
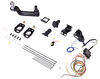
No drilling or welding required - this hitch mounts directly to your vehicle's existing frame attachment points. The included complete hardware kit and straightforward instructions make it a great DIY-friendly option.
Designed to accommodate a wide range of hitch-mounted accessories, this 2-inch receiver is ideal for multi-bike racks, cargo carriers, and a variety of towing setups. The standard sizing ensures compatibility with most hitch accessories on the market, making it a go-to choice for adventure and utility needs.
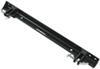
The square-tube construction enhances durability and provides a clean, streamlined appearance. This design ensures a strong and stable connection while integrating seamlessly with most vehicles for a factory-like fit.
Built with precision robotic welding and high-quality steel, this hitch ensures long-lasting strength, a precise fit, and consistent performance. Designed for reliability, it meets rigorous quality standards to provide a dependable towing solution for years to come.
When you purchase a hitch from etrailer, you have access to lifetime technical support from towing enthusiasts. Whether you need installation guidance, troubleshooting tips, or advice on accessory compatibility, our team is here to help every step of the way.
California residents: click here
Videos are provided as a guide only. Refer to manufacturer installation instructions and specs for complete information.
Hi, this is Scott with etrailer. Today we're taking a look at and installing our etrailer hitch on our 2016 Audi Q5. Our Audi Q5 is a really capable vehicle, but our neighbor wanted to be able to add some accessories on the back, like a bike rack or cargo carry, and sometimes pull a small trailer. This is gonna be a really good hitch for them to do that with. This one's always gonna be really accessible. You can see that you can get at your pinholes real easy and your receiver end is out where you can get at it.
So, they're gonna have no problems putting any accessories on. I really like the color of this one. With that matte black finish, I think it blends in pretty good with our Audi. Another nice thing about this one is it's gonna have a hidden cross tube design. So our cross tube is not gonna be visible.
That's gonna be hidden in behind our fascia. This switch is gonna have a 5/8 pin hole opening. This that's gonna hold in any of your accessories that you put in the back. Now, keep in mind, this won't come with a pin and clip, so you may want to pick one up here at etrailer or you can take a look at your accessories. A lot of them will have either a pin and clip with it or a lot of your bike racks will have an anti-rattle pin that comes with that.
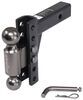
This sits gonna have heavy duty welded on chain loops, so it's gonna accept either your S-style hooks or your clevis-style hooks. So either one of those are gonna work for your trailer towing needs. As far as measurements go for this hitch, from the center of our pin hole out to the edge of our bumper, we're looking at right around 2 1/2 inches. And with that number, you'd be able to decide if any of your accessories that fold up or stow away make any contact with the back of your vehicle. Now, from the top inside of our receiver to the ground, we're looking at a measurement of right at about 14 1/2 inches.
So with that measurement, you can figure out if you need to have any rise in the shank of either your bike rack or your cargo carriers. And that number can also help you figure out what you need for a ball mount. As far as weights go for this hitch, we're looking at a tongue weight rating of 750 pounds. That's a pretty good number. That's gonna be the weight of your bike rack loaded down with your bikes or your cargo carrier loaded down with all of your gear. Now as far as a gross trailer weight rating, we're looking at 5,000 pounds. That's gonna be the weight of your trailer and everything that you have loaded on that. Now, keep in mind, it's always a good idea to take a look in your owner's manual and make sure you don't exceed any of your maximum towing capabilities listed in there. Now if you have any questions or comments about this hitch for your Audi, you can always leave a question or comment down below in the comment section or you can get ahold of one of our experts here at etrailer. They'd be glad to help you out. As far as installation goes, you are gonna have to remove the fascia. It can honestly be a little bit tricky. So if it's something you don't feel like tackling yourself, you can always take a look at our dealer locator and get something done for you locally. If it's something you feel like tackling yourself, stick around, watch our video, and we'll help you get it installed. To start our installation, we've got the hatch of our Audi opened up and we're gonna want to get our flooring out of the back. So we're gonna take our mat out, we'll get that set aside. We'll have our floor in the back, just wanna lift up, pull that out, and we'll get that set aside. We're gonna have a tray here, just wanna lift that out, and we'll get that set aside. Along our back, we're gonna have our threshold here. We just wanna pull up on this and start on either side. Work our way across, pop that up, and we'll get that. We're gonna have an electrical connection here in the back, squeeze in our tabs, pop that out. Now, we can remove this. Now we have our floor covering out of the way, we're gonna have our cargo loops in the back. And down in here, we're gonna have some T30 screws we're gonna need to remove, and we're gonna have two sets in each of these all the way around. We're gonna get all of those removed. (tool whirring) Now, to make this a little bit easier, we did fold our seats down a little bit and all we have to do now is just lift this up and out. This will have some hook and loop along the back and both of these will come out together. On each side, we're gonna have these little access panels. Just gonna pop those out and get those set aside. On this side, we're just gonna pull this out and we're gonna have our 12-volt power. Just wanna push in on that clip, get that unplugged, and we'll set our panel aside. Down in our driver's side, we're gonna have this little foam tray where our air compressor sits. Ours doesn't have the compressor, so we're gonna have these little, circular screw type things here. And all we wanna do is just turn those until those pop out. Kind of tricky to get out, but just keep turning those and they will on the thread. Then, we can lift out our little foam tray. On our passenger side, we're gonna have this little fuse box. And right directly down here, we're gonna have a 10-millimeter nut. We're just gonna remove that. (tool whirring) Now, we can lift up our fuse refuse panel carefully. Don't wanna undo any of our wires that are connected to this. So, all we're gonna do with it is just get it lifted up and set it aside. We need to be able to get it this 10-millimeter nut that's back in here. On the back of the inside of our trunk area, we're gonna have these little tubes, and inside of here, there's gonna be a 10-millimeter nut. We're gonna have one on each side. That's gonna use a deep well socket. (tool whirring) Now, remove that on each side. Now, back in here, where we took out our little foam tray, you can see right here we're gonna have this 10-millimeter nut. It's kind of hard to see. But I'm just gonna use an extension with a deep well 10-millimeter and get that removed. And we're gonna have one on each side. (tool whirring) And once we get that backed off so far, we can remove that by hand. Behind our fender well, on each side, we're gonna have four T25 screws. We want to go ahead and get those removed. (tool whirring) On our Audi, we're gonna have a hitch access panel, and with this, yours may not have that. So on down the line, you may have to trim this out. But with ours, I'm just gonna turn these two little thumb nuts and I can pop that panel down out of the way. Now underneath, kind of near where we took off our panel, we're gonna have two T25 screws. We need to get those removed. (tool whirring) We're at the point now where we can remove our fascia. And what we wanna do is just start here by our fender and just start working our way across. As you can see here, we do have some blue tape. I do recommend it's painted tape that's gonna help protect your paint when you're removing this. Now we're thrust the back. Now, we're gonna have our wiring harness here in the back. We're gonna leave this plugged in, so we're gonna have a cart handy and we're just gonna set this on a cart. Now, the reason we're leaving this connected is you can see here there's no plug and no way for that to really get disconnected. So, we're just leaving all of our wiring connected. That way, we don't have to worry about it resetting any computers or anything 'cause sometimes we'll have sensors in the back here and it'll have to get all reset and we're just gonna avoid that by leaving it all plugged in. In the back of our Audi, we're gonna have two 16-millimeter bolts on each side. You're gonna have one here, and then one back here. We're gonna remove those on each side and that'll allow us to remove our bumper beam. (tool whirring) We'll just pull up our whole bracket. With our bolts removed, we'll remove our bumper beam. We wanna slide that out. Now, we can set that aside. With our bumper beam out of the way, now we can just slide our hitch in place. It's just gonna go right in our frame rears. I do recommend cleaning some of the debris out of there. Sometimes, you'll have a little bit of debris in there. You may want to get that out. Wanna line up our holes on the inside. You can see where we got those to line up. Now, it's gonna take our factory bracket and hardware, and drop those back in place. And go ahead and start those finger tight. Now then, what we want to do is make sure we have our hits centered up where we want it, and I'm just going by our center latch here and everything looks good. Now, we'll just go through and snug down our hardware. (tool whirring) With everything snugged out, we'll come back through and torque down our bolts on the inside here to the specifications listed in our instruction manual. If you don't have a torque wrench, you can pick one up here at etrailer. We do have some options available or you can take a look at your local auto parts store. You should be able to rent one there. (wrench beeps) With everything torqued out, we'll come back through and get our fascia put back in place in reverse order that we took it off. It is a little bit of a tight fit, but now we can continue to get our fascia put in place. And that was a look at our etrailer hitch on our 2016 Audi Q5.

Service was great, delivery was on time. The hitch fit perfectly. Our hitch was for a 2023 Porsche Macan T and we were worried about putting a hitch on that new of car but the videos on the E trailer website were correct and simple to follow. It took about 2 1/2 hours to install.
Info for this part was:
At etrailer we provide the best information available about the products we sell. We take the quality of our information seriously so that you can get the right part the first time. Let us know if anything is missing or if you have any questions.


Gwendolyn Y.
7/16/2025
High-five on the install, Don, it looks great! What are you going to be using on your hitch?