
To see if this custom-fit item will work for you please tell us what vehicle you'll use it with.
Thank you! Your comment has been submitted successfully. You should be able to view your question/comment here within a few days.
Error submitting comment. Please try again momentarily.


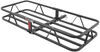
TowSmart's fully welded hitch bolts onto your Mazda CX-5. The receiver sits beneath the bumper for easy cargo access. Built from powder-coated steel, it resists rust and corrosion for lasting durability. Perfect for towing and hitch-mounted gear.
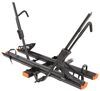
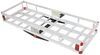
With a 675-lb tongue weight, this hitch is ready for your multi-bike rack or a fully loaded cargo carrier. Whether you're hauling electric bikes or extra gear for a weekend trip, it handles the weight with ease.
The 4,500-lb towing capacity makes it ideal for hauling small travel trailers, utility trailers, or lightweight boat trailers, giving you the flexibility to take your adventure wherever you want.
Designed for a simple bolt-on process, this hitch includes all necessary hardware, eliminating the need for drilling or welding so you can get on the road faster.
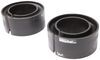
The square-tube design adds durability while maintaining a clean look. Built to handle work and play, it's ready for whatever your vehicle needs to tow.
The matte black powder coat resists rust and road grime better than traditional glossy finishes, keeping your hitch looking great even in harsh conditions.
California residents: click here
Videos are provided as a guide only. Refer to manufacturer installation instructions and specs for complete information.
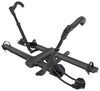
Hi everyone, Jesse here with etrailer. Today we'll be taking a look at and I'll show you how to install the TowSmart custom fit trailer hitch receiver on our 2019 Mazda CX5. Even though this is a very practical car, it's always nice to be able to add some extra storage space onto the rear of the vehicle, and adding a trailer hitch allows you to do that. This allows you to add extra storage using, for example, a bike rack or a cargo carrier, or you can even do some light duty towing. Here's a closer look at our hitch installed on our neighbor's vehicle. As you can see, the cross tubes are completely hidden behind the fascia, so all you'll be able to see is the receiver opening and our receiver opening is a standard two inch by two inch.
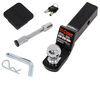
Then behind that we have a standard 5/8 inch pinhole. The pin and clip are not included with the hitch. However, we have many options available here at etrailer. Also, any accessory that you add on will most likely come with one included. Then we have a nice wire type safety cable loop.
Very easy to install whatever safety cable style you have. For example, this S style or even a small clevis like this. Now for some measurements, from the ground to the top of the inside of the collar is just over 12 inches, and then from the center of our pinhole to the edge of the bumper is about four inches. You'll want to keep that in mind for any folding accessories that you might add on to ensure they don't make contact with the vehicle. For our weight capacities with this hitch, we have a gross trailer weight of 4,500 pounds.
That's the amount of weight that you can pull behind the vehicle. Then we have a maximum tongue weight of 675 pounds. That's the amount of weight pushing down on the hitch. Always be sure to double check your owner's manual to ensure that your vehicle can handle that weight safely. If you're looking for a hitch for your Mazda, you really can't go wrong with this TowSmart option.
As for the installation, it's really a pretty simple process. It does involve lowering the exhaust and having the help of a friend to lift the weight of the hitch into place. So if it's not something that you're looking to do yourself, maybe you don't have the time, the space, or the tools to do so, feel free to check out our dealer locator to find somebody local to you that's willing to help you out with that. If you have installed this hitch yourself and you just wanna share some tips or tricks with us, please feel free to leave a review or a comment. But otherwise, if you're looking to see how this gets installed, just follow along and I'll walk you through. We'll begin our installation by lowering our exhaust. Make sure you have something to support it. I'm using a cam strap, but if you're working on the ground, you could use a floor jack or something like that, but we'll start with this rear driver's side hanger. Helps to have a tool like this. If not, you could use a pry bar and just pry it. That popped off all the way. There's another one back here, and two matching ones on the passenger side. One thing to note when removing these hangers is you'll want to remove them from the exhaust side, meaning that the hangers will still be up here, and then to give us clearance, I'll just spin 'em around because if you remove them and keep them on our actual exhaust, we won't be able to reinstall them just 'cause the hitch will be blocking you. But if you leave them on the vehicle side, then you're good to go. Now we have a couple push pins to remove one on each side. Just take a flathead screwdriver, pop the center out, pull the whole thing out. Now we'll pop this center plastic piece off. There's a small clip that if you push the tab, it should come down. With that out of our way, we have two more push pins to pop out. Now this here will be our access hole, and we'll start by fishing the coiled end of our fish wire through this forward hole here, and then we will bring it out through that access hole. Let's take our spacer block, slide that up and tuck it into our frame. We'll take our carriage bolt, thread that on, tuck it up and pull through and down. Now for the other hole, it's a little bit different. We're using that access hole again, and then we'll bring the hardware down through that same hole. So first we'll slide our spacer block on, then thread our carriage bolt through, tuck the carriage bolt up into the frame, followed by that spacer block, then pull back, and it's the same process on the other side. It's a good idea to have an extra set of hands. I have my good friend Joe here to help me lift this up. We fed our fish wires through our holes. Now we'll get this tucked back behind our fish in here. Looks like my fish wire came out. I'll just slide that back in. And you just have to work between the fascia. And also keep in mind that exhaust hanger. Pull our bolts through. And then for now, I'm just gonna thread a nut on and we'll install the washers with the rest of the hardware. Now that we have a nut holding it up, it'll be easier for us to install our conical tooth washer. Just make sure you have the teeth facing up towards the hitch. Now we'll tighten our hardware down with a three quarter inch socket. (socket wrench whirring) Take a torque wrench and torque everything down to the specification listed in the instructions. Now all we have to do is get our exhaust hung back up. But other than that, that's gonna do it for our look at and installation of the TowSmart custom fit trailer hitch receiver on our 2019 Mazda CX5.

I received the package today and so far it’s good but it looks like it’s been used or someone tried it before returning it. Anyway I’m happy with it and I can’t wait to put it on, that’s the only reason why I give it a 4 star rating but it’s a 5 star product.
Info for this part was:
At etrailer we provide the best information available about the products we sell. We take the quality of our information seriously so that you can get the right part the first time. Let us know if anything is missing or if you have any questions.


Nick S.
1/19/2026
I am glad you are liking the hitch so far and are excited to get it put on! We will reach out shortly and see if there is something we can do for those scratches on the paint. What are you planning on using the hitch for once it is installed?