
To see if this custom-fit item will work for you please tell us what vehicle you'll use it with.


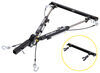
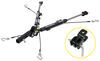
This fully welded trailer hitch receiver bolts onto your vehicle's frame with no welding required. Receiver sits beneath your bumper so it's out of the way when accessing cargo. Powder coated steel is sturdy and corrosion resistant.
Features:
Specs:
California residents: click here
Videos are provided as a guide only. Refer to manufacturer installation instructions and specs for complete information.
Hey, neighbors. Kevin here with etrailer, and today we have Russ in from TowSmart Customs here to talk about their custom fit hitches. Hey, neighbors. Thanks for taking some time and checking out the video. We're a little new to the custom fit hitch business, but we've made some great strides. We're up to about 80 SKUs, a thousand fits by year, make, model lookup, and they are made right here in the USA, right in Cleveland, Ohio.
We do use a tier one OEM manufacturer, so our testing standards are well above our competition. So you mentioned these are all made in Cleveland, Ohio, so that's a big differentiator, having it made in America versus the majority of the other trailer hitches on the market, which are made overseas and then just shipped over, and then typically powder coated over here just to say it was made in America. It's a really big differentiator. I also like with these being custom fit, we don't have to do all that drilling like we would with some of the other hitches on the market, so we know this is gonna fit right up in there and match the vehicle. So we can either use the included hardware, or in the case of this specific hitch, it's reusing factory hardware.
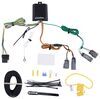
Another thing I do really like, especially on some hitches, they'll add in a mounting bracket so that way you can bolt right up your little bracket for whatever type of wiring harness you have. So whether you have a four pole or seven pole, all you have to do is purchase that one bracket instead of having to purchase a couple other ones. Now, typically with us, we're adding on a no-drill mounting bracket that's just gonna hose clamp to the cross tube of the hitch. So already having that on there just sets the neighbor up for a much easier install. And then one other thing I noticed that no one else really does is you guys have a QR code on here, which will bring up all the specs and installation instructions.
So that way if you ever did lose that paper, you can just scan that QR code and look it right up and have all the info you need. Innovation's a huge contributor at your company. I've noticed that you guys have also taken it from not only just the cargo management and tow straps, all the way over to the trailer hitches as well. Could you give us a little bit more details on your hidden and disappearing hitches Yeah, sure. So our detachable and disappearing are two technologies that we partnered with ORIS over in Europe.
They're the leading OEM manufacturer in Europe. We are the sole distributors in North America for these two products, and they're exclusive at etrailer. Well, with both of these being hidden behind the fascia, it's gonna give you that nice, sleek design, but this isn't gonna be for everybody. This is more for those higher end vehicles, so your BMWs, Mercedes, stuff like that, where you don't really have that great of an option when it comes to a standard trailer hitch, and you have to kind of go with that one that's gonna sit behind the fascia and then have a little cutout. So being able to retain that look is definitely one of the higher priorities when it comes to those vehicles. So having the ability to do that and then still be able to tow without a separate attachment point like some other companies do is just a real game changer. How do I get my receiver tube to come out, and how do I put it back in It's super, super easy. So all you're gonna do is just grab this knob, pull and spin. This will release your receiver, and you have this beautiful bag to keep it nice in your trunk. When you're ready, all of this, it pops right back into place. Now over here on the disappearing hitch, it's a little bit different of an operation, but pretty much the same here. It looks like you still got some kind of knob here just to turn. Could you tell me a little bit more about that Yeah. This is very simple. So this one completely hides behind the fascia, nothing to remove. When you're ready to tow, you simply push this lever, pop out. The ball mount will lock in your receiver. And when you're done, you remove your ball mount and this thing will fold right back in behind the fascia. For a nice, hidden look. If you still have questions about what's gonna be the right custom fit trailer hitch for your vehicle, please feel free to reach out to us via the Ask the Experts link, a comment on this video, or phone call to our customer service department, and we'd be happy to help you out on your journey.

Info for this part was:
At etrailer we provide the best information available about the products we sell. We take the quality of our information seriously so that you can get the right part the first time. Let us know if anything is missing or if you have any questions.


Thank you! Your comment has been submitted successfully. You should be able to view your question/comment here within a few days.
Error submitting comment. Please try again momentarily.