
To see if this custom-fit item will work for you please tell us what vehicle you'll use it with.
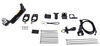
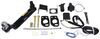
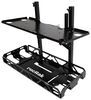
This custom-fit trailer hitch with a hidden cross tube installs behind your vehicle's rear bumper, leaving only the receiver visible beneath it. Aluminum and steel alloy construction is durable and eco-friendly. Powder coat finish resists rust.
Features:
Specs:
The EcoHitch Hidden trailer hitch is designed to be as inconspicuous as possible. The hitch's cross tube bolts onto your vehicle's frame, behind your rear bumper. No drilling or welding is required. Once the hitch is installed, only the receiver will be visible beneath your bumper. This means that your vehicle can maintain its stylish, from-the-factory look, and you won't have to do any major modifications to its body or frame.
With a combination of aerospace-grade aluminum, steel, and stainless steel, each EcoHitch is made of a strong metal alloy that will withstand the test of time. The lightweight alloy is composed of recycled materials. Traditional steel hitch manufacturing can use coal or oil, which can contribute to harmful gas emissions. The EcoHitch's recycled materials limit the carbon footprint during manufacturing, so you get a sturdy trailer hitch while also helping the environment.
This EcoHitch trailer hitch is tested for durability and sturdiness. Using Finite Elemental Analysis (FEA), individual points of stress on the hitch can be detected and remedied. Designers can accurately test the hitch to ensure that it will meet or exceed SAE J684 standards. The EcoHitch Hidden trailer hitch is carefully researched and strength tested for a durable, high-quality hitch that can resist damage while on the road.
At etrailer.com we're committed to the products we sell, and to our customers. Our experienced and knowledgeable staff are available via both phone and email to address your questions and concerns for the lifetime of your hitch. The technicians at etrailer perform hitch installations on a daily basis, making them a valuable resource for do-it-yourselfers. The one-on-one, personal service you'll receive comes straight from an expert in the towing and automotive field. We've installed it, we've wired it and we've towed with it, so whatever your question, we can answer it.
California residents: click here
Videos are provided as a guide only. Refer to manufacturer installation instructions and specs for complete information.
Hey there neighbors, Kevin here with etrailer and today we're gonna be taking a look at and showing you how to install the EcoHitch trailer hitch receiver here on our 2023 Kia Telluride. Kia Telluride is a super popular SUV and it's gonna be able to allow you to get the whole gang all together and make it to that destination and have a good time. But once you have the whole gang in there, you might not have enough room for everything that you wanna bring along. So that leaves you with the question of how you're gonna get your gear from point A to point B. Now, there's a couple options when it comes to that. First one that comes to mind is usually roof rack.
You can throw a cargo box up there, maybe you get a platform rack, something like that where you can throw other things up top. Now the problem with that is you're limited to what your roof's capacity is, so you might not be able to haul all of that stuff that you need, especially if it's gonna be, you know, getting into 200 plus pounds. So that's where a trailer hitch really starts to shine. Now this is gonna come with a 2" by 2" receiver tube opening and that is gonna be pretty much a standard for most accessories out there. Now if you do have a 1 1/4 accessory, you still can use that with your trailer hitch.
You'll just need to pick up a reducer, which we can offer to you here at etrailer as well. And that's just gonna slot right into the receiver tube opening. And then you can put in your 1 1/4 accessory, pop in your 5/8 hitch pin and clip and you'll be all good to tow. Now when it comes to towing a small trailer or with hauling around some accessories like your cargo carriers, your bike racks, there's a few things that we wanna keep in mind. First of all, any accessories that you have is going to require a hitch pin and clip, that way you can lock it into the trailer hitch receiver.
Now this one has a 5/8 diameter and that's what we're gonna be needing here. Now this is just a standard hitch pin and clip that I'm using, but I highly recommend going with one that has a lock on the end of it so that way you can easily lock in whatever accessory you have in here. Don't have to worry about anybody else taking off with it when you're not at your vehicle. There also are some options for anti-rattle blocking hitch pins as well. Those are definitely worth checking out because then you can eliminate that noise at the back here and kind of help prevent rattling, especially if you have a bike rack or a cargo carrier, you don't want your stuff shifting around just because it's rattling inside of the trailer hitch receiver.
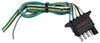
Now from there, if you are towing a trailer, there's a couple other things you're gonna need. One of those is going to be safety chains. So one thing I like to do is just kind of check out how our safety chain clevises and hooks actually match up with the tow loops that are on the hitch because there's not always a perfect tow loop on here. Sometimes you have ones that are pretty tight and it can start to bind up and that might cause some issues depending on what you have on your trailer. So starting out with our S hook style, usually there's not a problem with that. This one's wide open, shouldn't have an issue getting that hooked on real easy. Now the larger clevis style probably above the weight class of Kia Telluride is gonna be towing, but always a good option to double check, make sure that that's gonna work too. Some people do like to upgrade their clevises on a Tandem Maxwell like utility trailer I've seen, so not a bad choice to have. Along with that too, there's a couple measurements that can come into play here. So I'm gonna start with ground clearance. Ground clearance is gonna be what we use to determine if our accessories gonna potentially hit the ground and scrape if we're hitting a steep incline or decline. So what we like to look for is at least 12" from the ground up to the inside edge of our receiver tube opening. And with ours today, we're right around 15 1/4, maybe a little bit more, just kind of depends. I'm on some softer turf right now, so that's really good. We got a really good ground clearance with this hitch, so this is definitely one that's sitting up a little bit higher. So a lot of the other options for this vehicle will sit below the fascia and you can see right now we have our little trim panel popped out and it's been removed. So that could be a pretty big differentiator for you. If you do install this hitch, you will have to really kind of cut up that trim panel if you want to reinstall it. So there's always the potential that it's just not gonna look as good as one of the other options that sits below it, but the trade off is you get that better ground clearance. The other thing here is going to be if we have a folding accessory. So your cargo carriers and your bike racks can typically fold up to give you a little bit shorter of an overall length. And what we wanna measure for that is from the center of our hitch pin hole out to the furthest point on our fascia. So with that we're at probably 3 1/2, 4." We'll just call it 4" just to be safe. So what you wanna do is go to the accessory that you have that's folding, fold it up, and then measure from the center of the hitch pin hole on the shank of that accessory to the closest part when it's folded up. And if you have at least 4," if not more, you know you'll be good to fold it up and not have to worry about it hitting your fascia. Now, opening your lift gate can be a different story. Some of these might still swing out a little too far to where it could potentially contact that rack or cargo carrier. So make sure that you're slowly opening that yourself. Don't use the automatic opening if you do have that and then just kind of give it a couple of goes. Make sure that there's no way it's gonna come in contact and potentially damage your accessory or your lift gate. Now in terms of weight capacity, our trailer hitch receiver here is going to have a 750 pound tongue weight capacity, which is the downward force on the inside bottom edge of our receiver tube. And that is going to be your cargo carriers and your bike racks. So that's a much bigger capacity than what our roof rack's gonna come with 'cause most roofs typically are listed at a maximum capacity of 165 pounds. So that versus the 750 you can put at the back, major difference there. Now keep in mind, just because it has that capacity doesn't mean that your suspension can handle all that. So you will probably start to see some sag, you might wanna look into some other suspension enhancement options as well to kinda deal with that so that way you're still traveling safely and properly balancing that weight between the front and rear axles. And then along with that, if you are going to be towing a trailer, this is gonna have a 5,000 pound gross towing weight capacity and that is gonna be the, like I said, pulling a trailer weight, which probably gonna be over what our Telluride can actually handle. So make sure that you're double checking your owner's manual and figuring out what exactly your vehicle is capable of towing and then staying within that so that way you don't end up damaging your vehicle and anything you have behind it. Now as far as installation goes, Kia Telluride one of the easiest cars on the market to install a trailer hitch on. There's really no specialty tools or anything extra that you need to do this. You can honestly do it in just a few minutes. So this is one I definitely feel like you can do yourself at home, but if you don't have a torque wrench or maybe you just don't have the time to get the trailer hitch installed and you've got an important trip coming up and you just want to get it handled by somebody else, definitely feel free to use our dealer locator and you can enter in your zip code to find a shop near you and get it professionally installed. If you are willing to do this yourself, then stick around and I'll help walk you through the process. Okay, to start off our installation, we're gonna wanna first remove our spare tire so we have some more room to work with here. I've already gone ahead and done that and we're down below our vehicle here. Now there's gonna be three rubber isolators that we're gonna need to remove, but before we do that we wanna make sure that we grab the cam strap and we're gonna hook this onto our coil springs and just bring it across to the other one. Now this strap's gonna help support our exhaust once we remove these rubber isolators so that way it's not gonna put all of that weight at the back here and potentially damage our exhaust. So to get the isolators off, I like to take some silicone lubricant and spray that on each one of the posts. So there's one right here back by the passenger side, rear wheel tucked away, just a little hidden one here at the very end near our exhaust tip and then one also here at the back cross member. So getting these off, you can use a pry bar. I have a isolated removal tool too, so I'm gonna be using that today. It's simple as just popping it off the post, kind of pushing the isolator out of the way. Now this one over here can be a little bit more challenging sometimes, but still not really that bad. And finally, last one out here. (isolator tool clacking) There we go. Now there's two weld nuts on either side of the frame here that we're gonna be cleaning out first. So there's the two right here, two on the opposite and I'm gonna be taking some penetrating oil, we'll spray that up in there and then take just a little wire brush, kind of clean out the threads in there, make it a little bit easier when we go to put our hardware in later on with our trailer hitch. (metal brush scrubbing) Now on the driver's side there's gonna be this plastic cover right here. We're gonna need to remove that as well because when we go to put our hardware in through our frame rail here, we're not gonna have a lot of room to get up there and get to the other side of it. So there's gonna be take just three push pins and then there's gonna be two plastic nuts that are just gonna keep spinning. Those won't actually fully come off, so you will need to kind of keep some pressure on this and pull down. And I do believe it's gonna be a 14 millimeter socket, but we can double check that in just a sec. We can get these push pins out and I'm just using a flathead screwdriver. There's also trim panel removal tools that you can pick up as well. All right, so like I said, it is a 14 millimeter socket and you want to keep pressure on here. (drill whirling) Get each one off. (drill whirling) This one pops back up on it. (drill whirling) There we go. So here's those plastic nuts I was talking about. I'll just sit there and keep spinning on you. So you have to keep that pressure on to get 'em fully off. But now you can see we've got plenty of open space. Here's also where our wiring is typically gonna tie in. There's a factory connection point, it's usually right here. It doesn't look like there is on this model, but there's also a grommet right here which we would use to get up into our taillights 'cause there's probably gonna also be a plugin kit or splicing kit option for you, that way you can just tie right into your taillights, have your four pole on seven way, come right out here and then just hook right up, have it mounted up to your trailer hitch so you got a nice convenience spot for you to hook into. All right, now we have our exhaust lowered, everything's all ready to go here. We've got our weld nuts cleaned out. It's now time to remove our centerpiece here as well. So this trim piece, you can trim it to cut around the receiver tube and have it look a little bit neater. We're just gonna leave it off. We don't wanna cut it just until our neighbor is absolutely certain that that's what they want. But I'm gonna take my flathead screwdriver once again, we're gonna pop out two push pins, set those aside and then we should be able to unclip our panel here. Let's double check, we don't have anything else inside. Nope, okay, so on the inside you got two clips, right here and here. You can kind of pull on 'em on the inside to help push 'em through. (clips unsnapping) There we go, same thing on the other side. And then, yeah, okay, do have two more screws. You're gonna need a Phillips head screwdriver and there's two screws facing towards the rear of the vehicle. I'm gonna pull those out and then the rest is just little clips that are popped into our fascia. But that should come right out once we have those screws out. (drill whirling) (drill whirling) Here we go, You can see this is where those two screws are tied into these posts right here. Now we've got an extra set of hands here with Aiden. We're gonna lift our hitch up into place. Now you got your M10 hardware that's gonna go into the bottom or you can throw your half inch hardware through the frame rail. Now on the passenger side it's a little bit harder just 'cause we have a heat shield in the way. If you are doing the half inch hardware, make sure you throw flat washer on first. I'm gonna pop that in. And what I like to do is get that washer kind of towards the threads on here just to pass by the heat shield. And this is gonna be a little bit of a fight. I usually have to tap this in with a punch or just flathead screwdriver on the back and get a few love taps with the mallet. But you can see right here the heat shields catching on the bolt head. There we go, slot that in. Now that'll help hold it up. Now we can take our time. We're gonna get our M10 hardware into and you might wanna leave the half inch hardware loose. Don't tighten it down before you put these in just in case you need to kinda wiggle to hitch around and get it lined up properly. (socket drill twirling) All right, for our half inch hardware we're gonna using a 17 millimeter socket. (socket drill twirling) We're gonna get these snug down. (socket drill whirling) And for the half inch we're gonna have a few pieces of hardware to throw on the backside here. We'll start out with a flat washer. After that flat washer, we're gonna switch over to a split lock washer and then we will have a nut we're gonna throw on so we can get those up on there. For our half inch hard we're gonna be using a 3/4" socket and wrench and I'm gonna get these snugged down and then we'll hit these all with our torque wrench. (socket drill whirling) (socket drill whirling) (torque wrench cranking) (torque wrench beeping) So like I said, our neighbor wasn't sure if they really wanted this cut yet, so just kinda wanted to go over what that process would kind of look like here with how this sits. I mean you're cutting a huge chunk of this out at this point. I'd wanna save these two just so that we could still have the supports here be used, but I would probably trim it all the way out as close to the edge of that as they could. And then, I mean we're probably only 3" down from the edge here 'cause we're just trying to get to this gap. We wanna be a little bit above the hitch that way if you have any kind of accessory that you need to get over that or if you need to really get your kind of hand in there and get to your hitch pin and stuff, you obviously wanna be able to do that. So a lot of trimming is gonna be required. This might be one where you just leave the panel off and just call it a day. And then if you ever decide to swap out the hitch to a different one, maybe one that sits a little bit lower, that's where you can come back and slot the panel back in and have it all hidden. Now if you are doing wiring with this, that's probably not gonna be an option. You're just gonna have to completely leave the panel off because you wanna hook up your wiring, pick up a node drill mounting bracket. In this case it'd probably go with the long, so the 7" just to kinda get this flush with our hitch receiver here. And then also have yourself enough space for the wiring to sit behind it and kind of rope up into all of the stuff that we need to tie into for that. So that being said, we're gonna skip this for now. We're gonna set this aside and what we'll do is we're gonna get our exhaust reinstalled and then also that trim piece that sits over here on our driver's side. We'll get that put back into place. Now I did wanna talk about that too 'cause on some of these models you'll find that there's not really a good cutout in it, but on this one they actually did. It's very rare that I see the cutout actually already in there because those bolts that we put in for our hitch are gonna need to have some extra room and that's exactly where this comes into play, so. I can actually put this up without acting to trim it. just like so, pop in our push pins. And then like I said, just reinstall your rubber isolators for your exhaust. Remove your cam strap and then you can throw your spare tire back up. and that's gonna do it for your install. My name's Kevin, if you still have some questions about what's gonna be the right trailer hitch receiver for Kia Telluride, please feel free to reach out to us via Ask the Experts link. Comment on this video or a phone call to our customer service department and we'd be happy to help you out on your journey.

Fast shipping. The install took roughly 2 hours, and looks close to OEM.
Info for this part was:
At etrailer we provide the best information available about the products we sell. We take the quality of our information seriously so that you can get the right part the first time. Let us know if anything is missing or if you have any questions.


Thank you! Your comment has been submitted successfully. You should be able to view your question/comment here within a few days.
Error submitting comment. Please try again momentarily.