
To see if this custom-fit item will work for you please tell us what vehicle you'll use it with.
Thank you! Your comment has been submitted successfully. You should be able to view your question/comment here within a few days.
Error submitting comment. Please try again momentarily.
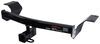
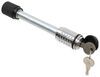
This fully welded trailer hitch receiver bolts onto your vehicle's frame with no welding required. Powder coated steel is sturdy and corrosion resistant.
Features:
Specs:
Note: Not compatible for use with vertical hanging bicycles (bike racks that require the bicycles to be hung / mounted vertically).
At etrailer.com we're committed to the products we sell, and to our customers. Our experienced and knowledgeable staff are available via both phone and email to address your questions and concerns for the lifetime of your hitch. The technicians at etrailer perform hitch installations on a daily basis, making them a valuable resource for do-it-yourselfers. The one-on-one, personal service you'll receive comes straight from an expert in the towing and automotive field. We've installed it, we've wired it and we've towed with it, so whatever your question, we can answer it.

California residents: click here
Videos are provided as a guide only. Refer to manufacturer installation instructions and specs for complete information.
Hey there, neighbor. It's Kevin here with etrailer. And today we're gonna be taking a look at and showing you how to install the Curt trailer hitch receiver here on our 2025 Lincoln Nautilus. So if you're like our neighbor today and your goal is to be able to haul your bike rack behind your Nautilus, Curt has a great option for you with their trailer hitch receiver that we installed today. This is gonna be more of a gloss black, so if you don't have as much of a gloss look to your vehicle, maybe that one's not gonna be like the best option in terms of aesthetics. But there is also another option where you can get this more of a matte black so that it can kind of match up with the matte look on the bottom of the fascia and kind of blend in a little bit more.
Now this is gonna have a hidden cross tube, so you don't see all that but you will still see the receiver tube just kind of sticking out just below the fascia. And this is gonna require a little bit of trimming into the fascia, so that way it can actually come out. So this is gonna be more of a permanent install. This isn't gonna be something you're gonna wanna take off later on 'cause you will have a little bit of a hole right here where you had to trim the fascia. But overall, once you have this on there, you're probably gonna be so excited to get out there and use it and utilize this two inch by two inch receiver tube opening for all of those accessories, that that's not really gonna be an issue.
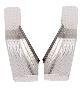
So like I said, this does have a two inch by two inch opening here, and that is gonna be the majority of accessories out on the market now. You can still get a reducer if you need to to get down to that 1 1/4 inch shank if maybe your bike rack or your cargo carrier has one. But aside from that, you will need to have a pin clip to lock that accessory in place, which is not gonna come with the trailer hitch. It'll typically come with whatever kind of accessory you're purchasing, but sometimes it doesn't. So you can definitely pick up one separate here at etrailer, and you can get just a standard pin and clip like this one or you can pick one up that's locking, so that way you don't have to worry about anybody taking off with your investment.
And also you could look into one that might be anti-rattle as well, or pick up an anti-rattle device that can slip right onto the face of our hitch receiver opening here, and that'll help prevent anything from kind of wobbling around or making a bunch of noise behind you, 'cause that's not really what we wanna hear when we're driving down the road. And with some of that precious cargo on a bike rack or cargo carry, you don't really wanna have that kind of jangling around either. Now, if you wanna tow a trailer with this, you definitely can, you will wanna definitely double check your weight capacities, because this one has a 3,500 pound gross towing weight capacity, which is that pulling force. And then it also has a 350 pound tongue weight capacity, which is the downward force on the inside of our receiver tube opening here. And that is gonna be your bike racks and your cargo carriers.
Now, just because this has this doesn't mean that the vehicle can actually handle that. So you will wanna verify what your vehicle's capable of towing as well before you make any trips. Along with that you're gonna have some safety chains that are gonna need to go into these loops here. So one thing I like to do is just kind of check each style. So this is kind of your more low end weight capacity. You'll see like a S-hook, maybe it'll have a little clip to kind of keep that from popping out. But what I like to look for is, can I put this on both ways Is it gonna get bound up in any kind of way And with this one, pretty good. No issues there. With the larger clevis-style hook, you probably aren't gonna have a trailer that's gonna be using one of these, at least that you'd be safely towing with a Nautilus. But even that, kind of no problems, I don't really see it binding up. And if I go the other way, that looks like you can't really get it in if you try to go backwards. So larger clevis, kind of an issue, but like I said, that's probably not something that you'll typically have with it. Now, if you are gonna tow trailer, you will also need to get some four-pole wiring at minimum, so that way you can transfer over your light signals, and I highly recommend picking it up at the same time that you pick up your hitch 'cause you're already gonna be down there doing the work anyway, you might as well just knock it out all at once. And then you have full capabilities with both that wiring and trailer hitch. Clearances, so when we hit a tight or steep incline or decline, what can happen is if the shank kind of sticks out too far, you might end up kind of having that scrape the ground as your car handles that incline or decline. So what we like to see is about 12 inches from the ground up to the top inside edge of our receiver tube opening. And it looks like we are like right at 12 1/4. So we are just above that. We shouldn't need to use an adapter to kinda lift that a little bit higher. So really good there. That's exactly what I wanna see. The other thing's gonna be if we have any folding accessories. So your bike racks and your cargo carriers typically fold up to kind of reduce that overall length for your vehicles that you can get into tighter parking spots or into your garage. And what you wanna do for that is measure from the center of the hitch pin hole out to the furthest point on your fascia, or maybe it's like your door, or like right here is probably gonna be the furthest point out for us and would be the closest in contact with that bike rack or cargo carrier. So I'm getting about five inches for that, and what I would wanna do is go over to my accessory and measure from the center of the hitch pin hole on the shank of that accessory to the closest point when it is folded up. And then if that is gonna be within that five inches, then maybe that's not something that we're gonna fold up ever. Maybe if you got more space, then yes, you can easily fold it up and not have to worry about anything kind of scratching up the back of your ride. So overall, this install isn't very difficult. You don't really need any specialty tools besides like a torque wrench, honestly you can probably get this up in just probably like a half hour. Maybe have an extra buddy with you so that way you can help lift it up too. And then honestly the scariest part would really just be trimming your fascia, and really you don't even have to cut too much out of it. So like I said, this is something you can definitely do at home in just a little bit of time. But if maybe that's a little scary cutting your fascia, you wanna make sure someone does it real nice and tight and gets it nice and clean, so that way your vehicle retains its value, then you can definitely check out our dealer locator and find a shop near you and get it professionally installed. Now, if you ever wanna do this yourself but want a little bit of a walkthrough, stick around and I'll take you through the process. So we're gonna start out our install by first lowering our exhaust. There's gonna be two rubber isolators, one on either side, you can see it just above the tailpipes here. And before we do that we wanna support our exhaust here. So I've just ran a cam strap over to our coil springs, and then just kind of snug that up against our exhaust here, so that way once we take those rubber isolators off, it's gonna have something to help support it so it's not just all that weight down at the back here. So I'm gonna be using this removal tool here. You can obviously still also just use like a pry tool and just kind of pop it off. Sometimes if you spray these with enough lubricant too, you can kind of just get them off my hand. So now we're just gonna work that off. There we go. And do the same on the other side. (metal clanging) There we go. And the strap will help support that. Now, there's gonna be a few screws and nuts on our heat shield that's right above that that we're gonna also need to remove. So I'm gonna start on that. We're gonna be grabbing a 10 millimeter and a seven millimeter socket, and that's seven millimeter is gonna be these screws that are right here at the front connected to our fascia. The 10 millimeters is gonna be those washers and nuts that are up on the heat shield. (tool buzzing) Oh. (tool buzzing) It's gonna be these two nuts and washers that are right here, 'cause you can see this is two separate pieces with this kind of round and around right there. (metal clanging) (tool buzzing) Should be able to remove this at this point. Just gonna be kind of stuck on the studs that are coming down through that first heat shield. (metal clanging) Next you're gonna be removing the little side panels here, and these are gonna have three seven millimeter screws that we're gonna need to pop out. And then this is gonna be two with that 10 millimeter socket, those washers right up top, they're holding this plate in, so. (tool buzzing) And we're gonna be doing this on both the driver and passenger sides. (tool buzzing) Now, at the end of your frame rails, you can see where this kind of sandwiches into the bumper beam. There'll be this little tab kind of hanging off the backside on the frame rail portion of this, and that is something we're gonna cut off. So we're just gonna keep along with that little flange line right there. Just get that outta the way 'cause that's what's gonna prevent us from getting our hitch up in place. (tool buzzing) And we'll do this for both the driver and passenger side. And I like to finish that off with a little bit of filing just to make sure there's no sharp edges here. (file scraping) I'm also gonna spray just a little bit of spray paint on here just to coat that bare metal now. Our next part's gonna be trimming out our fascia, so that way our receiver tube has space to actually sit into here, because this is gonna kind of stick into that fascia space. So what I did was I measured between center and center of these two holes here, I got my center, and then I measured out because we needed a 3 1/2 inch wide hole by two inches in depth. So what I did was I went 1 3/4 quarters over, 1 3/4 quarters over, it gives me 3 1/2, and then just measured back two inches. Now, we can always take more off. I typically err on the side of caution where I'll kind of trim a little bit tighter, and then if I need to, I can pull the hitch back down after trying to test fit it and then seeing if we need to take a little bit more out. Now, the other part of this is on the backside of here we have two wire harnesses running right across here with one of them being right in the line of fire here for our saw. So we're gonna come back behind here and we're just gonna pop that out of the little clips that it has holding it in, and we'll push that out of the way so we can do our cutting. Here's the harness, just a couple of little clips. That's all you need to do is kind of push that up out of the way. And then we got plenty of room to do our cutting. So now's the time to grab your oscillating saw and we can get a nice clean cut on here. (tool buzzing) (part clattering) (background employee speaking faintly) All right, looks like we got another inner piece here. We don't need to cut a little bit more through, but we are pretty close there. (tool buzzing) Next we're gonna be doing a little bit of fish wiring here. We're gonna have a bolt that needs to come out through this hole and this hole right here. And the pictures in the instructions, they have an arrow pointing at this hole. We're not using this one, just ignore that. This larger one back here is where we're gonna be slipping the hardware through. I'm gonna put that through the hole that I want the bolt to come through. And then what I like to do is try to find it with my finger, and if you can kind of press it against your finger, you can use that tension to help drop it down through the hole. All right, so once you get that through, you'll then throw on one of your spacer blocks and then thread in your bolt. You'll wanna throw the spacial block up in there, get that kind of outta the way a little bit, because the hole is slotted to get you a little bit more room, but not slotted enough to really get that bolt fully in there. So you'll see that this carriage bolt has a square head on it. I'm gonna pull that down a little bit, get that square head fully butted up against it so I can get enough room to get the head into here, push that up, (parts clattering) and then we can use the fish wire to pull it down into place. And then we're just gonna repeat that with this other hole here. And then the same thing over on the passenger side. Now, on the hitch, the mounting brackets, there's gonna be three holes here. We're gonna be skipping that center one, that's just making room for the stud that holds up that carpeted section right here in the corner. So we wanna go with the back hole and the front hole and then we can lift this up into position. We'll have to kind of maneuver around the exhaust a bit. (metal clanging) There we go. And okay. I just don't wanna like pinch you with the fascia here. (parts clattering) There we go. Once you have it in position, you can then remove your fish wire and carefully start to thread on one of your serrated flange nuts. And I say carefully 'cause you can see that bolt wants to just kind of keep moving on me. So if you don't really have like tension on it, like one thing you can do is kind of stick your hand up against it or like a flathead screwdriver, keep it from moving, get those first couple of threads started. And from there it's a little bit easier to start closing that up a bit more. And once you get one on each side, it'll kind of help hold the hitch up, take some of the strain off. (parts clattering) Now we're also gonna have two bolts on the outside of our frame rail that we need to fish wire in as well. And that's gonna go for both sides of our hitch. So I'm gonna pop in my fish wire, and we're just going to that same hole we we inchesre already at for access. So I just gotta find our fish wire. Might need to bend mine just a little bit. If you're having some problems, like maybe it's sticking upwards in the frame rail, you can kind of just give it a slight bend, and then that'll give you a little bit more control of which way it's angling. All right, I get that first one in, I'm gonna put on my flange nut and prevent that from falling back in there. (parts clattering) And then we can tighten that up. I'm gonna do that just to kind of hopefully help keep that outta the way when I run my other fish wire. (parts clattering) There we go. All right, now I still gotta get that front one there and then do the same on the other side. I'm using an 11/16 socket. I'm gonna torque this down. And I've got like a little two inch extension on here just to clear the mounting flange here as well. (tool creaking) (tool beeping) (tool creaking) (tool beeping) Next we need to trim our heat shield to match up where the hitch is gonna be coming through. So just this little section right here in the center, you're gonna cut. We're just gonna cut straight up to this bend right here and then fold it back, and that should give us enough space. If you need to, we can always take a little bit more out obviously. But we should have it looking just like this. Oh, let me get that out the way. And then we can just kind of bend that backwards onto itself. And now we can go and test fit this, make sure it's fitting correctly. (parts clattering) Looks like we're lining up perfect, so that cut was exactly what we needed. We can just go ahead and start reinstalling our heat shield at this point. Find that stud. There we go. (tool buzzing) Now to get our little corner trim pieces back in place, you can trim it, but honestly you don't need to. It's carpet, it can kind of fold, and they have a hole for the bolt to come through. It just kind of pinches up against the side of the mounting flange. But realistically, if you sit there and you put that nut on with a ratchet or a socket wrench, you're gonna probably be able to crush it down enough to not have that be a factor. (tool buzzing) (background employees speaking faintly) (metal clanging) (tool buzzing) (metal clanging) (tool buzzing) Once you have all your fascia pieces back in place in any of these little underbody panels, you'll now want to put your exhaust back into place too, which it just pops right back into that rubber isolator on both sides. Then once you have it supported by the rubber isolators again, you can now remove your support strap. And at that point that is gonna do it for our look at and installation of the Curt trailer hitch receiver here on our 2025 Lincoln Nautilus. My name's Kevin, and if you still have some questions about what's going to be the right trailer hitch for your Nautilus, or if you just need help with the install, definitely feel free to reach out to us via our ask the experts link, or comment on this video or a phone call to our customer service department and we'd be happy to help you out on your journey.

Great customer service! Was delivered on time as promised!!
This company is amazing great customer service ups messed up the delivery address they sent out a new one right away

Do you have a question about this Trailer Hitch?
Info for this part was:
At etrailer we provide the best information available about the products we sell. We take the quality of our information seriously so that you can get the right part the first time. Let us know if anything is missing or if you have any questions.


Victoria H.
3/5/2025
Thanks Minda! Whenever you're ready for your next project, we will be here and happy to help!