
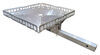
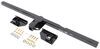
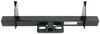
Blue Ox Trailer Hitch Receiver - Custom Fit - Class III - 2"


To see if this custom-fit item will work for you please tell us what vehicle you'll use it with.


This fully welded trailer hitch receiver bolts onto your vehicle's frame with no welding required. Textured black powder coat over e-coat shields against rust and corrosion. Mounting bracket for wiring is welded on for a clean look.
Features:
Specs:
At etrailer.com we're committed to the products we sell, and to our customers. Our experienced and knowledgeable staff are available via both phone and email to address your questions and concerns for the lifetime of your hitch. The technicians at etrailer perform hitch installations on a daily basis, making them a valuable resource for do-it-yourselfers. The one-on-one, personal service you'll receive comes straight from an expert in the towing and automotive field. We've installed it, we've wired it and we've towed with it, so whatever your question, we can answer it.

California residents: click here
Videos are provided as a guide only. Refer to manufacturer installation instructions and specs for complete information.
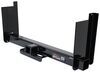
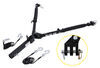
It's Brad here at etrailer and today we're taking a look and installing the Blue Ox trailer hitch receiver on a 2021 Chevy Express van. Now this is what your hitch is gonna look like when it's installed on your van and it's an exposed cross tube, meaning you're gonna see a good majority of the hitch hanging down. But on a vehicle like this, I don't think it really takes away from the look of it, and really you're gaining so much usability and new real estate with it, it's totally worth it. And this one being a two inch by two inch receiver tube opening is a great start to really get a ton of different accessories as this is the standard size. So when it comes to bike racks, cargo carriers, ball mounts, whatever the accessory, you're gonna look for two inch by two inches, the most common by far. All of them are gonna stay in place with a five eights pin and clip.
Now this is not included with the hitch, but many times when you pick up accessories they'll have those included. And if you plan on leaving your accessories on the back of your van long term, you might wanna look at a locking pin and clip becomes a good deterrent for anyone that's just walking by and that way they can't just take your accessories with them. Our plate style safety chain loops make it super easy for a standard S-hook or even a larger clevis style to hook on that way when you're towing a trailer, you can keep that all safely attached. Speaking of trailers, if you plan on towing, this has some pretty good weight capacities. As far as your gross trailer weight rating, which is the trailer plus the accessories loaded on.
We have a 6,000 pound weight capacity, which is pretty solid overall. Now tongue weight rating, which is the downward pressure on the inside of the receiver tube opening is gonna be mostly for your suspended accessories, cargo carriers, bike racks, things of that nature. And it's got a 900 pound capacity. So, you know, you're gonna get a four bike bike rack fully loaded up, a cargo carrier loaded up. I really don't worry that you're gonna go over that 900 pounds.
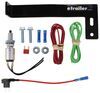
Now it can be used with a weight distribution hitch if you're looking for a little bit more capacity out of this hitch and it bumps up significantly. This one actually will go to 10,000 pounds for that gross trailer weight rating. And then your tongue weight actually goes up as well at 1500 pounds. So you really have quite a bit of room to grow if you ever needed to. And speaking of towing, something that's really cool with the Blue Ox hitch is gonna be this bracket that's welded on.
It seems kind of minor, but when it comes time to put a seven way or a four-pole wiring, this bracket will allow you to get an additional bracket to bolt up. You have a nice solid spot to get that mounted up. Other times, you'll have to get a separate bracket and use a hose clamp to go around it or find somewhere to mount. This just kind of takes the guesswork out of it, this is a nice little addition. The hitch sits really nice against the bumper. It doesn't stick out too far to where you're gonna hit your shins on it, but you wanna make sure that accessories are gonna work well with this. So measuring from the center of the hitch pinhole to the furthest point on our bumper, it's about three and a half inches. And that comes into play for two different reasons. Sometimes you have cargo carriers and bike racks that stow in a vertical position and not all fascias will allow for that unless you get special shanks, that's not the case here. I don't worry too much that you'll have any accessories that are gonna cause issue, but sometimes when choosing a ball mount, you might want to get one with a slightly longer shank for that ball to stick out further. It'll make it a little bit easier to hook up, but even a traditional ball mount should work just fine with this. And going along with that ball mount, making sure you get the proper rise or drop necessary is gonna be important for safe towing. So from the top of our receiver tube opening to the ground, 16 inches. So the best thing that I can recommend for you is if you have your trailer available, get it level measure from the ground to the top of the coupler. And then from there you can do the numbers to figure out the riser drop necessary. And that way everything's gonna be level. You can also get an adjustable ball mount, that's a great option as well. Now with all of these capacities and towing, it is important just because the hitch is rated for a certain number doesn't necessarily mean the vehicle is 'cause it accounts for transmission, brakes, suspension, all of that. So check your vehicle's owner's manual, see what it's capable of towing, compare that not only with the hitch but also your ball mount, ball, or anything that you're gonna be using to tow and take the lowest number that way you're not overloading anything and you stay safe out on the road. When it comes to the installation of this trailer hitch receiver, it is extremely easy to do. You can definitely do it in your driveway or in garage, probably about 30 minutes or less. You're gonna be taking bolts, putting them through a block and feeding them through the frame rail, then you just raise the hitch up, take nuts, tighten it down, torque them, and then you're good to go. If you're gonna be doing this yourself, I'll walk you through all the steps to make sure you get it installed. But, if you don't have the place to do it, the tools will do it, the time or want to do it, I totally get it, but having hitch is totally worth it. If you need someone to get this installed for you, you can reach out to our dealer locator to find someone close to you to get that hitch on and then you can start enjoying the travels and adventures with your van. Now also, once you get it installed, whether you do it yourself or have someone install it, take some pictures of it, let us know how you're using it. It helps us kind of paint the picture for neighbors out there that may have a similar vehicle, figure out what they can do with the hitch and maybe some helpful tips. As far as the installation goes, follow along. Let's get this hitch installed. We got our hitch installed. This is actually a pretty easy one to do. What we're gonna do on each side of the frame rail is get three carriage bolts and three spacer blocks ready to go. These are gonna become the mounting point for our hitch to bolt up. And pretty easy we're gonna drop in, you'll see that there's two holes towards the rear of the vehicle. We'll be using both of those and there's a cutout in the frame that allows me to just simply drop these into place. Make sure that carriage bolt's seated in there, that way when we raise the hitch up we'll be able to thread on our bolts. Now on the backside, or I guess technically the front side of the vehicle, there's two holes and the hitch also has two holes. So looking at the instructions, they had me use the forward-most one, but the picture had it into the rear one. I really don't think it matters. They're pretty close together so I'm just gonna use this rearmost hole. And then we're just gonna repeat on the other side. Now you may notice the pull wires that are included with the hitch. And these are nice because what you can do is thread these on and you can actually just spin this on. And what that's gonna do is when the time comes to raise the hitch up, you can guide these through the holes and then that hitch will go straight up. But if this gets pushed up in the frame rail, you'll have that pull wire to pull that back down. It's not a hundred percent necessary, especially because you can reach in the frame and push that down. But if you're doing this by yourself or you wanna make this a little bit easier, you can by all means, put those in place. I'm gonna omit it, I'm gonna have an extra set of hands raise this up. And like I said, if these push in, normally on a frame rail you're in a world of hurt 'cause you'll have to fish those out. But the fact that this is all open, it makes it to where these really aren't that necessary. So again, if you do push it up in the frame rail, I wouldn't worry too much because I mean really you can just push that through. Now our exhaust here on our passenger side, the heat shield's kind of in the way, but if you just kind of push that off to the side, you should be good. And with this raised up, I'll just thread this on, we'll make sure we have our other side threaded on and then we'll continue getting our hardware in place. You can go back and snug them down with a three quarter inch socket. You don't need to get crazy here because we're gonna come back with a torque wrench. (power tool whirring) We will come back with our torque wrench, same socket. Torque wrench settings are found in the instruction manual. And this is gonna be important because it's gonna make sure that long term, you know we're gonna be towing a decent amount of weight potentially, that everything's gonna stay in place. It's also not gonna be too tight. And if you need a torque wrench, you can find one here at etrailer. You can generally go to an auto parts store and rent one for free. But we'll get these torque down and then we'll be good to go. And that was the look and installation of the Blue Ox trailer hitch receiver on a 2021 Chevy Express van.

Nice hitch
Info for this part was:
At etrailer we provide the best information available about the products we sell. We take the quality of our information seriously so that you can get the right part the first time. Let us know if anything is missing or if you have any questions.


Thank you! Your comment has been submitted successfully. You should be able to view your question/comment here within a few days.
Error submitting comment. Please try again momentarily.