
To see if this custom-fit item will work for you please tell us what vehicle you'll use it with.


Note: Due to the size of this item, it ships via truck freight.

Videos are provided as a guide only. Refer to manufacturer installation instructions and specs for complete information.
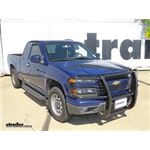
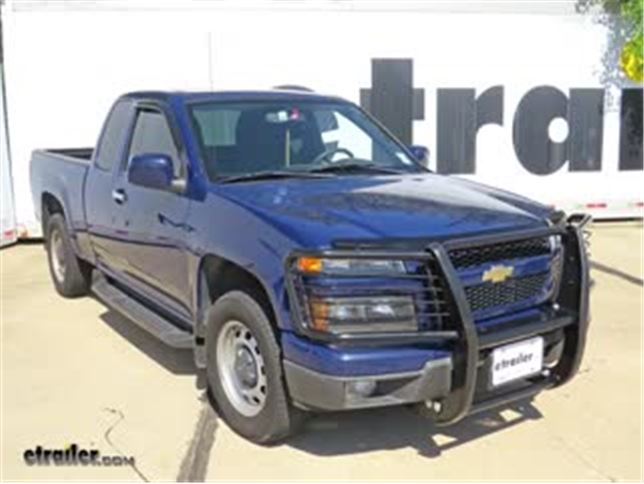
Today on our 2012 Chevrolet-Colorado, we're going to be taking a look at and installing the Aries black grille guard, part number AA4080. Also available in polished stainless steel, part number AA4080-2. Here's what this grille guard is going to look like once it's installed on the vehicle. As you can see, it's going to give us a nice heavy duty clean look to the front of the truck. It's made of a heavy duty carbon steel construction with 1-1/2 inch tubing. Here in front of the headlights, it's got these cages.
They can help protect things that may kick up from potentially breaking your headlight lenses and these are also removable so that way, depending on what look you want, you can take these out or leave them in. It's got this rubber that goes over the risers here on the very front of the guard and those are going to help protect it if you possibly bump into something whether that be in a parking lot or a garage, something like that. What this grille guard is going to do is give you that nice clean look on the truck and make it look a little bit beefier. It also gives you the option with 2 grommets that are in pre-drilled holes here in the center cross bar that you can mount up a light bar if you'd like to for any off-road use. It can also help protect the front of your vehicle if you're going through any light brush from too much of kicking against the front and prevents some potential scratches. What I like most about this grille guard is it does give a nice heavier duty look but it also leaves it open and accessible to the front grille here and to down at the license plate. You can still see the license plate and you'll still get good airflow through the grille.
Now, let's show you how to install it. First thing what I'm going to need to do to begin our installation is we're going to need to remove this lower lip on the front fascia here. That lip is over at the fender. There's going to be a push pin fastener in each side. You can use a flat head screw driver or a pair of side cutters.
You want to pull that center out and then once you pull it out the body will come with it. Keep in mind when installing this, whatever we do on one side, we'll be doing that exact same thing on the other side. Now there's tabs all along the front here that hold this up into place. You can take a flat head screw driver and work up underneath there so that you can pull the tabs out. Then we just continue along the front and release all of our tabs. We'll reach around the edge of it here, pull that out and release it and we can pull that lower lip of our fascia off.
Now we'll remove this plastic splash guard underneath. There's a 13mm bolt on both sides that holds it in. Now we can take one of our long 12mm bolts. We'll put one of the flat washers onto it. Then we can take our bracket, because with this one, it doesn't have the other mounting locations so we'll need to create it using this bracket and you'll want the longer end of the bracket which is up here to go up on the outside of the frame. The bolt will go through the bracket and then through that hole right there in order to come out the other side. Then on the inside of the frame rail, we can take a large mounting bracket, slide it up into position to line that upper hole up with where that bolt's coming through. Then we'll put on another flat washer, a split lock washer in the hacks 00:03:56 nut. You just want to get that started. Then from the lower mounting point, what we'll do is we'll take one of our 10mm bolts with flat washer, insert it through and then on this side we'll do flat washer, split lock washer and nut. Just under the inside edge of the headlight here, there's a bolt that mounts up the bumper. I'm going to use a 15mm wrench in order to loosen that. Once you've got the bolt loosened up and there's a good little gap there, we'll be able to take our upper bracket and we'll take the open end here and we'll slide it underneath the head of that bolt. You want to be sure to refer to the instructions so that you can make sure that you have the correct side. Then we'll get that pretty straight and leave that right about there. We'll leave it loose just to make sure in case we need to adjust this a little bit. When we put the grille guard up into place, we don't want it to be tight. Now with the help of an assistant, take our grille guard and carefully slide it into place and wind up the holes in the lower bracket. Then we'll take our shoulder 12mm bolts with flat washers and insert them through the holes. Then on the other side of each bolt, we'll put a flat washer, lock washer and nut. Now we'll carefully take our grille guard and get it lined up with the holes in the upper brackets. Then we'll take one of these bolts with the Allen head on it and a flat washer and send it through. Then on the inside we'll install flat washer, split lock washer and 10mm nut. With all the hardware installed, we can make sure that our grille guard is level and make any adjustments necessary. Now we can begin tightening all of our hardware down to make sure that our grille guard's nice and secure in the position that we want it. Then we use a 5/8ths socket and you'll need a 6mm Allen key for the head of the bolt in order to tighten it up. Then on these 12mm bolts and nuts, we'll be using a 3/4 inch socket and wrench. Then on this 10mm bolt here at the bottom, it will be a 5/8ths socket and wrench. Then we'll torque it down to the specification listed in the instructions. Then we can reinstall our splash guard. That's going to complete our look at and installation of the Aries black grille guard, part number AA4080 on our 2012 Chevrolet-Colorado.
Info for this part was:
At etrailer.com we provide the best information available about the products we sell. We take the quality of our information seriously so that you can get the right part the first time. Let us know if anything is missing or if you have any questions.


Thank you! Your comment has been submitted successfully. You should be able to view your question/comment here within a few days.
Error submitting comment. Please try again momentarily.