

 Arrives before Christmas
 To see if this custom-fit item will work for you please tell us what vehicle you'll use it with.
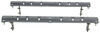
Heavy-duty 5th-wheel trailer hitch has interlocking jaws, a torsion head, and a color-coded lock indicator for safety and security. Non-binding slider ensures proper clearance during slow turns. Rails and installation kit included.
Features:
Specs:
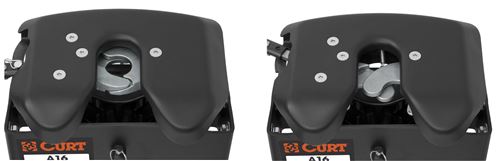
Unlike slide-bar models, the rounded, interlocking, two-piece jaw on this fifth-wheel trailer hitch inhibits rattle and movement by securely wrapping around your trailer's king pin, resulting in easier hookup and a safer, quieter ride.
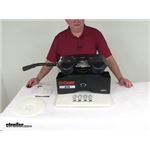
Get peace of mind with Curt's color-coded lock indicator. Just look at the indicator - either the one on the handle or the one on the hitch itself - to determine whether the jaw is in the correct position to uncouple (red), couple (yellow) or tow (green).
Most often used on trucks with 6' and 6-1/2' beds, this slider helps to eliminate clearance problems during slow-speed turns. When you are towing a fifth-wheel trailer, your hitch must be situated on the cab side of your truck's rear axle. However, at slow speeds you can use a slider to slide the fifth-wheel hitch (and the trailer) toward your truck's tailgate and past the rear axle, creating enough space between the cab of your truck and the trailer to permit less-restricted turning.
Curt rebranded this fifth-wheel trailer hitch by changing its name from Q16 to A16 in 2016. All features and specifications remained the same.
 Alternate Instructions
California residents: click here
Videos are provided as a guide only. Refer to manufacturer installation instructions and specs for complete information.
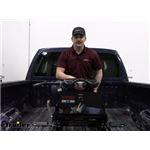
Hey neighbors, Kevin here with etrailer and today we're gonna be taking a look at and showing you how to install the Curt A16 fifth wheel hitch with S20 slider base for Toyota Tundras here on our 2017 Toyota Tundra. If you own a Toyota Tundra and you're looking for an all-in-one kit that's gonna have everything you need so that way you can tow your fifth wheel trailer and then going with this kit is gonna be a great option. It's gonna have the A16 fifth wheel hitch head along with the center section and then that S20 slider base because with Tundras you're typically gonna have a shorter bed. You're gonna need that extra clearance so that way you can make a turn without the nose of your fifth wheel contacting the cab of the truck. The best part about this is it's also going to include the base rails and the custom fit brackets that you're gonna need to mount to the frame so that you can mount up your trailer hitch. Now one thing I do wanna mention since we are in a Toyota Tundra is that typically Tundras aren't gonna be your best option whenever you are gonna be towing a fifth wheel.
Typically the capacities that they can handle are pretty low, so you really have to have that fifth wheel that's gonna be a much lighter GVWR. So I would definitely double check what your trailer weighs, figure out what your truck can actually handle, make sure that you're going through your owner's manual figuring out 'cause there's a lot of different variables for your vehicle. I mean the type of cab you have, the engine you have, there's a bunch of different factors that go into what that actual capacity is. So you definitely wanna make sure that you're gonna be able to handle it. You don't wanna be right at what that trailer weighs or under it because if you are, then you're gonna overload your vehicle and it's gonna end up damaging things and it's not gonna be a good time.
Now when it comes to the custom fit brackets, these are gonna be reusing some holes in your frame and if you have a crew max cab, then you're gonna not be able to use them because what happens is the cab takes up a bigger portion of your frame so our cab would be sitting further back, which then pushes everything else back and then our holes aren't gonna line up. So you would not be able to use this kit if you do have that. And if you don't know that you have that or not, you can come and look at your door on the back side of the cab. So that rear door, if it's a full-sized door, you most likely have the crew max. If you have a slightly smaller door, you might just have the double cab.
We can show you what the double cab looks like because that's what we have with this Tundra. Alright, so if we look at our front door here, we have a full-sized door and then when we come back to our rear, we've got that shorter door, we don't have the same handle. And then we also have a much smaller window here with less leg room in the cab itself. So that's a good way to just eyeball it and make sure that you don't have the crew max. So the biggest part of this kit is going to be our fifth wheel hitch.
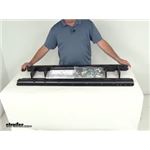
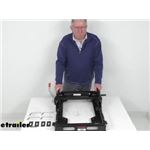
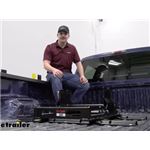
And with this one, this is gonna give you that extra turning clearance here since it has a slider. Now this is really easy to work. I've already popped out the pin and clip, which will lock this into the towing position and even from the outside of the bed, which I'll show you in just a bit later, is you just pop this handle down really easy. There's some other ones where you kind of gotta really pry it out. This one really just pops down nice and slide forward, it locks right back in place. We can make our maneuver and then we can get back in our truck, pop that back into here and we're off towing again. Now this has a lot of the features you've probably already seen just because A16's a pretty popular fifth wheel hitch. So we have full articulation side to side, back to back. There's rubber dampeners that are built into the head that are gonna help eat up that road shock and any kind of vibration that you have help with your chucking so that back and forth motion when you're kind of coming to a stop or when you're starting to take off and the trailer wants to kind of fight back and forth with you or when you're going over those railroad tracks and it's kind of jarring back and forth. So that's built into there so that you don't have to feel that as much through the truck itself. So taking a much closer look at our fifth wheel hitch, one thing that comes with it is a lube plate, which is gonna allow you to prevent scratches and make it a much easier transition when you're connecting up to your fifth wheel trailer, this will simply just pop right onto the kingpin just like so. And then when we come up onto our hitch, it's gonna be creating a barrier between that plate on our pin box and the top of our fifth wheel hitch. That way we're not putting any grease on there that can accumulate some debris and make things kind of gross and get it all over yourself. And this just makes it much cleaner and easier to do so. So let's show you how this works. We'll pop out our pin and clip on this, we'll pull the handle out towards us, pop back and that opens up the jaws. Now when we go to pull this in, I don't have as much weight as the trailer does so I can get it back a little bit, but I'll have to pull a handle as well. So that would be locked in place and now we're getting a full 360 degrees around our kingpin with the two jaws overlapping each other by an inch there at the front. Now before we go anywhere though, we need to make sure that we pop our pin and clip back into place and our handle, we don't want to have any issues with our coupler coming unlocked. So we pop that back down and into place and now we know we're safe to tow. So another nice thing that Curt does is they put an indicator on the back. So right now Tom is sitting in the driver's seat looking back with the camera and we can see we have a green circle here which tells us that we are safe to tow. Now if we weren't, we would see red like we saw when I started to push that in. And then also yellow. I'll push it back in so you can see it. So this is with the handle fully back in the coupling mode where our jaws we inchesre kind of split open. When we go to put that in, you can see we're not fully into that safe mode. If you we inchesre still able to get your pin and clip in, you now need to come back here and look at it and say, oh, okay, we still have got red here. That's not safe. We wanna make sure that we're fully into that green like that. So a couple other important factors here are going to be our hitch height for one. With this base it's gonna sit a little bit higher just because we are sitting on top of that sliding base instead of just the normal footprint that we'd have. Another factor to consider is because we're using base rails, that's gonna add another inch and a half as well to it. So at the lowest setting we're gonna have a 17 and a half inch hitch height. So that's up to the top of our hitch here. And then at the highest setting that would be 21 and a half. And the goal with that is we want to have our fifth wheel trailer riding level with us. So the way to do that is to measure from the ground up to the bed. So we'd measure for that. And then over on the fifth wheel we would want to get to our pin box and we're not gonna measure up to the kingpin. We want to get to that plate that the kingpin comes down from. So that's this portion of it right up here where that kingpin starts. We wanna make sure that we're getting from the ground up to that while the trailer's level. The difference between those two numbers is gonna be what your hitch height needs to be with your fifth wheel hitch. The goal along with that is also to make sure that you have at least six inches from the top of the bed rails up to the nose of the trailer. That way you don't have to worry about the fifth wheel's nose coming in and damaging your bed rails. The other important factor here is gonna be our weight capacities. Now this has a 16,000 pound gross towing weight capacity and a 4,000 pound vertical load limit. So that's that pin weight coming down on the fifth wheel hitch itself. And like I said before, you definitely wanna make sure that you're verifying exactly what your truck can handle and make sure you're not overloading it. Now with this being an S20 slider base, if you did upgrade to a larger truck later on and installed base rails, you would be able to swap out the hitch head here, maybe put in A20 and get that 20,000 pound capacity from both the rails as well as the hitch itself. And as far as the maintenance goes, this hitch is super easy to take care of. Step one, always use your lube plate, that way you're not scratching up or dirtying up the head of your hitch, it's gonna save it and keep it lasting for a much longer time. You might even wanna pick a few of these up. These are super inexpensive. I keep a couple extra just for my dad because he's the kind of person that doesn't fully have it where it needs to be. And then he ends up smacking it up against the hitch here and then kind of dents up that ring and then over time it'll wear down. So super easy and it's you know, a couple bucks just to save yourself a much larger cost of fixing up the hitch head or maybe your pin box. As far as the jaws go, there's gonna be a grease zerk fitting on either side and those you just wanna pump in one or two squirts every trip maybe if you're going once or twice a month. If you're going a little bit more, definitely throw a little bit more in there as you're using it more often. If you're one of those hot shot drivers and you're hooking up to multiple trailers, that would be a good choice for you as far as the base. So with this we just wanna rub on some white lithium grease and make sure that we're not attracting any dirt or debris that could potentially bind up our slider here to where we wouldn't be able to have it go. And maybe it would catch at one spot and then now you're not able to get that full 12 inches of extra clearance. Other than that, there really isn't too much more to this. I would definitely recommend if you can, get a tonneau cover, cover up your hitch, don't let it get rained on, it's gonna last a whole lot longer and you won't have any of those kind of rusted or corroded issues. And then if maybe if you're starting to feel like there's too much vibration, maybe things feel a little bit off, the dampeners that are built into the head and in the center section down in here can easily be as replaced as well. All you'll have to do is pop out this pin and clip here, you can pull this whole pin out which allows you to remove the hitch head. Now it is a little bit harder just 'cause those dampeners are sitting in there. There's like a V shape kind of going down into that so that when you set the hitch head in, it kind of forces it into that one spot. But that dampeners what I'm kind of catching on here a few times in moving this in and out. It should be pretty much good to go. But with this being brand new, it's affected me just a little bit. Once you get that worked in though, if you do wanna remove your hitch and you want to take it out in pieces, you could do that so that you could pop the whole head off. This is just four bolts and these are gonna be torqued down but if you have a torque wrench you could easily take the center section out as well and then make this a whole lot lighter because the slider base by itself is pretty heavy. I would not recommend lifting that up just by yourself. I'd definitely get an extra friend to help. That way you can safely put it in and out of your truck without scratching up the bed. So included in this kit is also those base rails and frame brackets. The base rails are gonna come with a carbide finish, which is gonna help prevent any rust or corrosion because we don't wanna see all that paint starting to flake off in our bed. That's not a good look and it's just gonna lead to further issues down the road. The hardware included is grade eight. Now with the frame brackets being custom and needing to match up with certain specific spots, you can run into some issues with clearance with the hat channel, there's a few cross members that are gonna be in your way and we actually had to swap out some of our hardware. So on this spot right here at our cab side rail on both this one and the one over there, we did have to swap that out with a hex bolt just because we had a cross member that was right below it to where there was no way to get a wrench on it. So you might end up having to change some things around just depending on what you have going on under the vehicle itself. But that is gonna be very specific. You might not run into any issues at all. You might be able to just easily slap this in place and have no problems. But with that being said, I would not probably choose to do this myself outside unless I was a qualified mechanic that had all the extra tools and had the time to really sit here and dig through it all just because this did require a lot of crow's foot tools and other specialty things that I had to use just so I could get to some of these bolts and get them all torqued down properly. Getting the brackets in place was not easy either. So this is one where I would definitely reach out to a shop. Use our dealer locator, you can enter in a zip code and find a shop to get it professionally done and save yourself the headache. But with that being said, please feel free to use this video so that way you can get it properly installed yourself. So starting off our install, first step's gonna be removing our spare tire so that way we have some room to work. And once you have that done we're gonna be taking our side plate for the front on the passenger side. So it's gonna be this guy right here where it's nice and long up front it's just got that square piece up top with the rectangle portion more than the slotted portion facing towards the front of the vehicle. And what they want you to do is hold this up and we're gonna find the hole, which is this guy right here and we're gonna enlarge that. Now when I went to pull this up, it's not really sitting how I would like it to. So we're gonna skip some of these instructions and just double check that they, we are getting this exactly how we want it to by drilling our holes up in the bed with the base rails first. So as you can see, like for me to get this lined up with this other hole where it's supposed to be really isn't giving us a straight shot at that bolt hole. So might be that the hat channel is in our way and we might have to cut a little section of that out just to make that work. This could just be a year model issue instead of a overall issue. So we're gonna start by going up in and drilling down those four holes for our base rail. That way we can line it up and make sure that this is actually where we want it to sit. So like I said, we are gonna skip over the frame rail brackets and start drilling our holes for the base rail so that way we can line up with the holes down there so that we're making sure we're putting our frame bracket in the right spot, especially since we're gonna be drilling through the frame. So for this part we're gonna start with the cab side, which is a little unusual. Typically we're going for the tailgate side first, but the instructions are gonna call for 49 and 3/8 spacing from the end of our bed here. But since we have a spray in liner, that's gonna add about a 16th of an inch onto our length here that we're going over. 'cause this goes over the lip of the bed. So I'm gonna add a 16th on. So we're right, 49 and 7/16. And I've not only measured from this side, I come back over measured from this side. Make sure that you have this perfectly even both ways. And then I've also gone ahead and I'm gonna check my from the wheel well over to it. And looking at this right now, looks like we're right at three and a half, a little bit off here but it's kind of hard to tell with your wheel well. There we go. You gotta make sure you're hitting at the same exact spot because it curves up. So I'm getting three and a half right there as well. So we know we're good front to back and side to side, we got this perfectly lined up. So our next step is gonna be taking a center punch and we're gonna do the outer four holes with our center punch and then we'll just drill a little 1/8 pilot hole down so that way we can see where we need to be. Now we have this set in place, we can use our center punch and for the cab side here we're gonna be using the second slot in. So we'll want that for both sides so we can get that centered, run our punch. Since it's so hard to see my center punch hole, why move this out of the way. Instead I'm gonna be paint markering it first. That way we can actually see what we're doing. We'll get our base rail out of the way. We've got our spots here. I'm gonna hit those one more time with my center punch just because this is a really textured pattern. And then we'll take our eight inch drill bit and we will do a little pilot hole here. (drill whirring) Alright, so we're back under looking on our passenger side frame rail. Trying to line up our bracket, lines up pretty well with the front hole but this hole closer to our tailgate is a little bit blocked just because we have a hat channel on the way. So what I'm gonna do is just notch out just a small section here so that our bracket can sit over it because we're gonna have a spacer that's under it plus one on top of it between that and the bed. (power tool whirring) There we go. That looks a lot better. Alright, now that we've drilled out those holes to show where our base drill's gonna come through, this is lining up with that channel edge just kind of trimmed out so we can get to actually drilling through the frame rail now and run our bolt through our frame rail mounting bracket so that we can move on to getting these base rails attached. Now that we've confirmed this is the correct hole and it's exactly how we need it, I'm going to step this up to a 5/8 hole. So right now I've got a 7/16 so I'm just gonna work my way up to it. That way we're not really having to sit here and drill forever. (drill whirring) Now we have that hole enlarged over on our passenger side. The next step is going to be removing this control box right here. And to do so, on the backside there's gonna be a nut and that's gonna require a 12 millimeter socket. So we'll pop that off and we're gonna be reinstalling this again but just with a bracket that's included with the kit just to get it spaced further away and slide this out. It's a little rusty so not really one to come out of the bracket here. There we go. Now that we got access to that back one, I'm gonna get that one off as well and then we'll pull this whole bracket off 'cause it's gonna be, this black bracket on the back is gonna be separate from these two guys. And then once we have our frame bracket up on here, the new bracket that we have, which is this guy right here, this little Z shaped bracket is gonna mount up with the hardware that clamps the bracket to the frame rail. Alright, so they had us remove that electrical connector and then put the bracket in, bracket's nowhere near it. There's no way for me to get that electrical control box over to where they're saying to mount it with this bracket but it's honestly right out of our way. So I think I'm just gonna reinstall it back with those factory nuts and then we'll just skip this part for now. If we do run into an issue later on, we'll press to just fabricate something to make it work. I'm seeing a lot of inconsistencies with the instructions versus what we're actually seeing with the vehicles. This might actually just be a trim package issue but if you're gonna put it for, you know, each model it should really match up. And in this case I'm just not really seeing that too well. So we're gonna keep chugging along now. I marked out my hole because this bracket is going to line up with the hole inside there and I was just under the truck and I could see that my holes were matching up from the bed. So I just marked this out. We'll center punch that and then drill that out 'cause it's also gonna need to allow for a 5/8 bolt to go through. So I've hit it with the center punch. Now I'm going with my eighth inch drill bit and I'm just gonna work my way up all the way to 5/8. (drill whirring) So we just drove that hole down on the frame rail on our driver's side. Now they want you to come back up into the bed and we're gonna enlarge our holes that we have. So the two on this side and the two on the passenger side as well for our base rails and we wanted to get that up to 9/16. So I'm gonna be going skipping around through the bits just so I get up to that 9/16 just to make it easier. So each way we're just only chipping out just a little bit each time. (drill whirring) So once you have that cut out you'll wanna come back and just file and keep vacuuming, kinda make sure you got this all nice and cleaned up. No burrs, it'll potentially hang up on your hardware. I think we're good on this side. (vacuum whirring) And then once you are ready, we're gonna put some clear coat on here that's gonna help protect that bare metal from us drilling. So now we're gonna drop in our carriage bolts along with our U-shaped spacers. We're gonna slide that right into place and we'll use our carriage bolts to make sure that we are installing our frame brackets right where they need to be. Alright, with that in place now we can go back down under the vehicle. Alright, I'm on the driver's side right now. If you don't really have enough room you might need to pull those carriage bolts just back up before you get the plate in. But we're gonna try and get it with it down already. When you hold it, hold it like this and we're gonna slot it in and then turn it to get this in place. There's a lot of other stuff in the way here. Yeah, so I'm heading back here, the bolt and then you can just pop it up just a bit. There we go. Get some wiring here, we'll work around. Alright, now we're gonna be using our larger hex bolts. We're gonna throw a flat washer on it and we're gonna slot that through, get that lined up with the side, that way it'll help hold it in place so that way when we go under Foley and put on the nuts and plates that go on the vertical bolts, we won't have any issues. Same thing with this. A second one of these with a flat washer on the other side, we're gonna be using these offset spacers. So it's these guys right here with the square bit, a little bit further out, it's not just centered on there. These will slot right on there and then we'll have flange nuts, sorry, larger flange nuts that'll go on those bolts. And that's gonna be on the inside of our frame rail 'cause our frame rail is a C channel. So I'm gonna wait and we'll lift it back up. We'll get under there so we can see everything and get everything tightened down. Now for our side bolts, the horizontal one's going through the frame rail, we're gonna be throwing on these offset spacers. Put that one in, put that one in and these are gonna clamp onto it as we tighten it down with those flange nuts. I show you what the larger ones, I get that started. And then I'm gonna tighten and torque this down to the specifications listed in the instructions manual. It's gonna be just a little bit too hard to see just 'cause I'm gonna have to be right in the way of the camera here just once we get to that point. And since these aren't carriage bolts on the side, you will have to have a wrench holding the head of it. Otherwise it's gonna keep spinning like it's doing to you right now. Alright, so now we're gonna do the same process over on the passenger side as well with our front bracket on the cab side here. And it's gonna be just those offset spacers again along with a flange nut. Now this top one up here is gonna be a nightmare. There's not really any room to get in there and we've got a bunch of other stuff in the way. I might need to trim out this rail just slightly just to get this on, but this is the factory hole I do believe so it's not like it was something that we chose. There we go. We lucked out. It does actually work, but getting a socket on here, probably not gonna be the same. Alright, we lucked out, we don't have to actually do anything special. We used a chrome socket and we just barely fit in place there. So I'm gonna get my torque wrench set up and we will get these torqued down. We tried, I mean it was super tough to try and get it from the inside so I did end up having to come towards the outside. We had a wrench with a 15/16 socket on the nut and then we torqued it from the bolt head side just because it was just impossible trying to get our torque wrench in there. So you might have to do the same at home depending on how much space you got there. So we did have to make some changes on the bolts on the tailgate side. So I've already got this one dropped in. We're gonna be doing the same thing over on the other side as well on the passengers. So the carriage bolts that they give you unfortunately come out in a spot where there's no way to get a wrench onto the nut at all just because it's so tight in the frame with the hat channel right there. So there's no way to torque it down from the nut side and with it being a carriage bolt, there's no way to get it from the top. So we switched over to some hex head bolts. These are two inches half inch by or grade eight, sorry. And we are dropping those in and we're gonna use that flange bolt 'cause they can get a pair of pliers on it. And then since it is a flange bolt with some teeth on it, it is gonna start to bite into that spacer that we have down on the bottom and we will be able to torque it from the top. Now that's typically not what we wanna do, but in this case this is gonna be the only way to safely torque these down. So you may find that if you have that same issue, if you get down there and find that you just can't get your hands or any kind of tool on that nut just 'cause of the spacing there, then switch over, make sure you go to your hardware store, you wanna get grade eight bolts and like I said, half inch by two inches. (drill whirring) Alright, now we've struggled through, I've had a couple of assistants help me 'cause we needed a second person up in the bed to work on the bolt because we had just enough room to get the nut up in place and then have the bolt start to go down into it and it needed to thread all the way in. Otherwise it's not gonna fit if you just hammer the bolt in and then try to get the nut on. So definitely a huge challenge. But now that we have it in the teeth on our flange nut or biting, I'm gonna torque this down to the specs that are listed in the last step of the instruction manual. Now we have the front two or the tailgate side torque down. I'm gonna get back under the vehicle and then we will do the cab side here and then once those are in place, we can switch to our back brackets. So it was really tight on the backside here. We ended up using an 18 inch extension with a three quarter inch deep well socket so that we can get onto both bolts here but we've got 'em both torqued. So now we can move on to those rear brackets. For our rear bracket we are gonna have to remove the bolts holding in our hitch. Now this might not be for every single model, they do make a note of that. Unfortunately on ours we are gonna have to pop out this bolt, this bolt, these three bolts here and we are gonna pivot the hitch on this back bolt. So I would loosen that up just a bit too so you get a little bit of wiggle room. That way it's not pinched up against the frame here. But we're gonna pop those five bolts out and we'll do the same thing over on the driver's side. Now if you have anything that's gonna be super tight, I would probably loosen that up. So like they had airlines ran right here but it was real tight so I didn't wanna risk that kind of pulling on that. So I did cut the zip ties off and I'll replace those later. But it looks like we're pretty much good on the wiring and stuff. There's enough slack in that I could probably be fine just with the pivot motion that we're gonna do. So I'm gonna get these taken off and we'll get to the next part here. Now I am gonna have my lovely assistant Sam push up on the bumper and hitch here and that's gonna drop down that bracket over there so that we can slide this into place. Definitely gonna take a little bit of maneuvering to really get it how you need. There we go. And it's kind of pinched on that. While that's up I'm gonna get the other side and we're just gonna do the same exact thing. Alright, now with that back in place, we can lift this back up and we're gonna use that factory hardware 'cause we got weld nuts on the inside of the frame. So once we push this back up, it'll sandwich in between the hitch and the frame rails. Now you might have to use the pry bar. I just stuck the pry bar inside 'cause we have a rounded one, this guy right here. And what I did was tried to move it around, kind of just jingle it back and forth so that way we can get that hole perfectly lined up. I would probably start with your front ones here when you're putting on the trailer hitch and then go to those three rear ones later. That way you know you got this all set before you go and try and tighten it up. Now we have our frame brackets in place. We need to figure out how to or what spots to drill through on the base rail so we can get that mounted up to our brackets. And the easiest way to do that is drop in your fifth wheel hitch. If you already have it there, that's gonna give you that perfect measurement because we are gonna match right up with our feet. If you take a tape measure, you should be getting 22 inches from the center of the tailgate rail to the center of our cab rail and then we'll want to just double check. Now it should be pretty good just because we have the hitch in place but it never hurts to double check just the side to side. So it looks like we're right at three and 9/16. Here, I'm about three and three eight so I do need to kind of tap this over just a bit and get this lined up properly. 22, alright now that that's all good, we are going to be switching to a different hole this time. So instead of the second hole in, we're gonna be going to the third hole in. I'm gonna mark that just because I have to get this out of the way so I can drill and then we're gonna work our way up. I'm gonna start out with an eight inch drill bit, then we'll go down below. Just double check, make sure that we're lining up with our frame bracket and then we can start going a little bit bigger, working our way up to 9/16. (drill whirring) So now we're gonna be doing the same process. We're gonna have our U-shaped spacer and then our carriage bolts. Now our U spacers will go under the bed between our bracket and the bed. So the rib portion of our bed right here. And that's gonna prevent any crushing. Our square spacer is going to go underneath the bracket and that's gonna be followed up by our flange nut. Wouldn't hurt to have an extra hand up top just pressing down on that carriage bolt 'cause each time I try to do it, it's fighting me. But you can also try pulling on the spacer. So my camera guy Tom here is a genius and I thought of that as well, help pull it back, just get it started and then we'll move on to our next one. So in the passenger side there will be a wire harness in the way. If you pry up on the push pins that are holding it in, you meet yourself a little bit more space to work with. Alright, so I'm starting these up right now and just trying to kind of get a idea of how we're gonna approach torquing these down. Furthest one out to the tailgate here has a bunch of stuff in the way that's probably gonna end up having to be a crow's foot. And we'll come in from here and crank away at it 'cause they can't get a socket on it just 'cause this cross member here is blocking us. And on the other side I do have a tiny bit more room. Maybe I can switch over to a short well and sneak it in, but we'll have to try that out. The backside of it closer to the cab, those ones are perfect. I could easily get right into 'em and tighten 'em down. Alright, so I was able to get a crow's foot on both front ones here by the tailgate side, but because it's a crow's foot, we are only getting a small turn each time. So torquing this down can take quite a bit. Good to keep resetting every single turn here. Alright, now that we have everything torqued down, I just need to reconnect my harness. I popped it off in a couple places, like I was saying, those push pins, so I pushed that back in. There's one more up top here. We can get back in place if I can find it now. There it is. I'll push that back down into this cross member. Like that. And then like I was saying earlier in the video with this wire or this control box here, we honestly didn't even need to take it off. So this might just be a trim specific issue where this is in the way. 'Cause the way they're showing in it, it was sitting way further back here in the way of our cab side brackets. But fortunately for us it was not in our way. So I'm just gonna reinstall those nuts, have that mounted back up and then we'll be good to go. With everything torqued down, the last thing to do is just drop in your fifth wheel hitch, make sure that you put in your pin and clip and then you're all ready to go and the install is complete. With all that being said, if you still have some questions about what's gonna be the right base rail kit or if maybe the base rail kit's not gonna be the right fit for your Tundra, maybe you need to go with something else just so that you can tow your fifth wheel trailer, please feel free to reach out to us via our ask the experts link, a comment on this video or a phone call to our customer service department and we'd be happy to help you out on your journey. Well that will do it for today's look at and installation of the Curt A16 fifth wheel hitch with the S20 slider base for Toyota Tundras here on our 2017 Toyota Tundra.
Product was as described. Fit and price were great. Just wish shipping would treat the package as their own. First couple pictures are from damage due to shipper carelessness.
The product shipped and was received in a timely manner. The installation went very good, took me about 3 1/2 hours to install. Instructions were easy to understand. The installation kit came with many extra parts so I wasn't worried about missing parts. Items are very heavy so be careful lifting. The drillbit needed for the holes is 17/32 which is an uncommon bit to find at a hardware store. It would've been nice if the drillbit was included in the kit. I did find one at a local hardware store for $6.35. By the time I was done drilling my last hole the drillbit is now useless, burned the tip out and last hole was hard to finish. When I first started my measurements I didn't realize the truck model at the top of the page and initially measured for a GMC, but I own a tundra. I was thankful my wife came in and was talking with me and disrupted the job. After she left is when I realized I measured for the wrong vehicle. Double check everything before drilling. Very good product and would definitely recommend it to another person.

good product
Alex at E trailer was fantastic. Very helpful in assisting me with this purchase. And to top it off, everything worked perfectly. Thanks Alex
I did my research & saw excellent reviews for the Curt products. I was looking for a 16 locally but none were in stock & none could be available before I left to get our fifth wheel. So I had a 20 shipped to our destination which arrived a day earlier than expected. We had it installed & drove it back home—almost 2000 miles. It handled rough roads, construction zones & road work, and unexpected snow storms with ease. I am very happy with our unit & would strongly recommend Curt products.
Poor and wrong instructions. Had to grind bracket. Had to heat and twist one bracket. Bolts to long. Had to cut. Finally got installed and it should be fine. I wanted to get the custom kit but it was gonna take about five weeks to get. If I had known it was gonna be this hard to install I would have waited.
Do you have a question about this 5th Wheel Hitch?
Info for this part was:
At etrailer.com we provide the best information available about the products we sell. We take the quality of our information seriously so that you can get the right part the first time. Let us know if anything is missing or if you have any questions.


Thank you! Your comment has been submitted successfully. You should be able to view your question/comment here within a few days.
Error submitting comment. Please try again momentarily.