

California residents: click here
Videos are provided as a guide only. Refer to manufacturer installation instructions and specs for complete information.
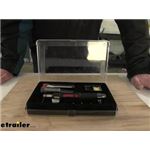
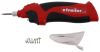
Instructor Hi there, do it yourselfers. Today, we're going to be taking a look at, and showing you how to use, Performance Tools 3-in-1 Soldering Iron, Heat Gun, and Torch. It's powered by butane and it is refillable. Now and you'll get your torch here. Butane doesn't come included, so you have to provide your own to fill it on up. But what you will get is the torch itself where you hook all your attachments to, You will receive some solder, as well as a cap.
There's a small stand over here with a pad, you can put a little water in to wipe off the tips. And then we've got several tips here for various applications. First one we've got here is our foam cutter. We've got a scoop here, which is really useful for heat shrinking down, butt connectors and heat shrink. We've got a hot knife which is great for cutting plastics and softer materials.
And then we've got three different soldering tips just for the various wires and applications we will be soldering to whether it be circuit boards or wires. And so you've got just your standard needle and you've got your double edge and you've got just a regular old, single edge. And the last piece on the end here is the adapter that will let you hook up all the attachments that thread into place. So we'll show you how to get it hooked up here. We've gone ahead and filled it with butane here in the bottom.
You just put your butane there in the end. It'll fill it up. You can have it. It's got a nice, clear sight glass so you can see how much you've got left. So it's kind of nice that you can determine, Hey am I going to have to put more in here Is this going to complete my job You can also see it's got to stand on it, so it does heat up, you going to have to let the tip get hot.
And while you're working, you are likely going to be twisting some wires and doing some other things. So you can set it down without having to worry about damaging any surfaces. So we've got that here, we're going to go ahead and unscrew, the collar. Slide off the small shield. We'll then take our tip here that our attachments can fit into. This is going to drop down inside of the small heat shield. We'll just slide it back into place. And then re-secure it with the threaded collar. At this point now we can put any of our attachments in whether we're wanting to cut or do some soldering. We're just going to grab one of the solder tips, thread it in there and we're now ready to do some soldering. So now we'll just show you typical soldering application. We've got some yellow wire here. If you've got your trailer out there and all of a sudden you don't have your left turn signal. There's a good chance that the yellow wire that's going to it, could be damaged. So we've got found our damaged wire. We've located where the issue is. We're going to repair it. So we're going to start by stripping back each end. And now what you don't get that comes included with your kit is heat shrink. If you're going to be soldering wires together I highly recommend using heat shrink with it so that way you can cover your connection back up. So we're just going to take a piece of heat shrink here. We're going to slide it over the end. If you need some heat shrink you can get that here at etrailer. I'm gonna go ahead and get the solder gun heated up though. Because if it's not hot, it's not going to do it's job here. So before we get everything prepared, we are going to just turn it on. So if you look on the side here, it'll show on and off we're gonna push up and slide it over to on, and then click up on the lever. And we can hear it now that it's lit, you can adjust the temperature by how big the flame is down here using the adjustments. We're just going to set it about there. We'll just let this get hot. So we got that soldering gun heating up for us here. We're going to take our wires. And there's a lot of different ways that people have for techniques for twisting the wires together and soldering them together. The way that I like to do it, is to take the two wires and cross them about like this. And we're going to take the two ends, once crossed and we're going to flip them like this. And this way, when we go to solder it our wire is still in a straight path. If you just take the two ends and twist them together then you got like a thing sticking out. And I don't really like the way it looks once my repairs completed. But if you do it like this you've got a very clean, wire going down. So now we've got them twisted together. We're going to take our solder and our gun here. We want to heat the wire, because if you touch this to the soldering iron, of course it's going to melt the solder. I'm going to show it to you here but you really don't want to touch it to it. You can see it's melting it. At least you know your solder gun is hot but we want it to stick to the wire. So what we're actually going to do is we're going to go on the bottom of our wire and we're going to heat the wire up. We give it a second there to get some heat into the wire, cause we want the solder to actually melt when it touches the wire. So we're just going to give it a second there to heat it up. Cause we want that solder to draw in, to the strands, that is in between each one. So we just got to get enough heat in there to where it actually starts to pull it through. If you're having difficulties getting a solder to stick to the wire, then you may need some flux and put some flux on your wire. Some solders do have certain amounts of flux in them to help assist you with this. Depending on the gauge of your wire. It may take longer to get enough heat into it. To heat it up. If that's the case, we're just going to turn up our heat just a little bit more. To make sure we get enough heat in there to draw this in. Here we go. And you can see here now that I'm touching the wire touching the solder to the wire, it's actually heating and melting on the wire and that's going to draw it in, between each of those strands to ensure, that we've got a nice solid connection. That's not going to come apart and also has very low resistance through it because it's one of the issues with butt connectors, butt connectors are great. They are a quick, easy repair and you can get heat shrink ones to seal them. So that way no moisture gets in there, but with a butt connector, you're just squeezing metal over wire. So it does leave chance for small resistance to build up in there at all those different connection points. This is going to reduce the amount of resistance that you have in the wire. We've got our sponge here. So if you've got solder and debris that builds up on the tip, you can wipe that off there. That will help clean it up. And it does also help to cool it down if you're all done as well. So that way you can get this taken apart and put back in the case. We'll then slide our heat shrink down. To cover up the work that we had just done to seal it all up. And then we just took the tip. After we cooled it off in the wet foam pad that comes in the kit, we just screwed the solder tip out. And then we slid the scoop on the end and that's going to help direct the heat all the way around to quickly shrink down our heat shrink. And the scoop helps make sure that the heat is directed to both sides. And with our heat shrink all shrunk down. Our wiring repair is complete. You definitely want to make sure you get those ends sealed up, keep out any dirt, keep out any moisture, which could cause corrosion later on down the road. But you can see here that with this repair it's a much cleaner look than with a butt connector. Butt connectors take up a lot more space. So if you're making a repair in tight locations or if you have to feed wires through, through openings like grommets and stuff like that, for various accessories you're going to be running and you have to cut it and put it back together. You can see how much cleaner, and this is a better repair than what a butt connector is. And butt connector, again, in most situations, will get the job done, but if you're wanting something that's going to last longer that you're never going to ever have to worry about and it's going to have it lower resistance in comparison, which can be important depending on the type of circuit that you're making a repair to. Then this is the better route to go. Now we've got a butt connector that is crimped onto a power wire, we do use a lot of butt connectors here at etrailer. If you're just doing like a lighting circuit for your trailer and things like that where resistance isn't nearly as important. These are just a much faster, quicker repair. And we can use our soldering iron here to shrink down our butt connectors as well. We are now going to go ahead, and show off the hot knife. If you are doing any modifications to the bumpers on your vehicles this works really well for cutting plastics. So, many cases for putting a hitch on your vehicle you have to make some small modifications to the back for the receiver to stick out the back. And if you're doing a full flat tow setup you're going to have to cut out quite a bit in the front for all the components that need to pass through there as well. So we're gonna go ahead and heat this up and just cut it out for our hips that we're putting on. And you can see here, it cuts through it very easily. We've got a nice clean cut. Now of course you are going to have to go in and clean up the edges because it does melt it just a little bit. But regardless of which tool you cut plastic, heat builds up and it's going to have strings and stuff like this anyway. So this still just saves you time because you don't have to get out your cutting tool, find the disc, you just turn this thing on slide the tip on and cut it out. We're not going to show off the foam cutting tip that comes with it. And this can be useful for just a lot of different crafts and stuff you want to do around the house. Things that I use it for at home is, if we get a lot of extra foam with packages we order and stuff and I use it to make storage cases and different things for drawers for organizers. So, some example would be maybe for, electrical tape you can see it just guides right on through it. It cuts it out. So we're just gonna finish making our cut there. And it just guides right on through it. I mean, it just cuts it like butter. Now this is pretty thick. So I am going to go ahead and stab it all the way through so I can see on the other side where it was and then we're just going to finish cutting it out And you can see now we've got a nice place for our tape to be stored. Now obviously we're just doing this as an example, but some of the things I've used it for at home was for a GoPro case. I cut out all the holes for all the different accessories in my GoPro. It can be really useful in your RV for a lot of your cabinets for some of your more easily breakable items like dishes and stuff you could cut out certain special ones, maybe for teacups to set in and you could also use it for making custom foam pieces to take up space maybe in like a battery tray or compartment. You might need some special cutout pieces and you can do that really easily with this. And that completes our look at Performance Tools 3-in-1 Soldering Iron, Heat Gun and Torch..
Info for this part was:
At etrailer we provide the best information available about the products we sell. We take the quality of our information seriously so that you can get the right part the first time. Let us know if anything is missing or if you have any questions.


Thank you! Your comment has been submitted successfully. You should be able to view your question/comment here within a few days.
Error submitting comment. Please try again momentarily.