
To see if this custom-fit item will work for you please tell us what vehicle you'll use it with.


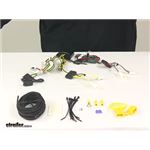
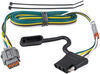
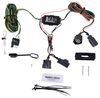
Quickly and easily install a 4-way trailer connector on your vehicle with this custom wiring harness. T-One connector plugs directly into existing wiring. Powered ModuLite reduces strain on wiring system.
Features:
Specs:
This custom-fit T-One connector plugs into your vehicle's wiring harness, which is located inside your rear cargo area, on both the driver's side and passenger's side. You will need to remove the rear threshold, cargo trays, and some interior paneling to access this harness. Once you've plugged in the T-connector, run the hot lead up to your car battery. Connect the lead to the included fuse holder, and then connect the fuse holder to the positive terminal on your battery and insert the provided fuse.
Once installation is complete, the 4-way flat connector will be stowed in your rear cargo area.
It is recommended that you use a small amount of grease on all electrical connections - the plugs on your automobile and the 4-pole connector itself - to help prevent corrosion.
A ModuLite power module is built into this T-One connector. Because most trailers run on a two-wire system - wherein the brake and turn signals are carried on one wire - the separate brake and turn signals from your vehicle's three-wire system need to be combined so they are compatible with the wiring system of your trailer. This power module functions as a tail light converter to combine the brake and turn signal functions of your automobile so that they run on one wire to properly activate your trailer's tail lights. Note: This will not affect how the tail lights on your vehicle operate.
With a ModuLite, your trailer's lights will be powered without overloading your vehicle's electrical system. Because the module draws power directly from your car's battery and bypasses the electrical routes that are used by a basic wiring harness, there is virtually no draw on your tail light circuits.

California residents: click here
Videos are provided as a guide only. Refer to manufacturer installation instructions and specs for complete information.
Shane: Hey, guys. Shane here with etrailer.com. Today I have a 2020 Toyota Corolla hatchback. I'm going to be walking you through how to install Tekonsha T-One vehicle wiring harness.There's going to be a plug and play wiring harness. It's going to plug in behind each tail light. What this is going to do, it's going to allow you to get tail lights to any accessories you may have on your hitch.
Maybe you have a cargo carrier on it that requires lighting because it covers your license plate. This is going to get you all the proper functions. It's going to get you your turn signals, running lights and your brake lights.When you're ready to use it, you simply pull it out. You're going to run it right over this rubber piece here. And then you're going to close your hatch right on it.
The wire is designed for this purpose. So it is not going to harm the wiring. You can see, we have plenty of wiring to get to our accessories.When you're not using it, you simply roll it up and store it down underneath of your floor covering. A couple of other things I want to point out about Tekonsha wiring. We're going to have an attached dust cap.
So when you're not using it, you have it down underneath your floor coverings. This is going to help keep any dirt, debris, or dust, or anything like that from your connections.The converter box itself is going to have a potting material on it. And what that does is it fills the hole inside of that box. And it really reduces the risk of those wires coming loose off the circuit board, in the instance that there's a lot of vibration in your vehicle. Maybe you're off on a gravel road or something like that.
So, Tekonsha's been known to hold up very well.As far as the installation goes, it's going to be pretty simple, pretty straightforward. As I mentioned before, it's going to plug directly into the factory wiring behind each tail light. The only thing you're going to have to do is run a power wire up to your battery. Now that we've gone over some of the features, let's walk through how to get it installed.We need to open our hatch and remove our floor coverings. We're also going to be removing this back panel here. We're going to start with these two foam pieces. Take a trim panel tool. You're going to have some little fasteners down here. Just going to pop those out. Pull this out and set it aside. We'll do the same thing for the other one.Take a 10 millimeter socket. We're going to have a bolt here holding on our tie down, and then we'll have one on the other side. Then we're just going to pull up on this panel. Like that and then we'll set it aside. You're going to need it to remove this panel. You just pull up on it. Then you're going to have a couple fasteners. You're going to have one here and one here on each side. And we need to pull out our floor covering, or our side panels here.Once you get this out, if you reach back, the wire coming out of your tail light, follow it up to the plug, and you want to disconnect that plug. Now you're going to do, push down right there on that white tab and pull out. Next, we'll take our wiring harness. The yellow side's going to go to driver. Green and red is going to go to passenger. Go ahead and connect those into the plugs.And all you're going to do is match them. This is a T-Connector. So when you disconnect your tail light from your factory wiring, the T-connection on your new wiring harness is going to connect between the two. The short black wire coming off of our converter box. We're going to install a butt connector that comes in your kit. Just crimp that into place.You're going to get a bundle of wire. It's going to look like this. We're going to take one end, strip it back. And we're going to connect it into the other end of our butt connector. And we take our green side, right over to our passenger side, and connect it onto our plugs.Next, we're going to take our two sided sticky tape that comes in our kit. We stick it right on the back of our converter box. And then we need to mount this back inside here. There's a little slot that goes in like this. You want to make sure it's a flat surface. This will keep it from getting in the way of this panel when it goes back into place. You take it and we're going to stick it right on.Push it into place. Make sure it's got a good hold. What that is going to allow us to do, is our kit's going to come with self-tightening screw for our ground wire. But if we look right here, there's actually a factory ground. 10 millimeter socket. We'll remove that bolt. Slide on your white wire, your ground wire and then re-install the bolt.I'm going to take my green wire, that's going over to my passenger side and I'm going to zip tie it to this factory wiring that runs across here. Just keep it up and out of the way and underneath the panel that we're going to be putting back in place.Next, what I'm going to suggest to you, is if these fasteners stay in here when you pull this panel out, take a trim panel tool, pop these out and install them back on the panel here. And they just slide right into place. You'll have one here and you'll have one here on both sides.Before you put this back in place on your driver's side, make sure your power wire and your 4-pole wire is pulled out to the center here. Before you get these two fasteners put back in, take your power wire and you're going to run it right up here to this grommet. Going to go ahead and reinstall your threshold.Now, we're going to take our power wire. We need to go through this grommet. We're going to pull this grommet out, just like that. Going to take some cutters and I'm going to put a small hole in it. Big enough to get my wire through. Going to take our wire and get it through that hole. We're going to feed it right through the bottom of the vehicle to the outside.Once you have all of your power wire down through the grommet, you can go ahead and reinstall your foam pieces and any other floor coverings you may have removed. Then we'll go down underneath and start running our power wire up to the engine department.To run our power wire up to the front of the vehicle, you want to make sure you're staying away from anything hot or moving. The grommet is right above our rear axle here. I went over top of these hard lines, zip tied here. This panel, you pull down this edge. You can take the wire and run it all the way up and then tuck it up underneath it there.Once you get up to the front, there's a little hole here. Run your wire through that. I ran a couple of zip ties. I have an airline tube that I ran down from my battery and I had my wire stuck in the end of it. You don't necessarily have to use an airline tube. It's just something that I have here at the shop. You can use a wire hanger or anything like that.So when we run this up, before our airline tube up and it'll actually pull our wire right up against our frame rail right there. Then we'll take our wire and we'll pull it up. We want to make sure that it's not going to fall back down. So, we need to find somewhere to zip tie it. I think I'm going to zip tie it right here on this hard line. We're going to remove this cover, got a little tab here. Just push in on it and pull out. Then we can really attach it to any one of these.We're going to take the end of our wire here. Going to cut it down. You're going to have a fuse holder, cut it in half. And then we're going to strip back both ends. On one end we're going to put a ring terminal. On the other end, we're going to put a butt connector. Your kit's going to come with a regular butt connector. I suggest, since it's going to be outside the vehicle to help keep it from corroding, use a heat shrink butt connector. If you don't have any, you can find them here at etrailer.Now we're going to strip back our power wire and hook it into the other end of our heat shrink butt connector. I'm going to use a heat gun. If you don't have one, you can find them here at etrailer.com. Now we'll take a 12 millimeter socket. We'll go ahead and remove one of the nuts. Make sure the fuse is not in the holder.Once you've got that connected, you can install your fuse. Test everything out to make sure it's working correctly. Don't forget to re-install your panel, your cover. Now we'll test out everything using part number I26. Right turn, left turn, brake lights, running lights.Now that we've tested everything out, we know it's working correctly. We're ready to go. That's going to do it for a look at an installation on the Tekonsha T-One vehicle wiring harness on your 2020 Toyota Corolla hatchback.


The comprehensive video instructions are very easy to follow and is what sets etrailer apart from the competition. The kit works great and gives you all the parts and support you need for a professional installation.
It works, what can I say... enough cable length, clear instructions. Where i spent my time was on routing the cables in such a way that it was away from the road, away from moving suspension parts, and away from the heat of the engine.
Very good people to deal with I would recommend them to anyone and they have good quality products
Have not opened the box yet but seems like I received what I ordered and quickly.
I like the instructional wiring video.
Easy to use web site
Worked great. Install took time due to my desire to keep wired inside the car from the battery but it went well.
Emailed me as soon as it shipped and it got here in 2 days!!! Extremely happy with the service and ready to install it on the car..
Friendly, helpful fast!!!!!!!
Info for this part was:
At etrailer.com we provide the best information available about the products we sell. We take the quality of our information seriously so that you can get the right part the first time. Let us know if anything is missing or if you have any questions.


Thank you! Your comment has been submitted successfully. You should be able to view your question/comment here within a few days.
Error submitting comment. Please try again momentarily.